> ## Documentation Index
> Fetch the complete documentation index at: https://docs.altoura.com/llms.txt
> Use this file to discover all available pages before exploring further.
# Add Callout
> Place an interactive text callout on any scene object, with an optional leader line and tap content
## Overview
A **Callout** is an interactive tag attached to a point on a scene object. It shows a text label in 3D space, optionally connected to the object with a leader line, and can open text, an image, or a video when the learner taps it.
Callouts are the fastest way to annotate models — label parts of a machine, flag inspection points, highlight hazards, or add "tap to learn more" hotspots. They are placed directly in the 3D scene using **Callout Mode**.
## Adding a Callout (Callout Mode)
The quickest way to create a callout is with **Callout Mode** on the ribbon.
Choose the state/step where the callout should appear. The ribbon enables step-level actions.
On the ribbon, open the **Callout** group and click **Callout / Mode**. The viewer cursor becomes a crosshair and a colored border appears around the 3D viewport to indicate the mode is active.
Click directly on the part of the model you want to annotate. A callout tag is placed at that point.
The **Callout Editor** opens in the sidebar. Enter label text, choose a content type (text, image, or video), and adjust style.
Click **Callout / Mode** again (or pick another ribbon tool) when you are done placing callouts.
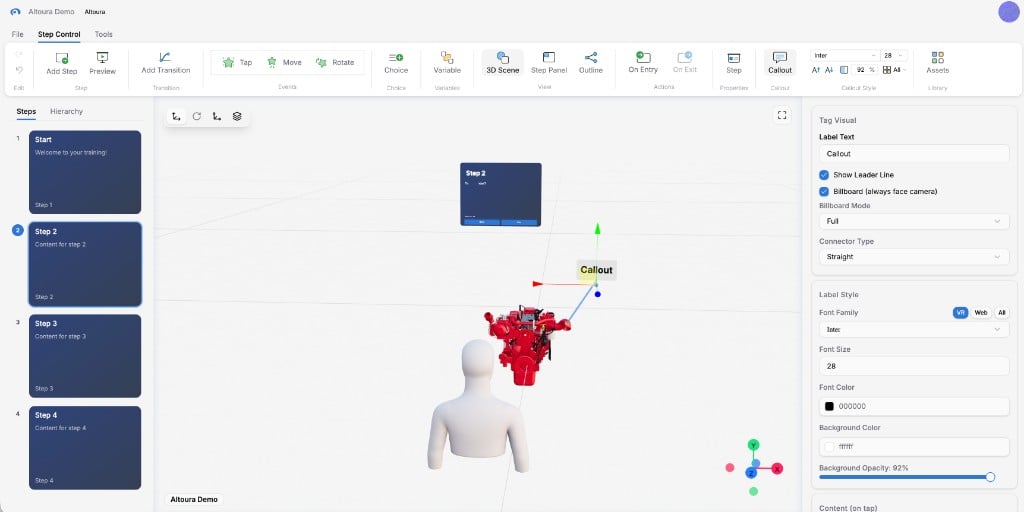 Placing a callout in Callout Mode creates three things in one shot:
* An **Add Callout** action on the state's **onEntry**
* A **Remove Object** action on the state's **onExit** (so the tag is cleaned up when the state exits)
* A **tap transition** on the callout that runs the chosen content action (Show Text, Show Image, or Play Video)
## Callout Editor
When a callout is selected, the Callout Editor panel shows the full set of options.
### Tag Visual
| Field | Description |
| ---------------- | -------------------------------------------------------------------------------------------------------------- |
| Label Text | The text shown on the tag (placeholder: **Enter label text**) |
| Show Leader Line | Draw a line from the label to the anchor point on the object |
| Billboard | Label always faces the camera |
| Billboard Mode | **Full**, **Vertical**, or **Horizontal** — controls which axes the label rotates on when following the camera |
When **Billboard** is off, a rotation gizmo is available in the 3D viewport so you can orient the label precisely.
### Connector Type
| Option | Description |
| -------- | ------------------------------------------------------------- |
| Straight | A direct line from the label to the anchor point |
| Elbow | A right-angle line with an adjustable arm height and distance |
When **Elbow** is selected, choose **Connect From Edge** (**top**, **bottom**, **left**, or **right**) to set which side of the label the line exits. You can also click the small edge dots on the label in the viewport or drag the orange handles to reshape the elbow.
### Label Style
| Field | Description |
| ------------------ | ----------------------------------------------------------------------------------------------------------------------- |
| Font Family | Pick from the font list. Use the **VR / Web / All** filters to restrict to VR-safe fonts, web fonts, or see everything. |
| Font Size | 8 – 120 |
| Font Color | Text color |
| Background Color | Label background color |
| Background Opacity | 0 – 100 % |
The ribbon exposes a quick **Label Format** group when a label callout is selected, so you can change font, size, color, and opacity without opening the full editor.
### Content (on tap)
Choose what happens when the learner taps the callout:
| Option | Effect |
| ----------------- | ------------------------------------------------------------------- |
| None (label only) | The callout displays the label but does nothing on tap |
| Text | Tap opens a text panel (uses **Show Text**) |
| Image | Tap opens an image (uses **Show Image**; supports alt text) |
| Video | Tap plays a video (uses **Play Video**; supports autoplay and loop) |
### Anchor Point and Label Transform
* **Anchor Point** — Position (X / Y / Z) of the point the leader line starts from, relative to the reference object.
* **Label Transform** — Position, Rotation, and Scale of the label in 3D space. Scale is clamped between **0.01** and **100**.
## Add Callout Action (Catalog)
Callouts can also be added from the action catalog as **Add Callout**, but the full object graph — tag, cleanup on exit, and tap content — is produced by **Callout Mode**. For most workflows, Callout Mode is faster and less error-prone.
The **Add Callout** action shows the same fields as the Callout Editor above:
* **Label Text** (placeholder: **Text on the tag**)
* **Reference Object** — the scene object the callout is attached to
* **Show Leader Line**, **Billboard**, **Billboard Mode**
* **Anchor Point**, **Label Transform**, **Label Style**
## Example: Label a Machine Part
A learner is inspecting an engine. You want to label the oil filler cap so the learner can see its name and tap it for a short description.
Select the **Inspect Engine** step. Turn on **Callout Mode** and click the oil filler cap in the 3D scene.
In the Callout Editor, set **Label Text** to `Oil Filler Cap`. Leave **Show Leader Line** on, **Billboard** on, **Billboard Mode** **Full**.
Under **Content (on tap)**, choose **Text**. Set the title to `Oil Filler Cap` and the body to `Remove to add engine oil. Torque to 8 Nm when reinstalling.`
The learner sees a labeled tag floating over the cap. Tapping it opens a short description.
## Example: Inspection Checklist with Image Callouts
Tag each inspection point with a numbered callout. Tapping a callout shows a reference image of the correct condition.
Click the first inspection point. Label it `1. Wear Plate`.
Under **Content (on tap)**, choose **Image**. Pick the reference photo. Fill in **Alt Text**.
Place `2`, `3`, `4` on the other inspection points, each with its own reference image.
Return to normal editing when all points are placed.
## Best Practices
Callout Mode wires up placement, cleanup, and tap behavior in one step. Using the raw action requires you to manage each piece manually.
Labels are most readable at 1 – 3 words. Put detail in the tap content, not on the tag itself.
Billboard labels stay readable regardless of how the learner moves around the scene.
An elbow routes cleanly around the model instead of cutting through it.
The **VR** font filter shows fonts that render correctly in headset mode.
If you add callouts manually, remember to remove them on **onExit**. Callout Mode does this for you automatically.
## How It Works Internally
A callout is a scene object whose tap event fires a transition to content:
* **onEntry:** `Add Callout` — places the tag
* **Transition** (event: tap on the tag) — runs **Show Text**, **Show Image**, or **Play Video** using the tag's stable id as the reference
* **onExit:** `Remove Object` — removes the tag so it does not persist into the next state
This is why placing a callout in Callout Mode automatically adds entries in **onEntry**, **onExit**, and **Transitions**.
## Related
* **Show Panel** — A richer, modal info panel (versus a lightweight callout tag)
* **Highlight Object** — Visually emphasise an object without attaching a tag
* **Show Text / Show Image / Play Video** — The content actions triggered when a callout is tapped
Placing a callout in Callout Mode creates three things in one shot:
* An **Add Callout** action on the state's **onEntry**
* A **Remove Object** action on the state's **onExit** (so the tag is cleaned up when the state exits)
* A **tap transition** on the callout that runs the chosen content action (Show Text, Show Image, or Play Video)
## Callout Editor
When a callout is selected, the Callout Editor panel shows the full set of options.
### Tag Visual
| Field | Description |
| ---------------- | -------------------------------------------------------------------------------------------------------------- |
| Label Text | The text shown on the tag (placeholder: **Enter label text**) |
| Show Leader Line | Draw a line from the label to the anchor point on the object |
| Billboard | Label always faces the camera |
| Billboard Mode | **Full**, **Vertical**, or **Horizontal** — controls which axes the label rotates on when following the camera |
When **Billboard** is off, a rotation gizmo is available in the 3D viewport so you can orient the label precisely.
### Connector Type
| Option | Description |
| -------- | ------------------------------------------------------------- |
| Straight | A direct line from the label to the anchor point |
| Elbow | A right-angle line with an adjustable arm height and distance |
When **Elbow** is selected, choose **Connect From Edge** (**top**, **bottom**, **left**, or **right**) to set which side of the label the line exits. You can also click the small edge dots on the label in the viewport or drag the orange handles to reshape the elbow.
### Label Style
| Field | Description |
| ------------------ | ----------------------------------------------------------------------------------------------------------------------- |
| Font Family | Pick from the font list. Use the **VR / Web / All** filters to restrict to VR-safe fonts, web fonts, or see everything. |
| Font Size | 8 – 120 |
| Font Color | Text color |
| Background Color | Label background color |
| Background Opacity | 0 – 100 % |
The ribbon exposes a quick **Label Format** group when a label callout is selected, so you can change font, size, color, and opacity without opening the full editor.
### Content (on tap)
Choose what happens when the learner taps the callout:
| Option | Effect |
| ----------------- | ------------------------------------------------------------------- |
| None (label only) | The callout displays the label but does nothing on tap |
| Text | Tap opens a text panel (uses **Show Text**) |
| Image | Tap opens an image (uses **Show Image**; supports alt text) |
| Video | Tap plays a video (uses **Play Video**; supports autoplay and loop) |
### Anchor Point and Label Transform
* **Anchor Point** — Position (X / Y / Z) of the point the leader line starts from, relative to the reference object.
* **Label Transform** — Position, Rotation, and Scale of the label in 3D space. Scale is clamped between **0.01** and **100**.
## Add Callout Action (Catalog)
Callouts can also be added from the action catalog as **Add Callout**, but the full object graph — tag, cleanup on exit, and tap content — is produced by **Callout Mode**. For most workflows, Callout Mode is faster and less error-prone.
The **Add Callout** action shows the same fields as the Callout Editor above:
* **Label Text** (placeholder: **Text on the tag**)
* **Reference Object** — the scene object the callout is attached to
* **Show Leader Line**, **Billboard**, **Billboard Mode**
* **Anchor Point**, **Label Transform**, **Label Style**
## Example: Label a Machine Part
A learner is inspecting an engine. You want to label the oil filler cap so the learner can see its name and tap it for a short description.
Select the **Inspect Engine** step. Turn on **Callout Mode** and click the oil filler cap in the 3D scene.
In the Callout Editor, set **Label Text** to `Oil Filler Cap`. Leave **Show Leader Line** on, **Billboard** on, **Billboard Mode** **Full**.
Under **Content (on tap)**, choose **Text**. Set the title to `Oil Filler Cap` and the body to `Remove to add engine oil. Torque to 8 Nm when reinstalling.`
The learner sees a labeled tag floating over the cap. Tapping it opens a short description.
## Example: Inspection Checklist with Image Callouts
Tag each inspection point with a numbered callout. Tapping a callout shows a reference image of the correct condition.
Click the first inspection point. Label it `1. Wear Plate`.
Under **Content (on tap)**, choose **Image**. Pick the reference photo. Fill in **Alt Text**.
Place `2`, `3`, `4` on the other inspection points, each with its own reference image.
Return to normal editing when all points are placed.
## Best Practices
Callout Mode wires up placement, cleanup, and tap behavior in one step. Using the raw action requires you to manage each piece manually.
Labels are most readable at 1 – 3 words. Put detail in the tap content, not on the tag itself.
Billboard labels stay readable regardless of how the learner moves around the scene.
An elbow routes cleanly around the model instead of cutting through it.
The **VR** font filter shows fonts that render correctly in headset mode.
If you add callouts manually, remember to remove them on **onExit**. Callout Mode does this for you automatically.
## How It Works Internally
A callout is a scene object whose tap event fires a transition to content:
* **onEntry:** `Add Callout` — places the tag
* **Transition** (event: tap on the tag) — runs **Show Text**, **Show Image**, or **Play Video** using the tag's stable id as the reference
* **onExit:** `Remove Object` — removes the tag so it does not persist into the next state
This is why placing a callout in Callout Mode automatically adds entries in **onEntry**, **onExit**, and **Transitions**.
## Related
* **Show Panel** — A richer, modal info panel (versus a lightweight callout tag)
* **Highlight Object** — Visually emphasise an object without attaching a tag
* **Show Text / Show Image / Play Video** — The content actions triggered when a callout is tapped