> ## Documentation Index
> Fetch the complete documentation index at: https://docs.altoura.com/llms.txt
> Use this file to discover all available pages before exploring further.
# Events
> An **event** is something that happens in your training that triggers movement from one step to another. Events are the things the learner does — tapping or moving a 3D object, picking a choice in a panel, or clicking Next.
## Types of Events
Events come in two groups depending on how they are created in the Creator App.
### Directly addable from the event picker
When you add an event to a transition, the picker offers exactly three types:
Learner clicks or taps a specific 3D object.
Learner physically moves an object to a target position.
Learner rotates an object around an axis.
### Created automatically by Show Panel
You don't pick these from the event picker. They appear on transitions for you when you configure a **Show Panel** action.
Generated for each choice in a Show Panel that has choices configured.
Generated when a Show Panel has its Next button enabled.
## Event Details
### Tap Event
The learner clicks or taps a specific 3D object in the scene.
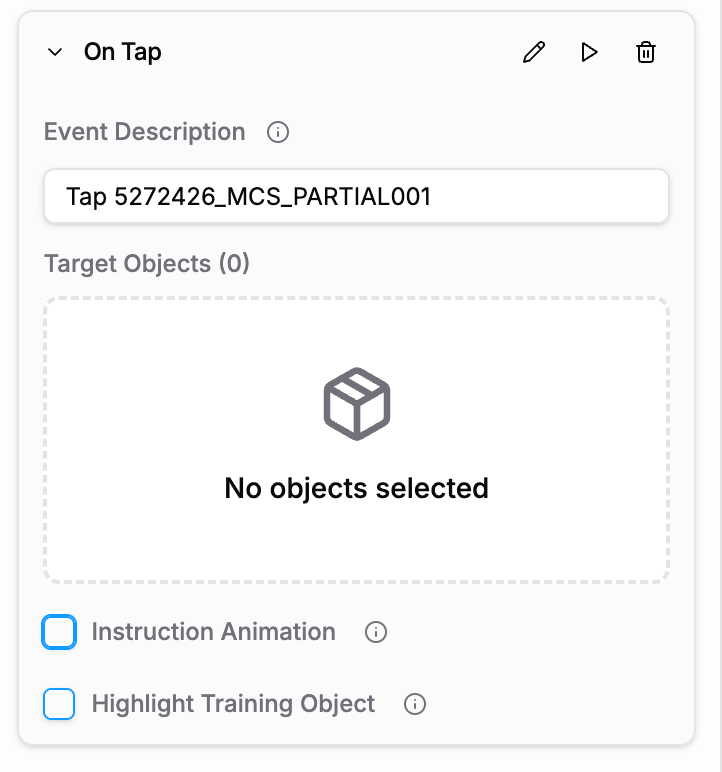 **Configuration options:**
* **Event Description**: A label describing the tap interaction (e.g., "Tap 5272426\_MCS\_PARTIAL001")
* **Target Objects**: Which object(s) the learner must tap
* **Instruction Animation**: Optional. Show a ghosted hand that demonstrates the correct tap location. Toggle on/off to guide learners.
* **Highlight Training Object**: Optional. Highlight the target object to draw attention.
**Example:** State "Wait for Valve Tap" has a Tap event on the valve object with instruction animation and highlight enabled.
### Move Event
The learner physically moves an object to a target position.
**Configuration options:**
* **Event Description**: A label describing the tap interaction (e.g., "Tap 5272426\_MCS\_PARTIAL001")
* **Target Objects**: Which object(s) the learner must tap
* **Instruction Animation**: Optional. Show a ghosted hand that demonstrates the correct tap location. Toggle on/off to guide learners.
* **Highlight Training Object**: Optional. Highlight the target object to draw attention.
**Example:** State "Wait for Valve Tap" has a Tap event on the valve object with instruction animation and highlight enabled.
### Move Event
The learner physically moves an object to a target position.
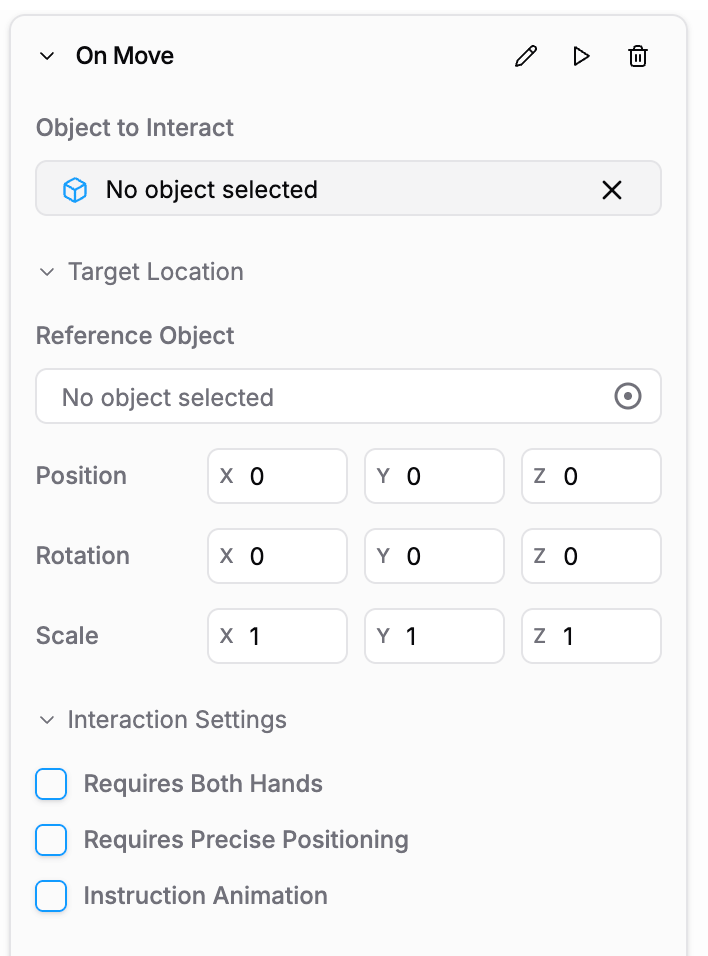 **Configuration options:**
* **Object to Interact**: Which object the learner must move
* **Target Location**: The destination, defined by a Reference Object and Position (X, Y, Z), Rotation, and Scale values
* **Interaction Settings**:
* **Requires Both Hands**: Whether the learner needs to use both hands to move the object
* **Requires Precise Positioning**: If on, the object must be moved to an exact location within a tolerance
* **Instruction Animation**: Show a ghosted animation demonstrating the correct movement
**Example:** State "Move the Pump" has a Move event where the learner must slide the pump along the X-axis to a specific position.
### Rotate Event
The learner rotates an object around an axis.
**Configuration options:**
* **Object to Interact**: Which object the learner must move
* **Target Location**: The destination, defined by a Reference Object and Position (X, Y, Z), Rotation, and Scale values
* **Interaction Settings**:
* **Requires Both Hands**: Whether the learner needs to use both hands to move the object
* **Requires Precise Positioning**: If on, the object must be moved to an exact location within a tolerance
* **Instruction Animation**: Show a ghosted animation demonstrating the correct movement
**Example:** State "Move the Pump" has a Move event where the learner must slide the pump along the X-axis to a specific position.
### Rotate Event
The learner rotates an object around an axis.
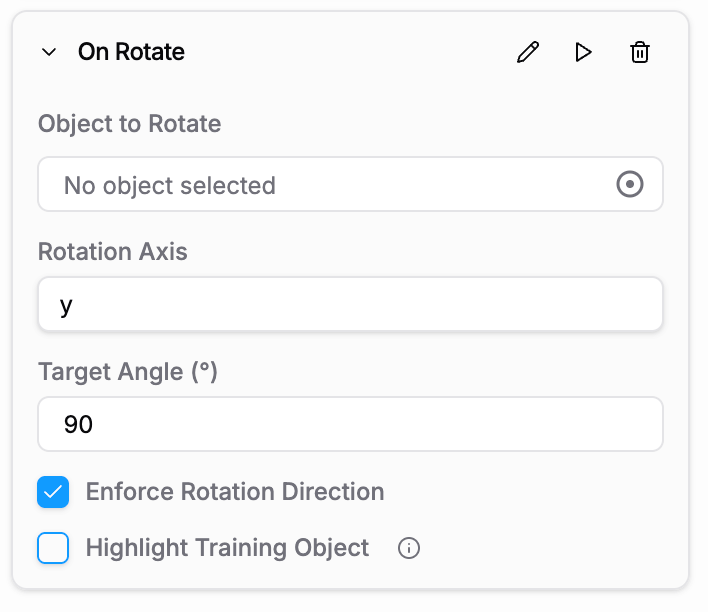 **Configuration options:**
* **Object to Rotate**: Which object the learner must rotate
* **Rotation Axis**: Which axis to rotate around (x, y, or z)
* **Target Angle**: The rotation amount in degrees required to trigger the transition (e.g., 90)
* **Enforce Rotation Direction**: When enabled, the learner must rotate in the correct direction (clockwise vs counter-clockwise)
* **Highlight Training Object**: Optional. Highlight the object to draw attention.
**Example:** State "Open the Valve" has a Rotate event where the learner must turn the valve 90 degrees on the Y axis.
### Choice Event
Generated automatically when a **Show Panel** action has choices configured. Each choice produces a separate Choice event you can route with its own transition and condition.
**How to set it up:**
1. In a step's **On Entry**, add a **Show Panel** action.
2. In the panel parameters, add the choices the learner will see.
3. Open the **Transitions** tab. A transition is created for each choice. Pick the **Destination Step** for each one.
**Example:** Step "Safety Quiz" runs Show Panel with three choices. The Transitions tab shows three Choice transitions — one per option. "Option A: Check the gauge" goes to "Correct Answer"; "Option B" goes to "Incorrect Answer".
Use one transition per choice. If two choices should go to the same step, you can still leave them as separate transitions for clarity, or combine them with a condition.
### Next Event
Generated automatically when a **Show Panel** action has its **Next** button enabled. Transitions on that step can listen for Next and move to whatever step you pick as the destination.
**How to set it up:**
1. In a step's **On Entry**, add a **Show Panel** action.
2. In the panel parameters, enable **Next**.
3. Open the **Transitions** tab. A Next transition is available. Pick the **Destination Step**.
**Example:** Step "Show Instructions" displays a panel with Next enabled. When the learner clicks Next, the transition to "Start Activity" fires.
## How Events Trigger Transitions
Here's the flow:
1. The learner does something (taps, moves, rotates, picks a choice, clicks Next)
2. The corresponding event is triggered
3. The Creator App checks all transitions from the current step that listen for this event
4. If a transition has a **condition**, the condition is evaluated. If it's false, this transition is skipped.
5. If the transition has no condition (or the condition is true), the transition fires
6. The training moves to the destination step
## Connecting Events to Transitions
In the Creator App:
**Configuration options:**
* **Object to Rotate**: Which object the learner must rotate
* **Rotation Axis**: Which axis to rotate around (x, y, or z)
* **Target Angle**: The rotation amount in degrees required to trigger the transition (e.g., 90)
* **Enforce Rotation Direction**: When enabled, the learner must rotate in the correct direction (clockwise vs counter-clockwise)
* **Highlight Training Object**: Optional. Highlight the object to draw attention.
**Example:** State "Open the Valve" has a Rotate event where the learner must turn the valve 90 degrees on the Y axis.
### Choice Event
Generated automatically when a **Show Panel** action has choices configured. Each choice produces a separate Choice event you can route with its own transition and condition.
**How to set it up:**
1. In a step's **On Entry**, add a **Show Panel** action.
2. In the panel parameters, add the choices the learner will see.
3. Open the **Transitions** tab. A transition is created for each choice. Pick the **Destination Step** for each one.
**Example:** Step "Safety Quiz" runs Show Panel with three choices. The Transitions tab shows three Choice transitions — one per option. "Option A: Check the gauge" goes to "Correct Answer"; "Option B" goes to "Incorrect Answer".
Use one transition per choice. If two choices should go to the same step, you can still leave them as separate transitions for clarity, or combine them with a condition.
### Next Event
Generated automatically when a **Show Panel** action has its **Next** button enabled. Transitions on that step can listen for Next and move to whatever step you pick as the destination.
**How to set it up:**
1. In a step's **On Entry**, add a **Show Panel** action.
2. In the panel parameters, enable **Next**.
3. Open the **Transitions** tab. A Next transition is available. Pick the **Destination Step**.
**Example:** Step "Show Instructions" displays a panel with Next enabled. When the learner clicks Next, the transition to "Start Activity" fires.
## How Events Trigger Transitions
Here's the flow:
1. The learner does something (taps, moves, rotates, picks a choice, clicks Next)
2. The corresponding event is triggered
3. The Creator App checks all transitions from the current step that listen for this event
4. If a transition has a **condition**, the condition is evaluated. If it's false, this transition is skipped.
5. If the transition has no condition (or the condition is true), the transition fires
6. The training moves to the destination step
## Connecting Events to Transitions
In the Creator App:
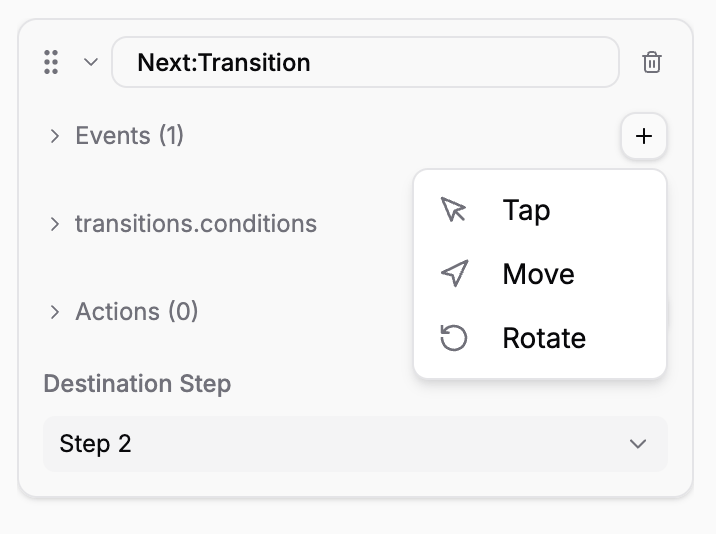 Click a step on the canvas.
You'll see your existing transitions and an Add Transition button.
The picker offers **Tap**, **Move**, or **Rotate**. The event is added to the transition.
Use the dropdown to select which step the learner moves to when this event fires.
Set the target object and options in the event configuration panel.
For **Choice** and **Next** transitions you don't use this picker. Add a **Show Panel** action in the step's On Entry, configure choices and/or the Next button, then set destinations on the auto-generated transitions in the Transitions tab.
## Best Practices for Events
Avoid ambiguous events. If the learner must tap a specific object, make it obvious (use a highlight or instruction animation).
If the exact position matters (e.g., inserting a valve into a specific location), enable **Requires Precise Positioning**.
For each Choice transition created by Show Panel, name the destination step clearly so the routing is easy to follow in the Transitions tab.
Make sure every event in your training actually works. Preview the training and interact with every object and button.
## Next Steps
Learn how to:
* **[Add Conditions to Transitions](/creator-studio/creator-app/transitions/conditional)** — Make events trigger different states based on learner choices or variables
* **[Use Variables in Conditions](/creator-studio/creator-app/variables/creating-variables)** — Store data and use it to control event behavior
Click a step on the canvas.
You'll see your existing transitions and an Add Transition button.
The picker offers **Tap**, **Move**, or **Rotate**. The event is added to the transition.
Use the dropdown to select which step the learner moves to when this event fires.
Set the target object and options in the event configuration panel.
For **Choice** and **Next** transitions you don't use this picker. Add a **Show Panel** action in the step's On Entry, configure choices and/or the Next button, then set destinations on the auto-generated transitions in the Transitions tab.
## Best Practices for Events
Avoid ambiguous events. If the learner must tap a specific object, make it obvious (use a highlight or instruction animation).
If the exact position matters (e.g., inserting a valve into a specific location), enable **Requires Precise Positioning**.
For each Choice transition created by Show Panel, name the destination step clearly so the routing is easy to follow in the Transitions tab.
Make sure every event in your training actually works. Preview the training and interact with every object and button.
## Next Steps
Learn how to:
* **[Add Conditions to Transitions](/creator-studio/creator-app/transitions/conditional)** — Make events trigger different states based on learner choices or variables
* **[Use Variables in Conditions](/creator-studio/creator-app/variables/creating-variables)** — Store data and use it to control event behavior