> ## Documentation Index
> Fetch the complete documentation index at: https://docs.altoura.com/llms.txt
> Use this file to discover all available pages before exploring further.
# Entry Actions (onEntry)
> **onEntry actions** are things your training automatically does when a state is entered — before anything else happens. Think of them as setup instructions that prepare the state for learner interaction.
## What Happens When a State is Entered
Here's the sequence:
1. Transition fires and moves the training to a new state
2. **onEntry actions run** (in the order you defined them)
3. State is now fully set up and waiting for learner interaction
4. Learner does something (taps, moves, chooses, etc.)
5. An event is triggered, and a transition out of the state may fire
## Common onEntry Actions
| Action | What It Does | Example |
| -------------------- | ---------------------------------------------------------------------------------- | -------------------------------------------- |
| **Load Scene** | Load a 3D scene into the viewport | Load "Factory Floor" scene |
| **Play Audio** | Play narration, background music, or sound effects | Play safety procedure narration (5 seconds) |
| **Show Text** | Display a brief text overlay in the scene | Show "Locate the pump valve" |
| **Show Panel** | Display a panel with title, body, optional choices, and Next button | Show "Quiz" panel with 3 choices |
| **Highlight Object** | Visually highlight a 3D object to draw attention | Highlight the valve in red, pulsing |
| **Set Variable** | Store or update a value (string, number, true/false, etc.) using an AXL expression | Set `startTime` to `now()` to track duration |
| **Set Time Limit** | Start a countdown that fires a timeout if the learner doesn't respond | Set a 60-second time limit |
| **Delay** | Pause execution for a specified duration before the next action runs | Delay 2 seconds after loading a scene |
## Adding onEntry Actions
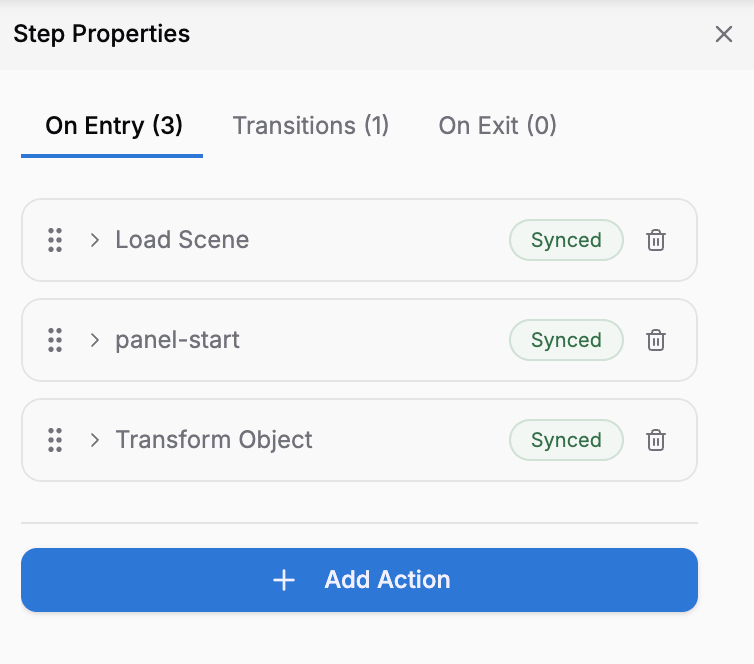 Click the state node in the steps list or on the canvas.
You'll see a list of actions already in this state's onEntry (if any) and an Add Action button.
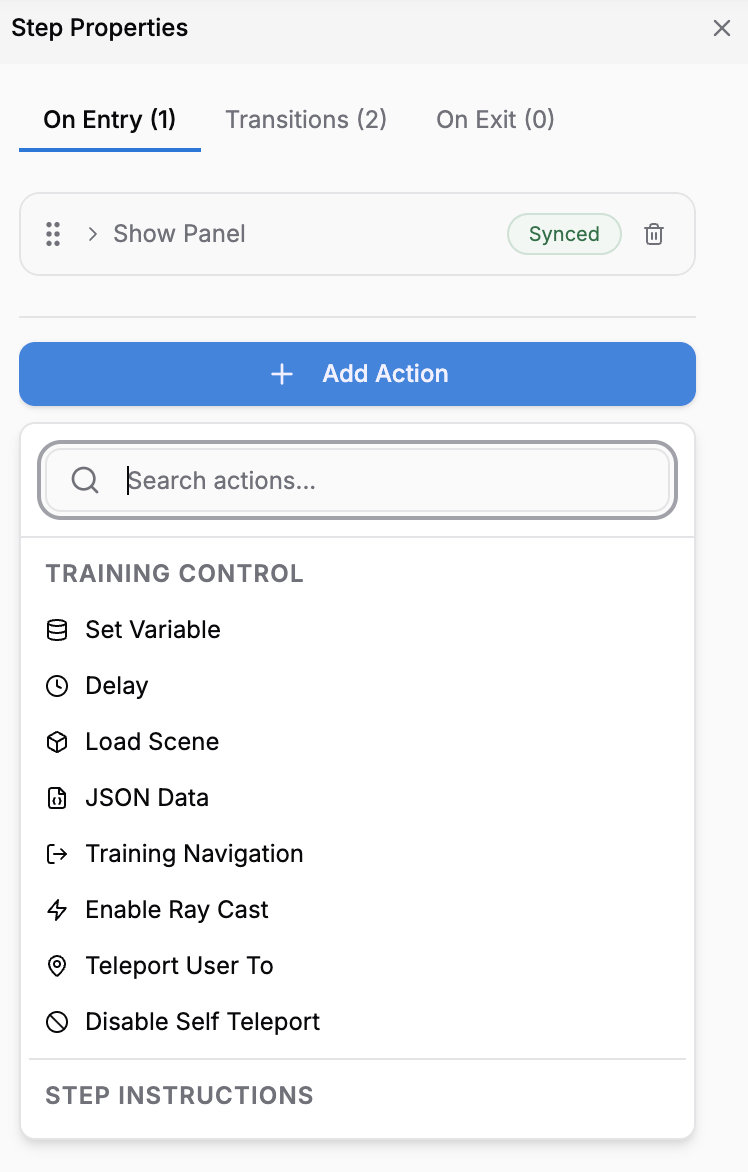
A searchable action picker appears with actions organized by category.
Browse categories like Training Control, Media Playback, Object Manipulation, etc. or use the search bar.
Expand the action to set its parameters (scene name, audio file, object to highlight, etc.).
Click the state node in the steps list or on the canvas.
You'll see a list of actions already in this state's onEntry (if any) and an Add Action button.
A searchable action picker appears with actions organized by category.
Browse categories like Training Control, Media Playback, Object Manipulation, etc. or use the search bar.
Expand the action to set its parameters (scene name, audio file, object to highlight, etc.).
 ## Action Execution Order
**onEntry actions run sequentially** — one after another, in the order they appear in your list.
**Example sequence for a state:**
1. Load "Operating Room" scene (immediate)
2. Delay 1 second (let scene render)
3. Play narration audio "Follow these steps..." (5 seconds)
4. Show Panel — title "Heart Monitor", body "Check the heart monitor" (waits for learner to read or click Next)
5. Highlight the heart monitor object in blue (stays highlighted)
The learner sees: scene loads → audio plays → panel appears → object highlights. Each action completes before the next one starts.
Use **Delay** actions to add pauses between things. For example, if you load a scene and then immediately show a panel, the panel might appear before the scene fully renders. Add a 1–2 second delay in between.
## Example: Typical State Setup
Here's a realistic example of onEntry actions for a state called "Identify the Problem":
```
onEntry Actions (in order):
1. Load Scene: "Factory Floor"
2. Delay: 2 seconds
3. Play Audio: "Listen carefully. The equipment is running abnormally. What do you notice?"
4. Show Panel: title "Pressure Check", body "Which indicator is in the wrong position?"
5. Highlight Object: "Pressure Gauge" (color: red, pulsing)
```
When this state starts:
* Scene loads (2-second delay for it to render)
* Audio narration plays (5 seconds)
* Panel appears below
* Pressure gauge pulses red to guide the learner's eye
* Learner can now tap the highlighted gauge or select an answer
## Coordinating onEntry with Events
Your learner interaction depends on what you set up in onEntry.
**Example:**
**onEntry actions:**
* Show Panel: body "Tap the valve to open it"
* Highlight valve in blue
**Event (Tap):**
* Trigger on valve tap
* Transition to next state
The learner sees the highlighted valve and knows what to do. When they tap it, the event fires and moves forward.
## Using onEntry for Setup, Not Just UI
onEntry isn't just for displaying things — use it to initialize your training logic:
**Examples:**
* Set Variable `score` to `0` at the beginning
* Set Variable `startTime` to `now()` to track elapsed time (`now()` returns the current time in milliseconds)
* Set Variable `isFirstAttempt` to `true` for attempt tracking
* Set Variable `userChoice` to `""` before showing a choice panel
Then, in later states, use conditions with these variables to create branching logic.
## onEntry Best Practices
Always load a scene before playing audio or showing content. Users need to see the environment before interacting with it.
Use a 1-2 second wait after loading a scene. It gives the 3D engine time to render everything.
If you have audio narration, play it before showing a text panel. The learner will read and listen simultaneously.
Use onEntry to highlight objects the learner must interact with. Make it obvious what they should tap, move, or rotate.
If onEntry actions take too long, learners may get bored or distracted. Aim for 3–5 seconds of setup.
## Next Steps
Learn about:
* **[Exit Actions (onExit)](/creator-studio/creator-app/transitions/onexit)** — Clean up and prepare for the next state
* **[Conditional Transitions](/creator-studio/creator-app/transitions/conditional)** — Combine events, conditions, and actions
* **[Variables](/creator-studio/creator-app/variables/creating-variables)** — Use variables to track data in onEntry
## Action Execution Order
**onEntry actions run sequentially** — one after another, in the order they appear in your list.
**Example sequence for a state:**
1. Load "Operating Room" scene (immediate)
2. Delay 1 second (let scene render)
3. Play narration audio "Follow these steps..." (5 seconds)
4. Show Panel — title "Heart Monitor", body "Check the heart monitor" (waits for learner to read or click Next)
5. Highlight the heart monitor object in blue (stays highlighted)
The learner sees: scene loads → audio plays → panel appears → object highlights. Each action completes before the next one starts.
Use **Delay** actions to add pauses between things. For example, if you load a scene and then immediately show a panel, the panel might appear before the scene fully renders. Add a 1–2 second delay in between.
## Example: Typical State Setup
Here's a realistic example of onEntry actions for a state called "Identify the Problem":
```
onEntry Actions (in order):
1. Load Scene: "Factory Floor"
2. Delay: 2 seconds
3. Play Audio: "Listen carefully. The equipment is running abnormally. What do you notice?"
4. Show Panel: title "Pressure Check", body "Which indicator is in the wrong position?"
5. Highlight Object: "Pressure Gauge" (color: red, pulsing)
```
When this state starts:
* Scene loads (2-second delay for it to render)
* Audio narration plays (5 seconds)
* Panel appears below
* Pressure gauge pulses red to guide the learner's eye
* Learner can now tap the highlighted gauge or select an answer
## Coordinating onEntry with Events
Your learner interaction depends on what you set up in onEntry.
**Example:**
**onEntry actions:**
* Show Panel: body "Tap the valve to open it"
* Highlight valve in blue
**Event (Tap):**
* Trigger on valve tap
* Transition to next state
The learner sees the highlighted valve and knows what to do. When they tap it, the event fires and moves forward.
## Using onEntry for Setup, Not Just UI
onEntry isn't just for displaying things — use it to initialize your training logic:
**Examples:**
* Set Variable `score` to `0` at the beginning
* Set Variable `startTime` to `now()` to track elapsed time (`now()` returns the current time in milliseconds)
* Set Variable `isFirstAttempt` to `true` for attempt tracking
* Set Variable `userChoice` to `""` before showing a choice panel
Then, in later states, use conditions with these variables to create branching logic.
## onEntry Best Practices
Always load a scene before playing audio or showing content. Users need to see the environment before interacting with it.
Use a 1-2 second wait after loading a scene. It gives the 3D engine time to render everything.
If you have audio narration, play it before showing a text panel. The learner will read and listen simultaneously.
Use onEntry to highlight objects the learner must interact with. Make it obvious what they should tap, move, or rotate.
If onEntry actions take too long, learners may get bored or distracted. Aim for 3–5 seconds of setup.
## Next Steps
Learn about:
* **[Exit Actions (onExit)](/creator-studio/creator-app/transitions/onexit)** — Clean up and prepare for the next state
* **[Conditional Transitions](/creator-studio/creator-app/transitions/conditional)** — Combine events, conditions, and actions
* **[Variables](/creator-studio/creator-app/variables/creating-variables)** — Use variables to track data in onEntry