> ## Documentation Index
> Fetch the complete documentation index at: https://docs.altoura.com/llms.txt
> Use this file to discover all available pages before exploring further.
# Step Node Customization
> Each step by step node in the Altoura Experience System represents a state with one set of instructions and one event to listen to. These fields allow you to connect the GameObjects in your space Asset Bundle to practical functionality and will help you construct discrete steps for your training by outlining when, where, and how these GameObjects are used.
 ### Node Definition
**Name** – The text value to title the step in the Experience Builder. This is only visible within the builder to organize and identify your nodes.
**ID** – The unique number value that identifies your node. This number is displayed at the bottom of the step display panel if there is one and can be used in Altoura as a debug method to search for a specific node in the portal. This value is generated by the database and cannot be changed.
### Node Definition
**Name** – The text value to title the step in the Experience Builder. This is only visible within the builder to organize and identify your nodes.
**ID** – The unique number value that identifies your node. This number is displayed at the bottom of the step display panel if there is one and can be used in Altoura as a debug method to search for a specific node in the portal. This value is generated by the database and cannot be changed.
 ### Node Properties
**Display Text** – The text value that displays in the middle of the blue step panel as the description.
**Audio Panel** - The audio that plays when you first reach this step. This can be auto generated from the *Display Text* with the *Convert Text to Speech* button or can be uploaded for custom audio with an mp3 file.
### Node Properties
**Display Text** – The text value that displays in the middle of the blue step panel as the description.
**Audio Panel** - The audio that plays when you first reach this step. This can be auto generated from the *Display Text* with the *Convert Text to Speech* button or can be uploaded for custom audio with an mp3 file.
 ### Step Details
**Title** – The text value that displays at the top of the blue step panel as the header.
**Target Object** - The name of a GameObject in the asset bundle with a Transform component. The position of this object will be the end position of the dotted tether from the blue step panel.
* The *Transform Matrix* below is an optional offset to the position, rotation, and scale of the **Target Object** transform.
**Event Type** – The event that the completion of the step is controlled by.
* The *Click/Touch* is the default event which indicates that the user can complete the step by only clicking or touching on the step panel arrow on any platform.
* The *Tap* event indicates that the user can complete the step by tapping the *Training Object* with their finger in the headset or mobile device, or by clicking on the *Training Object* with the mouse on a PC.
* The *Manipulate* event indicates that the user can complete the step by grabbing the *Training Object* and either moving it to the *Collider Name* on the headset. On a screen device, this event defaults as a *Tap* event because there is no hand tracking.
* When "Manipulate" is selected: A new option, "Use Both Hands," appears.
### Step Details
**Title** – The text value that displays at the top of the blue step panel as the header.
**Target Object** - The name of a GameObject in the asset bundle with a Transform component. The position of this object will be the end position of the dotted tether from the blue step panel.
* The *Transform Matrix* below is an optional offset to the position, rotation, and scale of the **Target Object** transform.
**Event Type** – The event that the completion of the step is controlled by.
* The *Click/Touch* is the default event which indicates that the user can complete the step by only clicking or touching on the step panel arrow on any platform.
* The *Tap* event indicates that the user can complete the step by tapping the *Training Object* with their finger in the headset or mobile device, or by clicking on the *Training Object* with the mouse on a PC.
* The *Manipulate* event indicates that the user can complete the step by grabbing the *Training Object* and either moving it to the *Collider Name* on the headset. On a screen device, this event defaults as a *Tap* event because there is no hand tracking.
* When "Manipulate" is selected: A new option, "Use Both Hands," appears.
 By default: The "Use Both Hands" option is unchecked. This means the user can manipulate the training object with one hand.
When checked: The user must use both hands to move the training object. Single-hand grabs won't work in this mode.
* The *Lever Arm Rotate* event indicates that the user can complete the step by grabbing the *Training Object* and rotating it to the value defined in the Success Rotation. On a screen device, this event defaults to a *Tap* event because there is no hand tracking. The *Training Object* can be rotated only on one axis; the axis on which it can be rotated should be unfrozen while the others should be frozen. The *Training Object* can be rotated in either direction (negative or positive value in the success rotation). The maximum rotation value is 178 and the minimum is -178. The *Lever Arm Rotate* event functions on HoloLens and Quest, but not on HTC Vive.
The user always has the option to click or touch on the step panel arrow to complete a step, even with the *Tap*, *Manipulate*, and *Lever Arm Rotate* events, to skip or auto complete the step.
**Collider Name** - The name of a GameObject in the asset bundle with a Collider component attached to it. This collider serves as the goal for the *Training Object* to fit completely inside to complete the step and is only used for a step with an *Event Type* of *Manipulate*. Ensure that this collider does not have 'isTrigger' checked.
**Collider Type** - Either *Touch* or *Encapsulate*. This indicates whether or not the *Training Object* should just touch or go completely inside the *Collider Name* collider for a step with an *Event Type* of *Manipulate*.
* When *Manipulate* is selected and *Encapsulate* is chosen for the collider type: A new option, "Align Training Object On Axes," appears.
By default: The "Use Both Hands" option is unchecked. This means the user can manipulate the training object with one hand.
When checked: The user must use both hands to move the training object. Single-hand grabs won't work in this mode.
* The *Lever Arm Rotate* event indicates that the user can complete the step by grabbing the *Training Object* and rotating it to the value defined in the Success Rotation. On a screen device, this event defaults to a *Tap* event because there is no hand tracking. The *Training Object* can be rotated only on one axis; the axis on which it can be rotated should be unfrozen while the others should be frozen. The *Training Object* can be rotated in either direction (negative or positive value in the success rotation). The maximum rotation value is 178 and the minimum is -178. The *Lever Arm Rotate* event functions on HoloLens and Quest, but not on HTC Vive.
The user always has the option to click or touch on the step panel arrow to complete a step, even with the *Tap*, *Manipulate*, and *Lever Arm Rotate* events, to skip or auto complete the step.
**Collider Name** - The name of a GameObject in the asset bundle with a Collider component attached to it. This collider serves as the goal for the *Training Object* to fit completely inside to complete the step and is only used for a step with an *Event Type* of *Manipulate*. Ensure that this collider does not have 'isTrigger' checked.
**Collider Type** - Either *Touch* or *Encapsulate*. This indicates whether or not the *Training Object* should just touch or go completely inside the *Collider Name* collider for a step with an *Event Type* of *Manipulate*.
* When *Manipulate* is selected and *Encapsulate* is chosen for the collider type: A new option, "Align Training Object On Axes," appears.
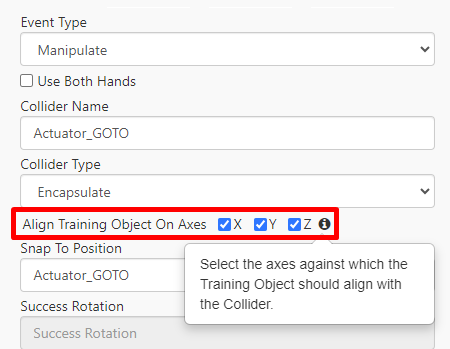 How it works: The user can select one, multiple, or no axes (X, Y, Z).
* If any axis is selected: The training object's axis should to align with the selected axes of the Collider Name to get snapped. For example: If X,Y and Z axes are selected, the training object's X,Y and Z will match the collider's X and Y to snap.
* If no axes are selected: The user can encapsulate the training object in any direction.
**Snap To Position** - The name of a GameObject in the asset bundle with a Transform component. The global position, rotation, and scale of this object is what the *Training Object* will snap to when a step is completed.
**Success Rotation** - The integer of the rotation value that the *Training Object* should go to on the unconstrained axis in the *Constraints*. This field will only be enabled if the *Event Type* is *Lever Arm Rotate*.
How it works: The user can select one, multiple, or no axes (X, Y, Z).
* If any axis is selected: The training object's axis should to align with the selected axes of the Collider Name to get snapped. For example: If X,Y and Z axes are selected, the training object's X,Y and Z will match the collider's X and Y to snap.
* If no axes are selected: The user can encapsulate the training object in any direction.
**Snap To Position** - The name of a GameObject in the asset bundle with a Transform component. The global position, rotation, and scale of this object is what the *Training Object* will snap to when a step is completed.
**Success Rotation** - The integer of the rotation value that the *Training Object* should go to on the unconstrained axis in the *Constraints*. This field will only be enabled if the *Event Type* is *Lever Arm Rotate*.
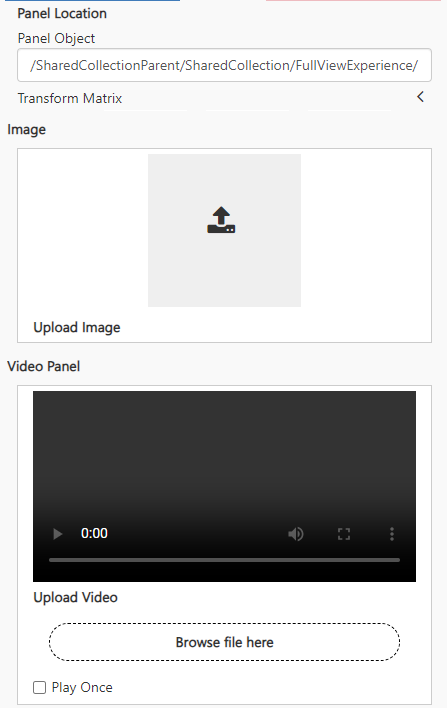
 ### Panel Location
**Panel Object** - The name of a GameObject in the asset bundle with a Transform component. The global position of this object will be the position that the blue step panel will display at. This value is only required for the first step of the training, otherwise the panel will show in the same location unless there is neither a Title or DisplayText in which case the panel will not show. The *Panel Object* is only read if there is a *Teleport User GameObject* defined in the connector going into the node.
* The *Transform Matrix* below is an optional offset to the position, rotation, and scale of the *Panel Object* transform.
**Image** - The image that displays to the left of the blue step panel. This should be a jpg or png file.
**Video**- The video that displays to the left of the blue step panel. This should be an .mp4 file. (preferably H.264 codec) **Play Once Toggle Feature:**
* Default Behavior: The "Play Once" toggle is unchecked by default. In this state, the video will continuously loop until the user manually stops it or proceeds to the next step.
* When Checked: If the "Play Once" toggle is checked, the video will play only once and then stop. To replay the video, the user can simply click the play button on the control panel.
### Panel Location
**Panel Object** - The name of a GameObject in the asset bundle with a Transform component. The global position of this object will be the position that the blue step panel will display at. This value is only required for the first step of the training, otherwise the panel will show in the same location unless there is neither a Title or DisplayText in which case the panel will not show. The *Panel Object* is only read if there is a *Teleport User GameObject* defined in the connector going into the node.
* The *Transform Matrix* below is an optional offset to the position, rotation, and scale of the *Panel Object* transform.
**Image** - The image that displays to the left of the blue step panel. This should be a jpg or png file.
**Video**- The video that displays to the left of the blue step panel. This should be an .mp4 file. (preferably H.264 codec) **Play Once Toggle Feature:**
* Default Behavior: The "Play Once" toggle is unchecked by default. In this state, the video will continuously loop until the user manually stops it or proceeds to the next step.
* When Checked: If the "Play Once" toggle is checked, the video will play only once and then stop. To replay the video, the user can simply click the play button on the control panel.
 ### Step Animations
**Training Object** - The name of a GameObject in the asset bundle with a Collider component and a Mesh component either on the object or nested under the object. This object serves as the subject for the *Event Type* of *Manipulate* and *Tap*.
**Constraints** - The limits that can be put on the local position, rotation, and scale of each axis of the *Training Object*. These constraints are only read when the *Event Type* is *Manipulate*.
**Instructional Animation Object** - The animation that plays when reaching a node, usually used as visual instruction to help inform the user what to do to complete the step.
If the **Auto Generated** option is checked there are two results depending on the *Event Type*:
* If the *Event Type* is *Tap* the *Auto Generated Instruction Animation* will be a ghosted hand looping to the *Training Object*. A value for the *Training Object* is required to have an *Auto Generated Instruction Animation* for a *Tap* event.
* If the *Event Type* is *Manipulate* the *Auto Generated Instruction Animation* creates a ghosted blue object that loops from the *Training Object* to the *Snap To Position*. A value for both the *Training Object* and the *Snap To Position* is required for this functionality. You also have the ability of adding instructional ghosted hands to the animation with the *No hands displayed*, *One hand displayed*, and *Two hands displayed* dropdown options.
The *Custom* option is the name of a GameObject in the asset bundle with a Playable Director or Animator component attached. This animation is played on all devices and is meant to show the user what to do for that step. This object is set active and the component is enabled when the step is reached, the animation is played, and then the object set inactive and the component disabled once the step has been completed.
There are two notations for a custom animation. If you are calling a Playable Director or an Animator from awake, then you can simply write the GameObject name that the Playable Director or Animator is on ex. "AnimationGameObject". If you are calling a specific string trigger in an Animator then the notation is the GameObject name that the Animator is on, then a "->" followed by the trigger name in that Animator ex. "AnimationGameObject->TriggerName"
**Success Animation Object**
### JSON Data
[JSON metadata](/docs/features/experience-system/experimental/node-metadata) can be added to nodes for some in development features. Ask a developer if you are interested in using one.
### 3D Objects
[3D Objects](/docs/features/experience-system/add-3d-objects) can be added to connectors in the same way they can be added to connectors. When adding a 3D Object to a node, the lifetime of that 3D Object is only for the lifetime of the node. Once the end user leaves the node, the 3D Object will be destroyed.
### UI Controls
[UI Controls](/docs/features/experience-system/add-ui-controls) can be added to connectors in the same way they can be added to connector. When adding a UI Control to a node, the lifetime of that UI Control is only for the lifetime of the node. Once the end user leaves the node, the UI Control will be destroyed.
### Step Animations
**Training Object** - The name of a GameObject in the asset bundle with a Collider component and a Mesh component either on the object or nested under the object. This object serves as the subject for the *Event Type* of *Manipulate* and *Tap*.
**Constraints** - The limits that can be put on the local position, rotation, and scale of each axis of the *Training Object*. These constraints are only read when the *Event Type* is *Manipulate*.
**Instructional Animation Object** - The animation that plays when reaching a node, usually used as visual instruction to help inform the user what to do to complete the step.
If the **Auto Generated** option is checked there are two results depending on the *Event Type*:
* If the *Event Type* is *Tap* the *Auto Generated Instruction Animation* will be a ghosted hand looping to the *Training Object*. A value for the *Training Object* is required to have an *Auto Generated Instruction Animation* for a *Tap* event.
* If the *Event Type* is *Manipulate* the *Auto Generated Instruction Animation* creates a ghosted blue object that loops from the *Training Object* to the *Snap To Position*. A value for both the *Training Object* and the *Snap To Position* is required for this functionality. You also have the ability of adding instructional ghosted hands to the animation with the *No hands displayed*, *One hand displayed*, and *Two hands displayed* dropdown options.
The *Custom* option is the name of a GameObject in the asset bundle with a Playable Director or Animator component attached. This animation is played on all devices and is meant to show the user what to do for that step. This object is set active and the component is enabled when the step is reached, the animation is played, and then the object set inactive and the component disabled once the step has been completed.
There are two notations for a custom animation. If you are calling a Playable Director or an Animator from awake, then you can simply write the GameObject name that the Playable Director or Animator is on ex. "AnimationGameObject". If you are calling a specific string trigger in an Animator then the notation is the GameObject name that the Animator is on, then a "->" followed by the trigger name in that Animator ex. "AnimationGameObject->TriggerName"
**Success Animation Object**
### JSON Data
[JSON metadata](/docs/features/experience-system/experimental/node-metadata) can be added to nodes for some in development features. Ask a developer if you are interested in using one.
### 3D Objects
[3D Objects](/docs/features/experience-system/add-3d-objects) can be added to connectors in the same way they can be added to connectors. When adding a 3D Object to a node, the lifetime of that 3D Object is only for the lifetime of the node. Once the end user leaves the node, the 3D Object will be destroyed.
### UI Controls
[UI Controls](/docs/features/experience-system/add-ui-controls) can be added to connectors in the same way they can be added to connector. When adding a UI Control to a node, the lifetime of that UI Control is only for the lifetime of the node. Once the end user leaves the node, the UI Control will be destroyed.
