> ## Documentation Index
> Fetch the complete documentation index at: https://docs.altoura.com/llms.txt
> Use this file to discover all available pages before exploring further.
# Dynamics 365 Guides Configuration
> Connect Altoura to Dynamics 365 Guides using OAuth 2.0 — Azure app registration, client secret, and Power Platform app user setup.
This guide is for **IT administrators**. By the end of it, you will have registered an Azure application, created a client secret, configured a Power Platform app user, and collected the four values the Altoura team needs to enable [Dynamics 365 Guides import](/frontline/procedures-portal/import-guides).
### **Steps to connect Altoura to Dynamics 365 using OAuth 2.0**
1. Log in to Azure Admin Portal -> [**https://portal.azure.com**](https://portal.azure.com) and go to Microsoft Entra ID.
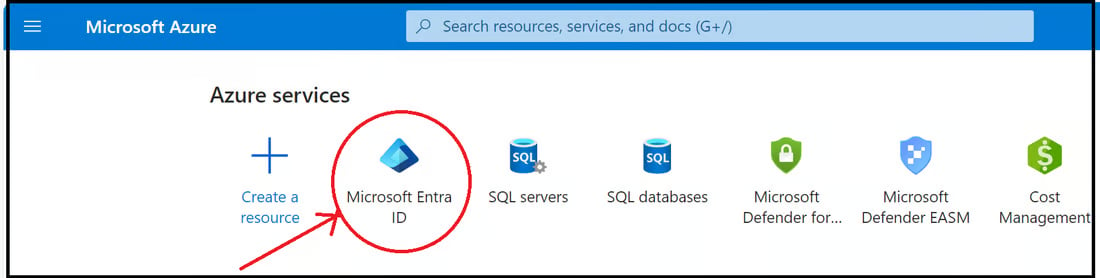 2. Here, click on Add and select App registration or select App registrations under Manage and click on the New Registration button.
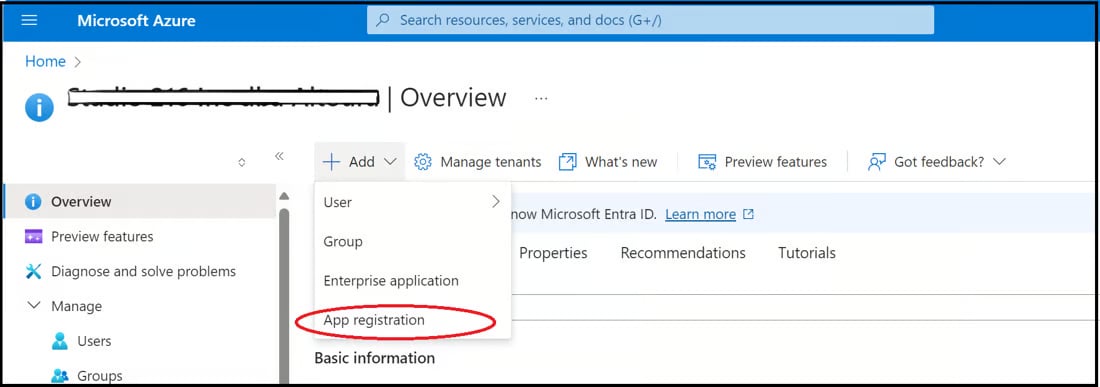
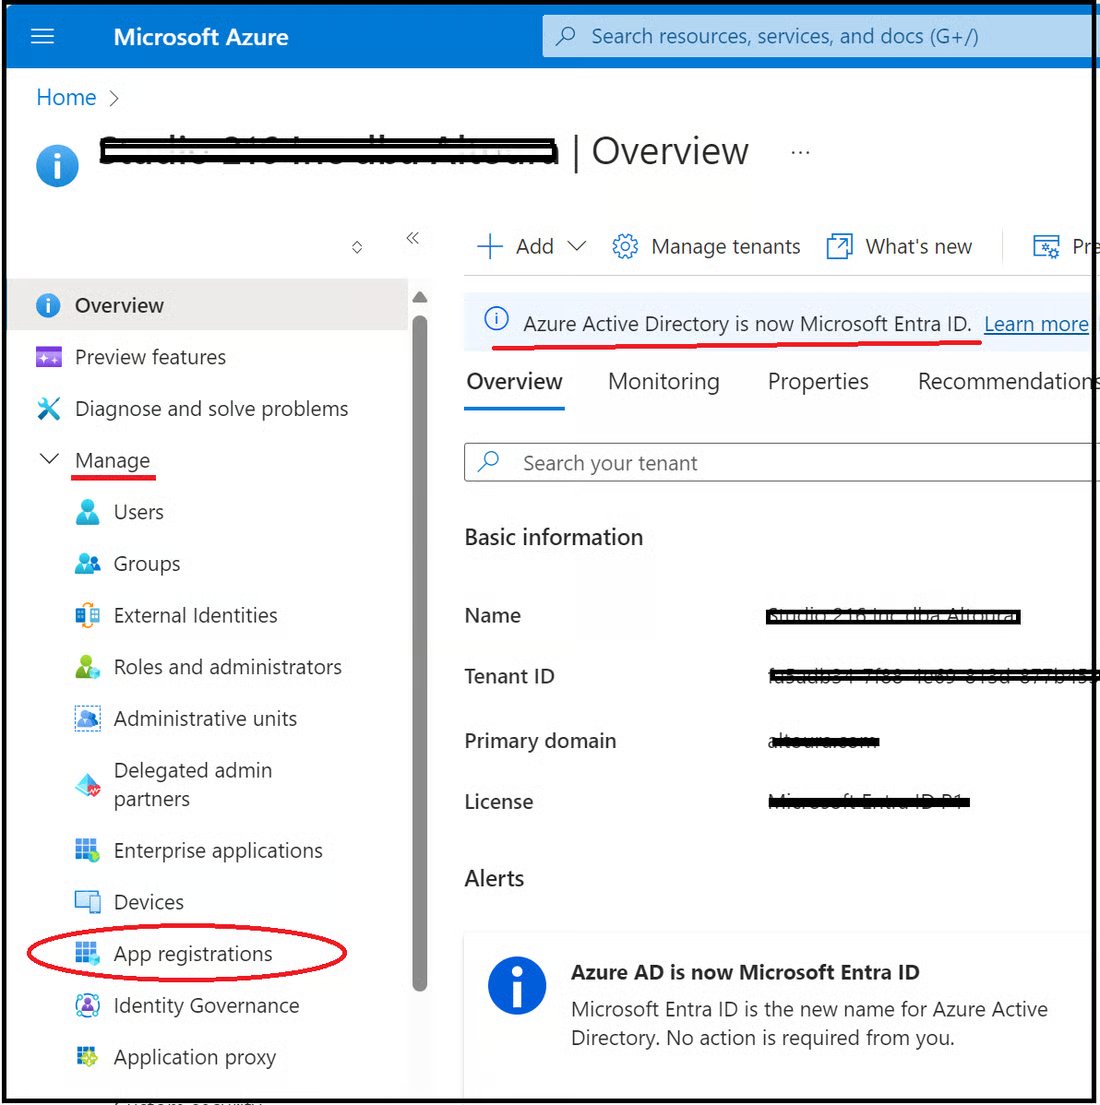
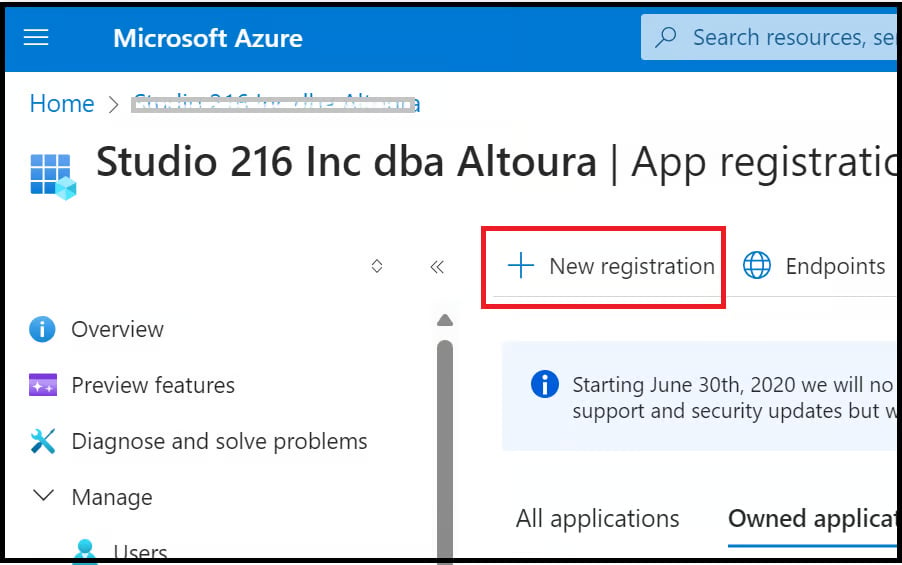 3. The following page is displayed, here, enter a name for the application and click on the Register button.
 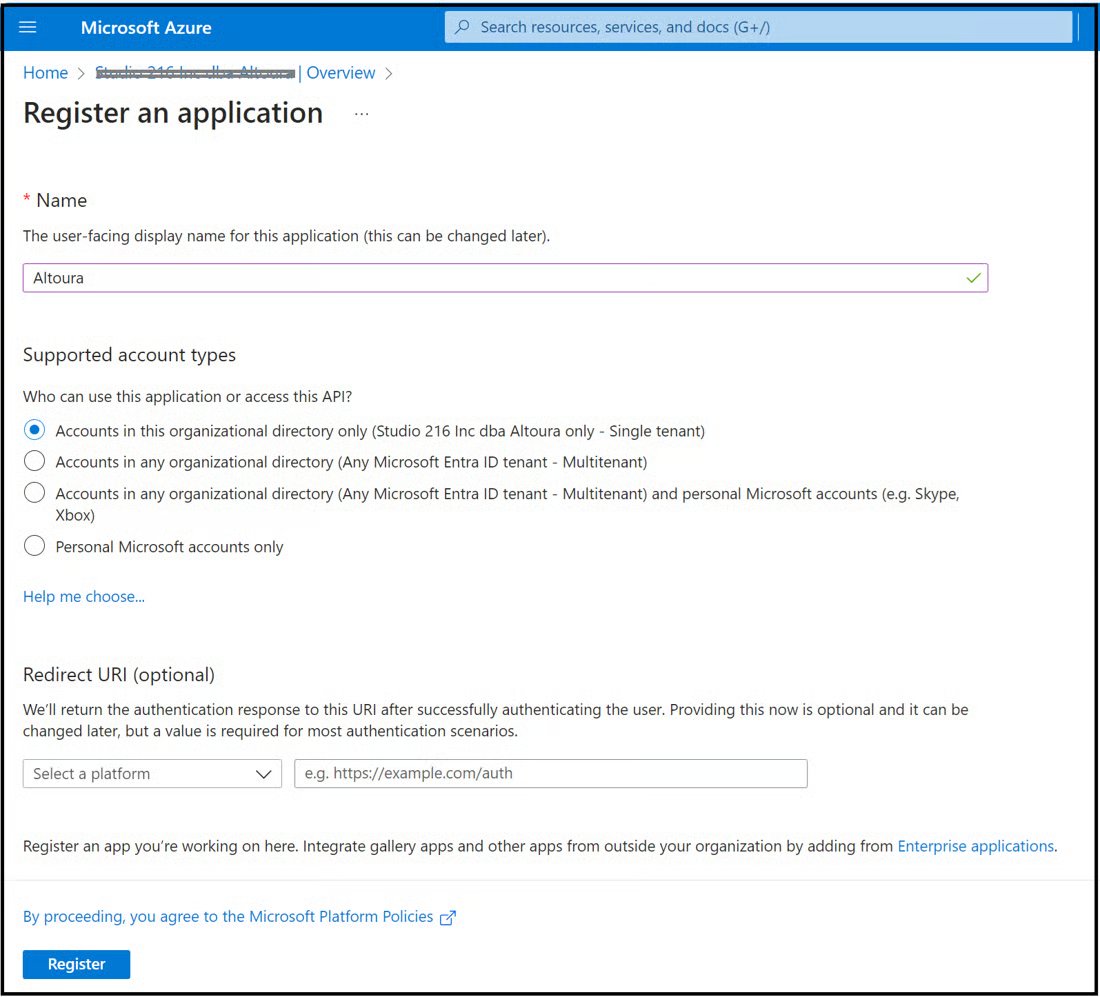 4. The application gets created and the following page is displayed.
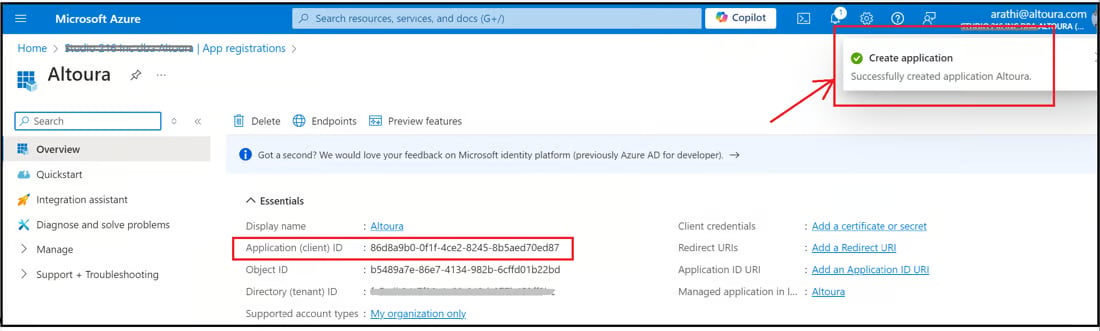 Here, note down the Application (client ID) value. This value needs to be shared with the Altoura team. `<>`
5. Next, click on Endpoints on the page
Here, note down the Application (client ID) value. This value needs to be shared with the Altoura team. `<>`
5. Next, click on Endpoints on the page
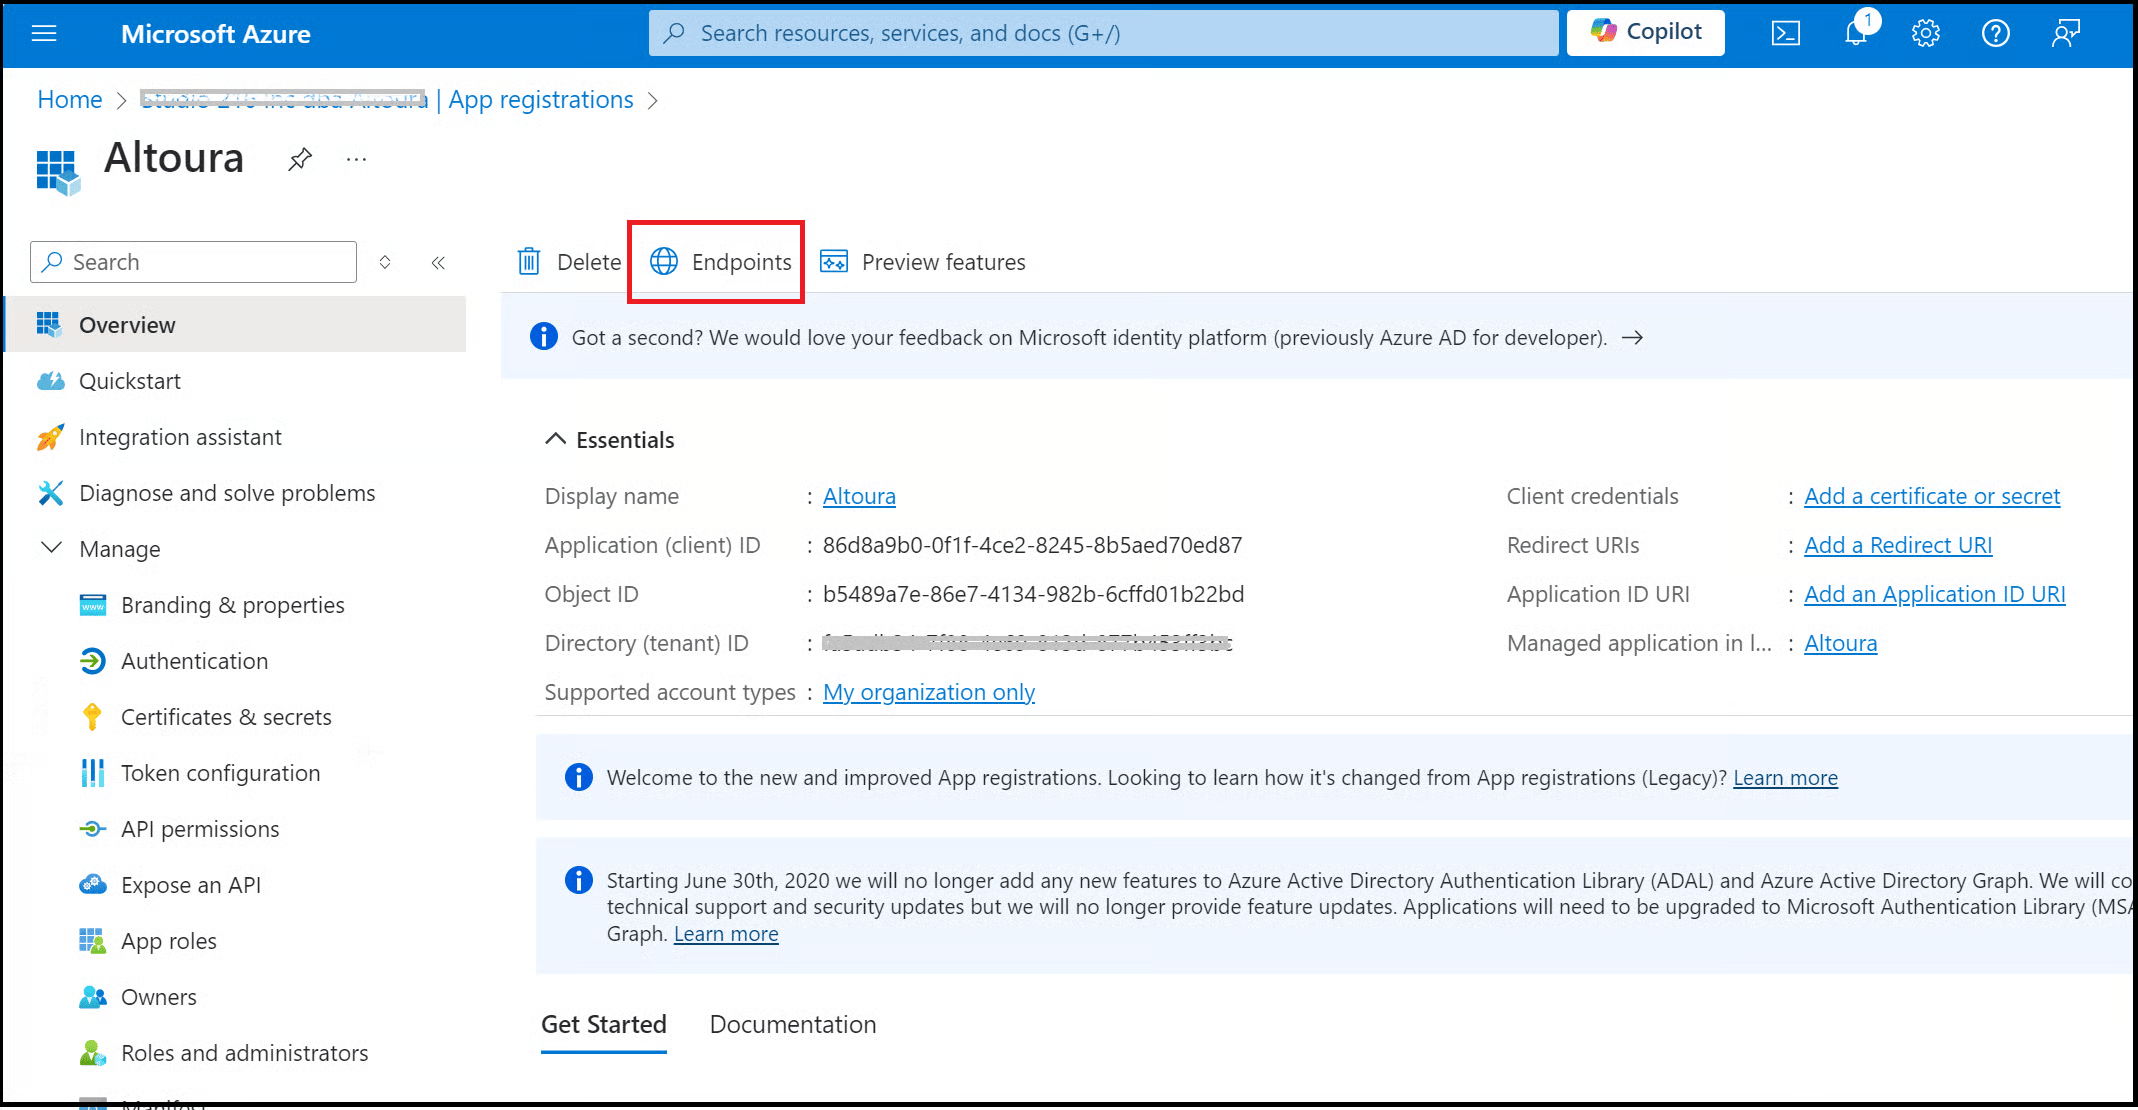 6. Endpoints window appears to the right.
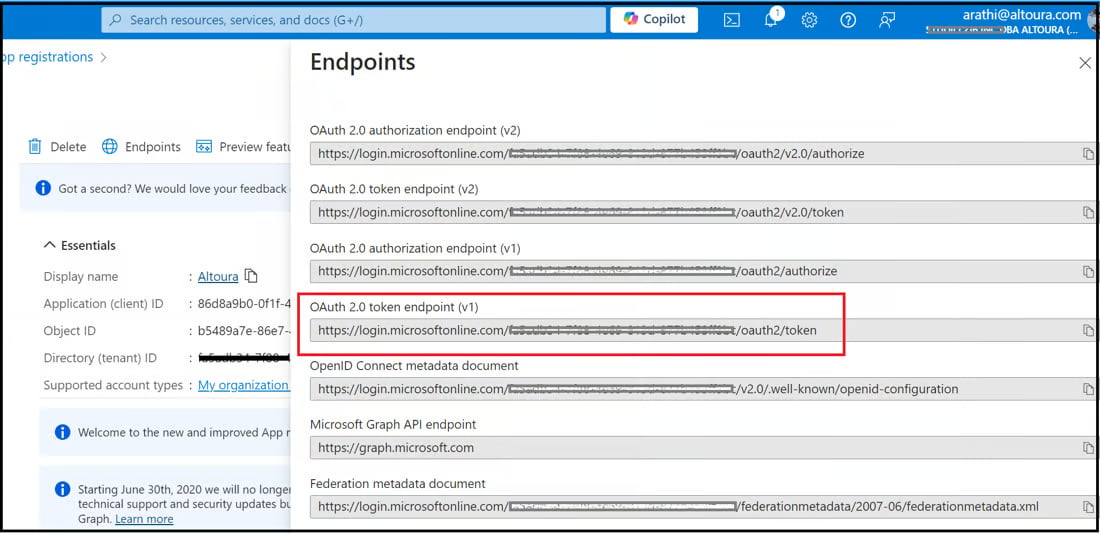 Here, note down the OAuth 2.0 token endpoint (v1) value. This value needs to be shared with the Altoura team. `<>`
7. Close the Endpoints window and on the main page, click on Certificates and Secrets.
Here, note down the OAuth 2.0 token endpoint (v1) value. This value needs to be shared with the Altoura team. `<>`
7. Close the Endpoints window and on the main page, click on Certificates and Secrets.
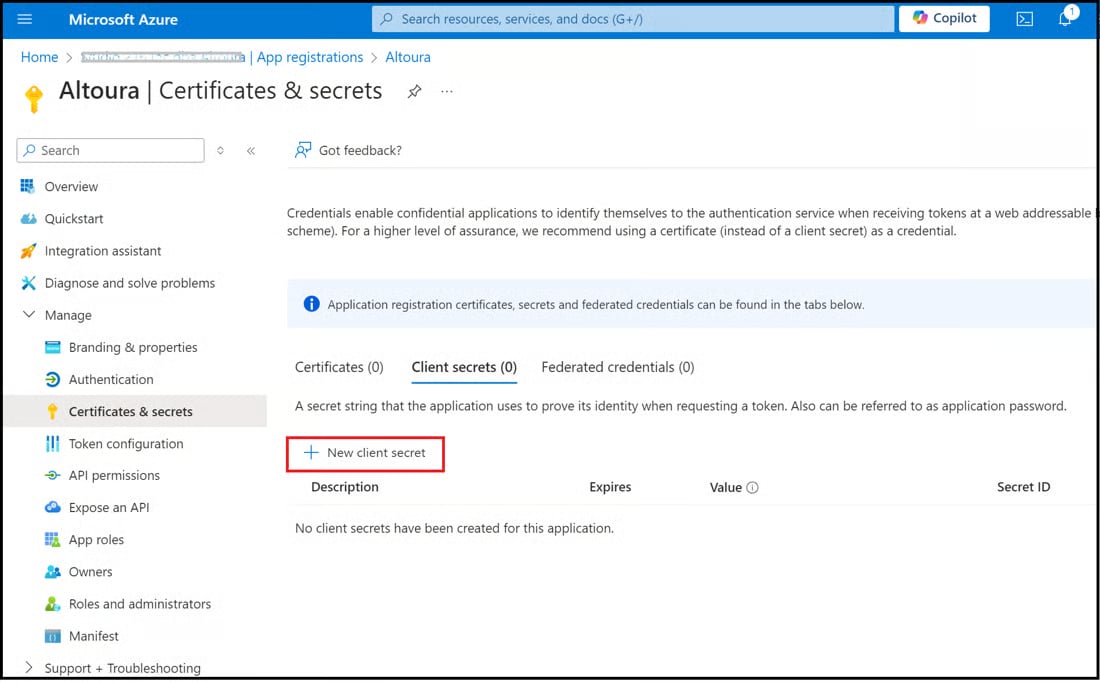
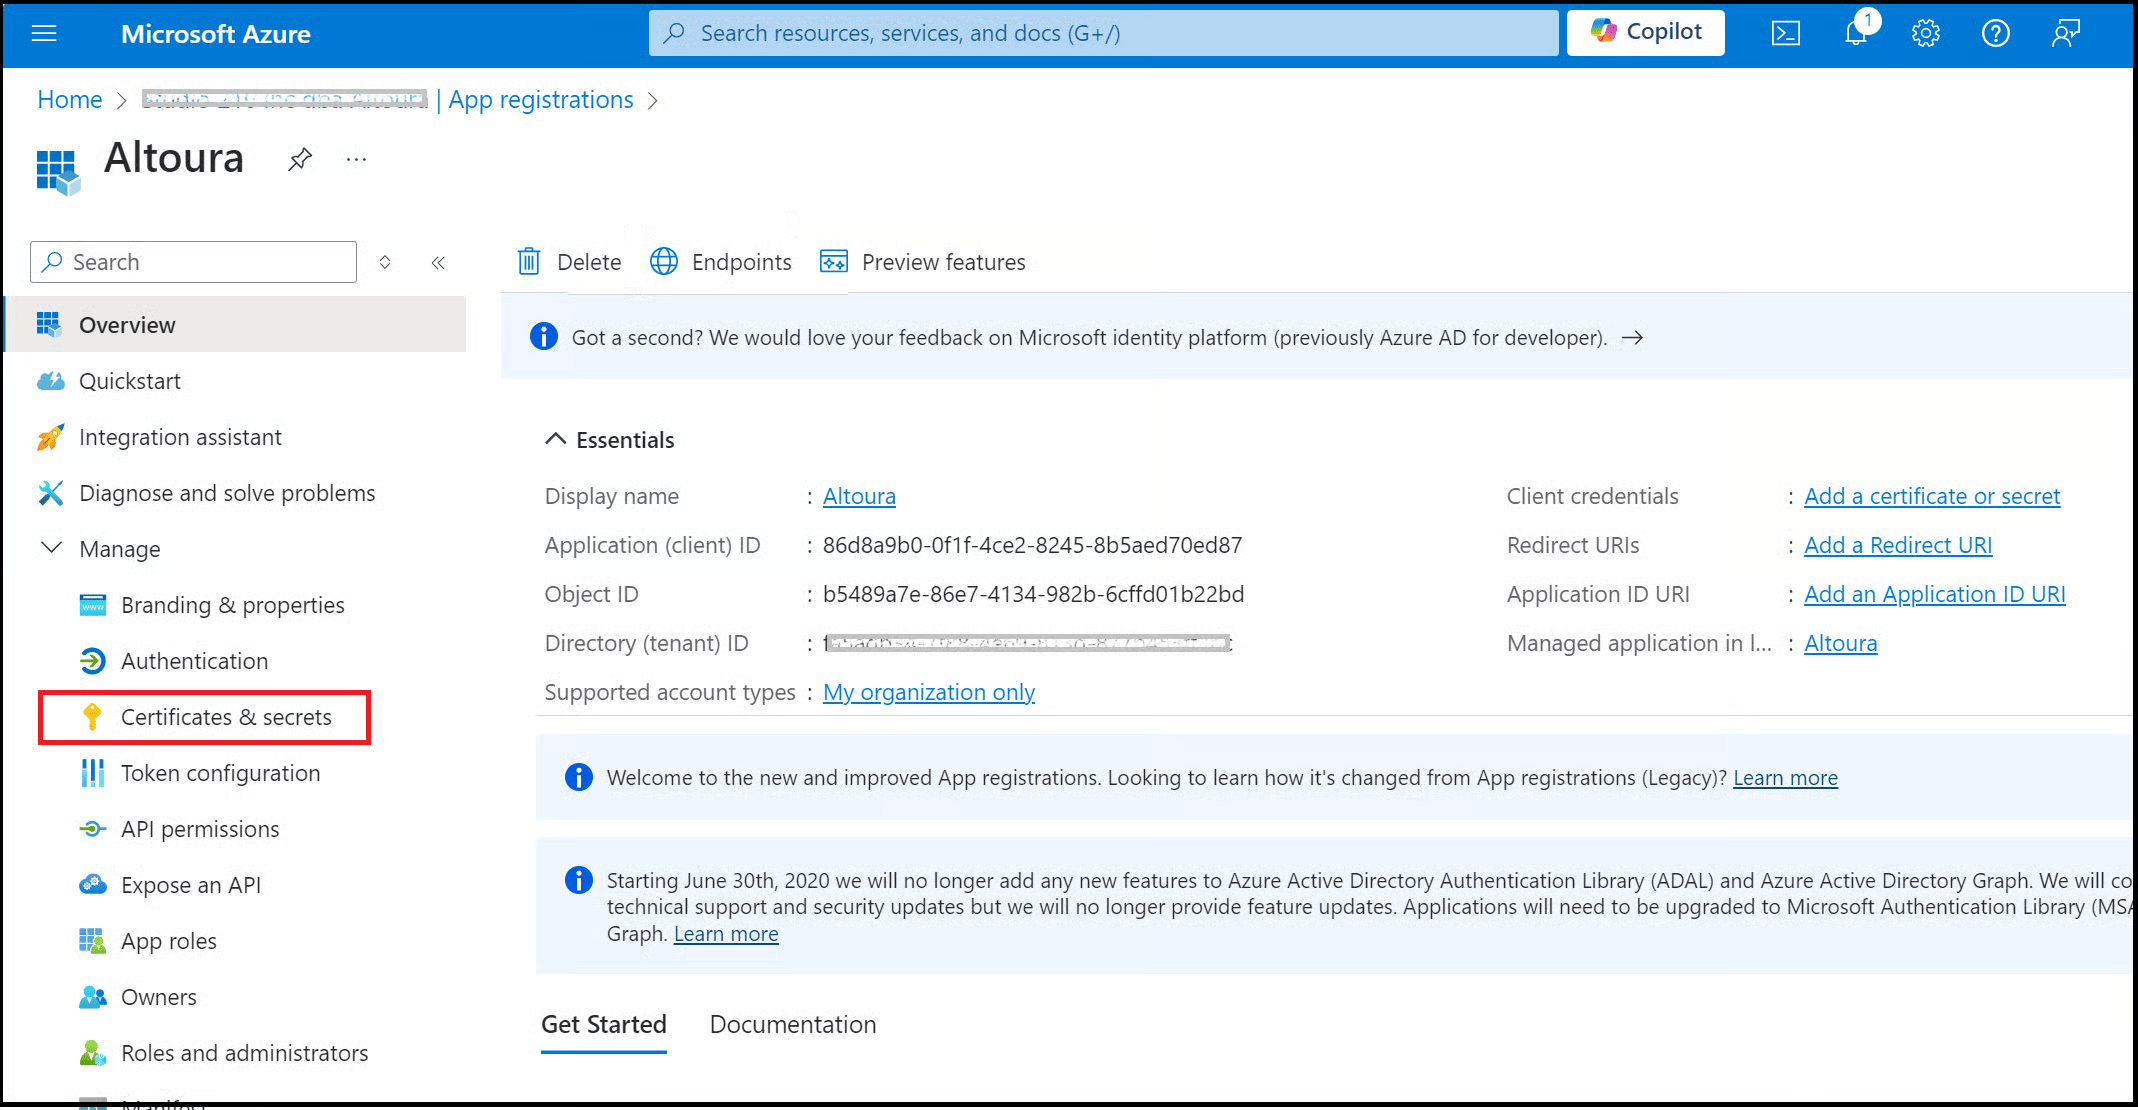 8. The following page is displayed, here click on New client secret
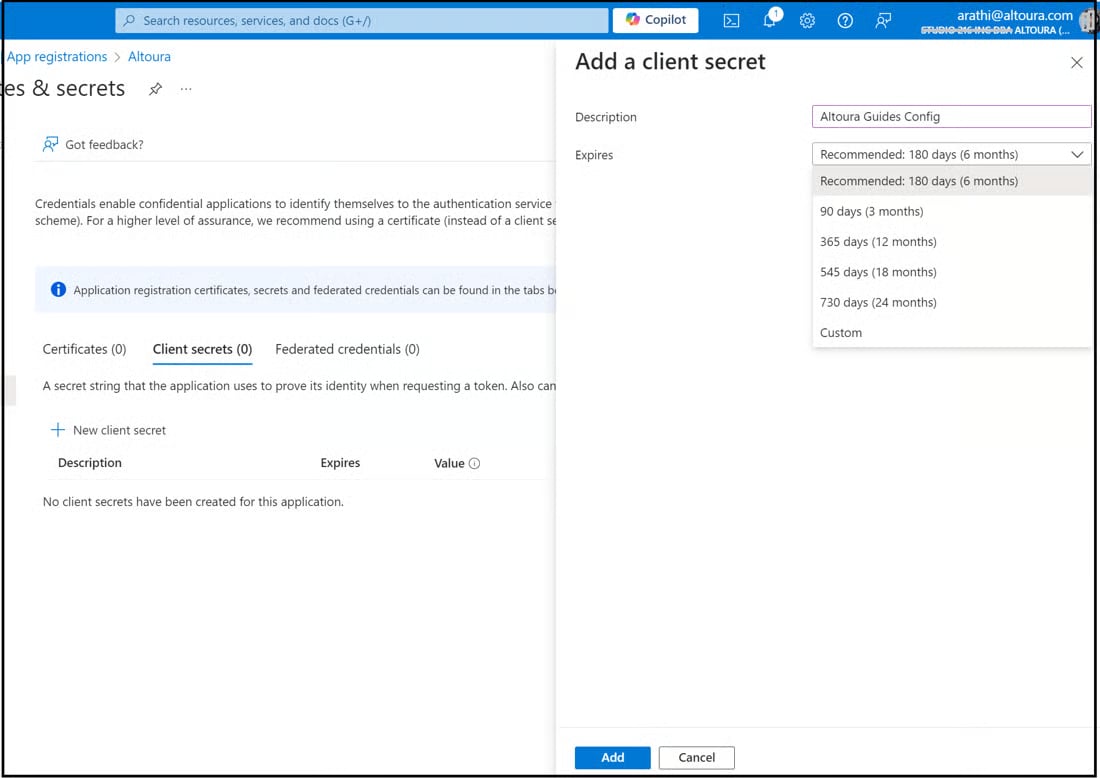
 9. Add a client secret window appears to the right. Here enter a Description and select the Expiry period and click on the Add button.
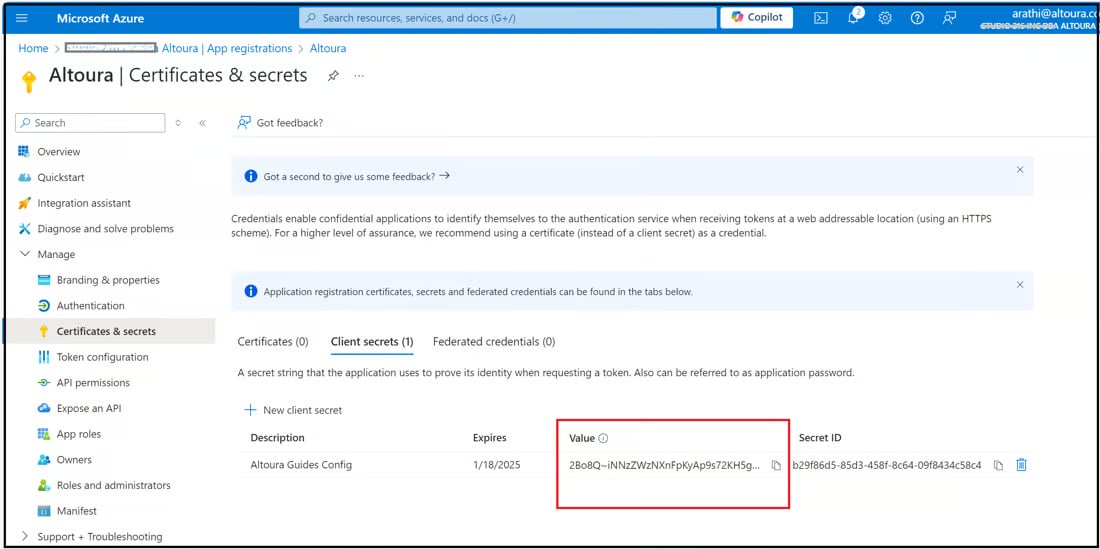
 10. The Client Secret value is generated. Copy this value and save it immediately. This value needs to be shared with the Altoura team. `<>`
 > ### **Note**
>
> Please note that the Client Secret value cannot be viewed later, so it is important to copy the value immediately after it is generated.
This completes the Azure Setup Configuration. The next set of steps have to be done on the Microsoft Power Platform Admin Center.
## **Microsoft Power Platform Admin Center**
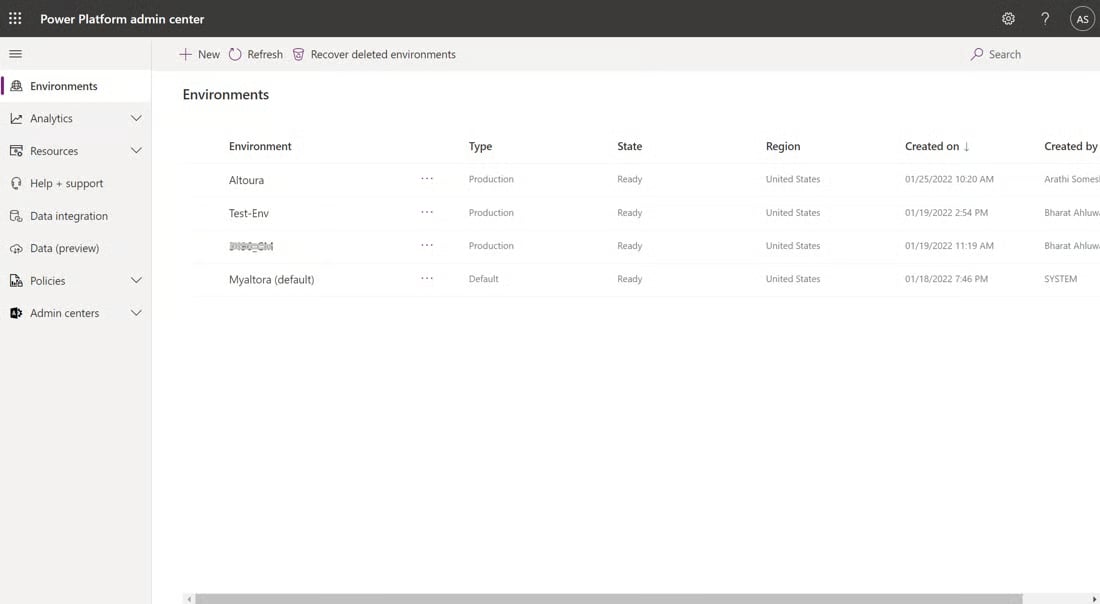
11. Log in to the Microsoft Power Platform Admin Center. [**https://admin.powerplatform.microsoft.com**](https://admin.powerplatform.microsoft.com) A list of Environments will be displayed.
> ### **Note**
>
> Please note that the Client Secret value cannot be viewed later, so it is important to copy the value immediately after it is generated.
This completes the Azure Setup Configuration. The next set of steps have to be done on the Microsoft Power Platform Admin Center.
## **Microsoft Power Platform Admin Center**
11. Log in to the Microsoft Power Platform Admin Center. [**https://admin.powerplatform.microsoft.com**](https://admin.powerplatform.microsoft.com) A list of Environments will be displayed.
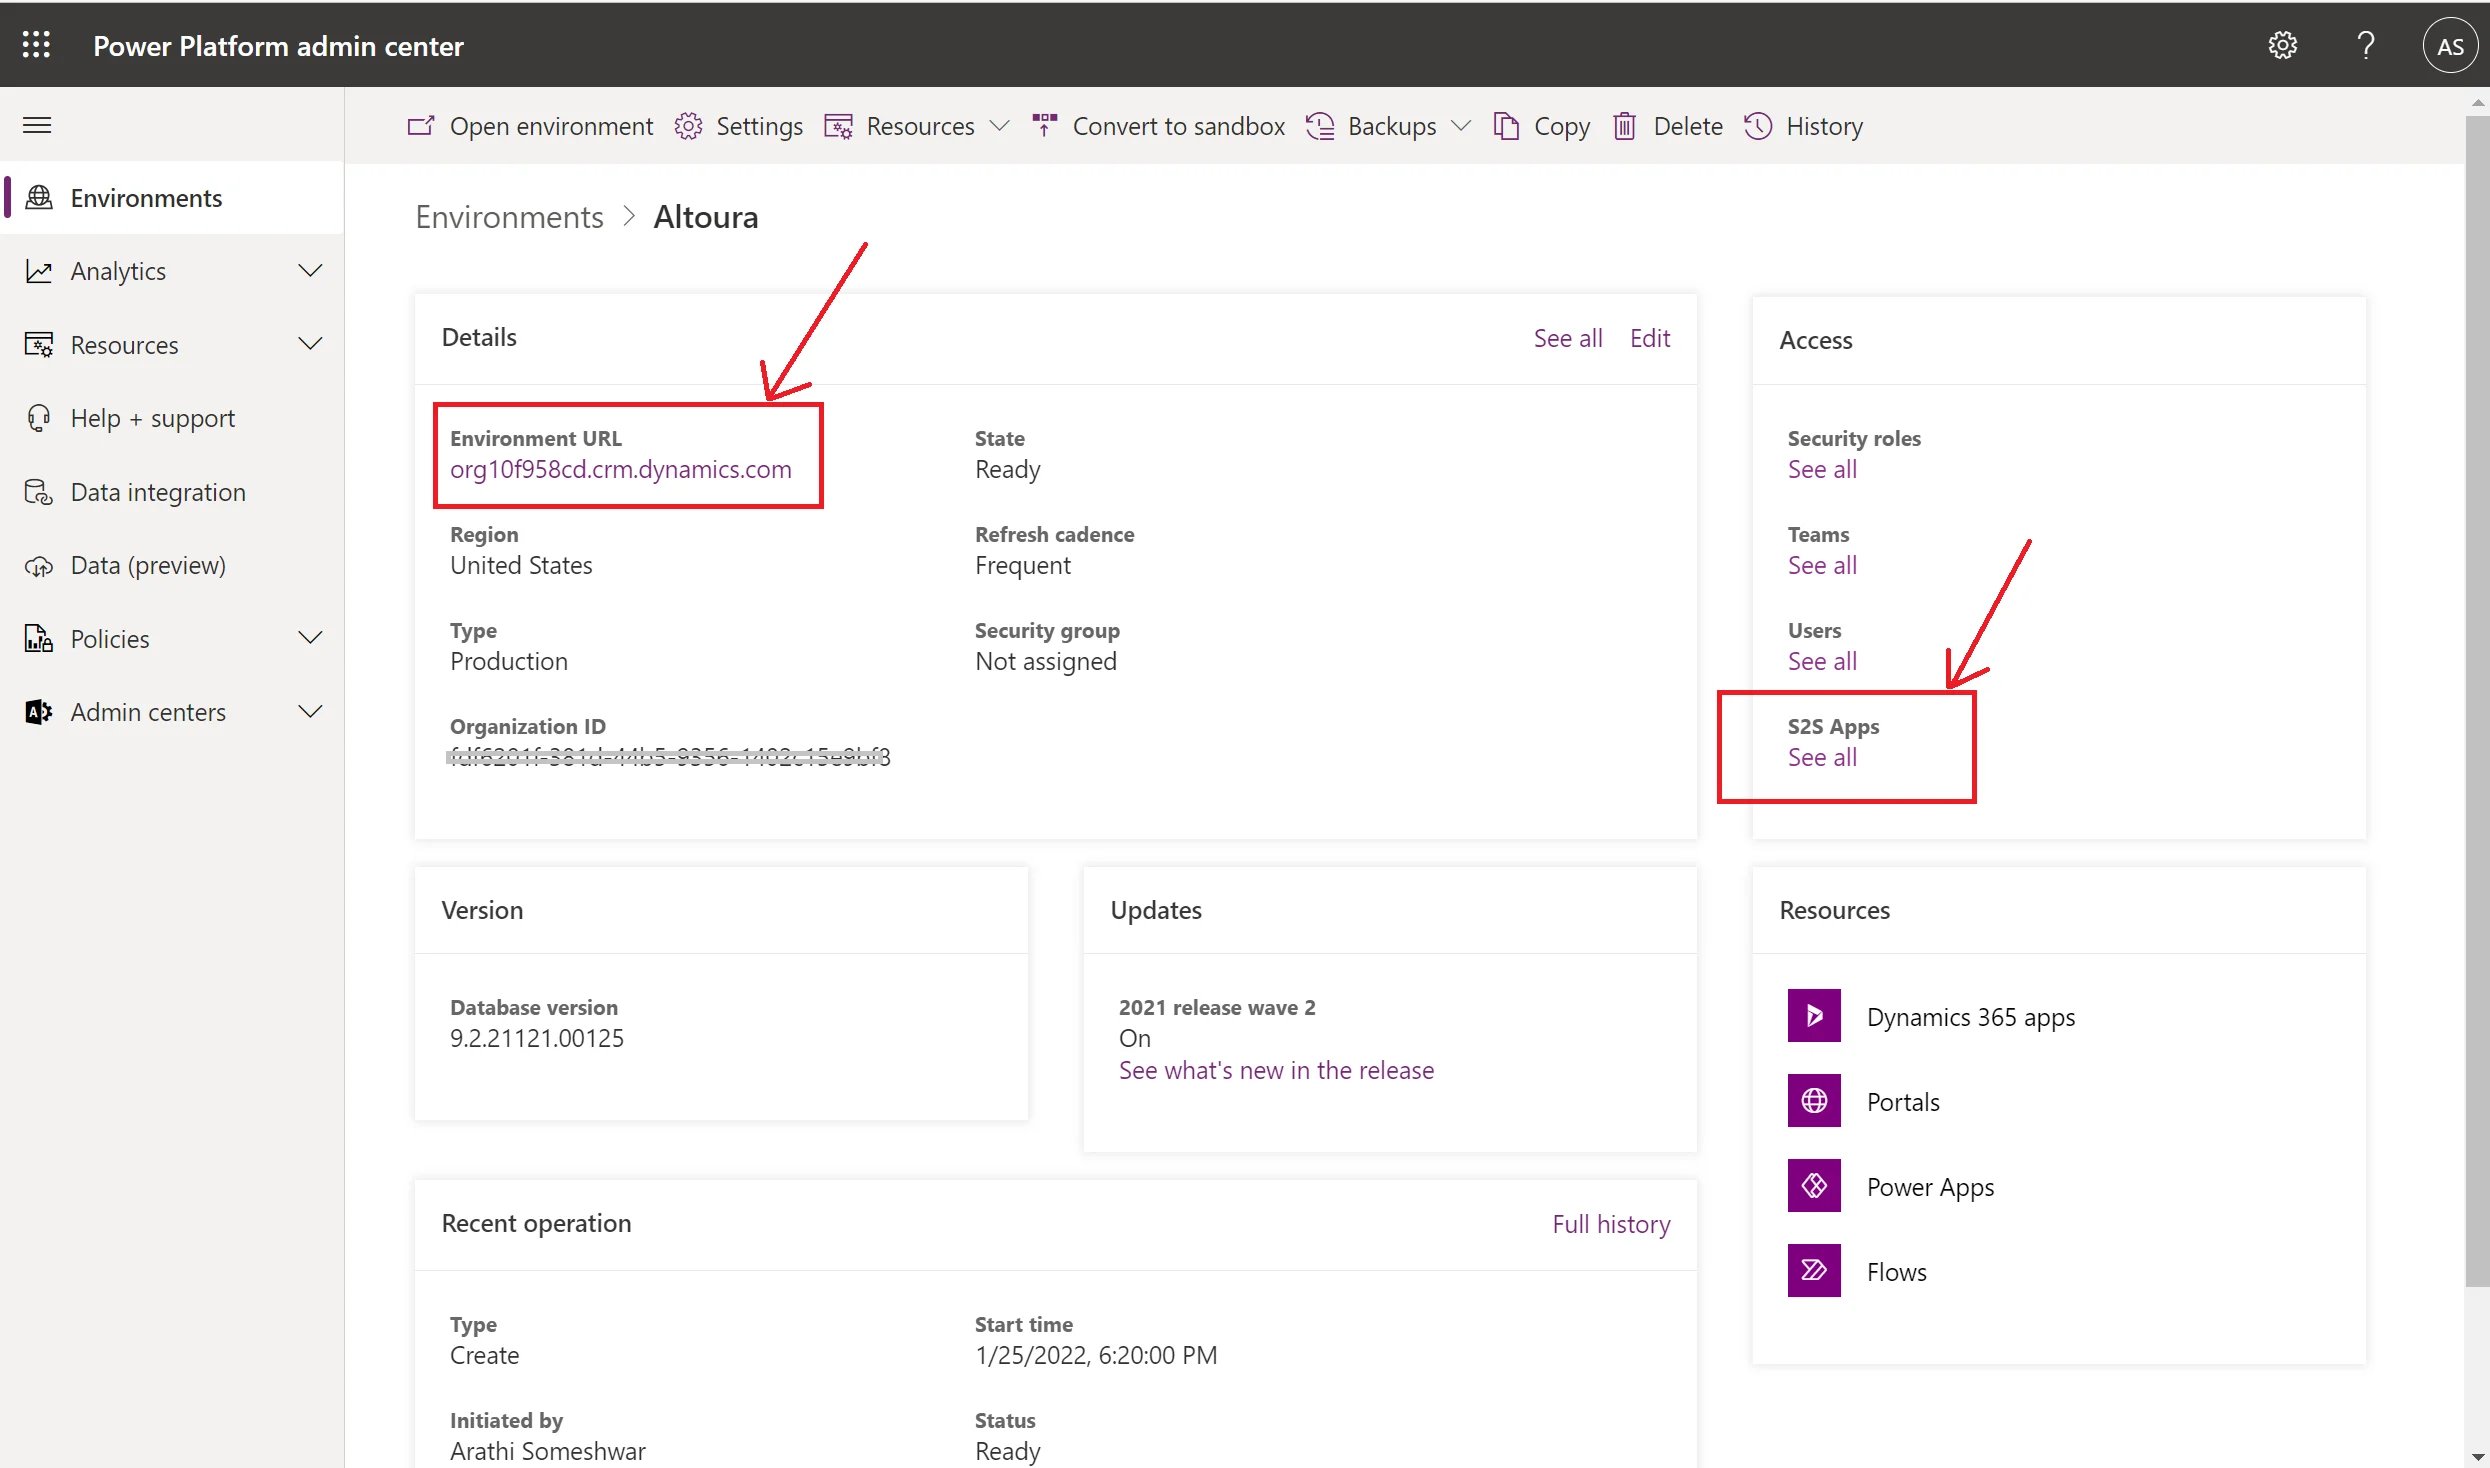
 12. Select the required Environment. The details page is displayed. Copy the Environment URL. This value needs to be shared with the Altoura team. `<>` Click on the S2S Apps link under the Access tile.
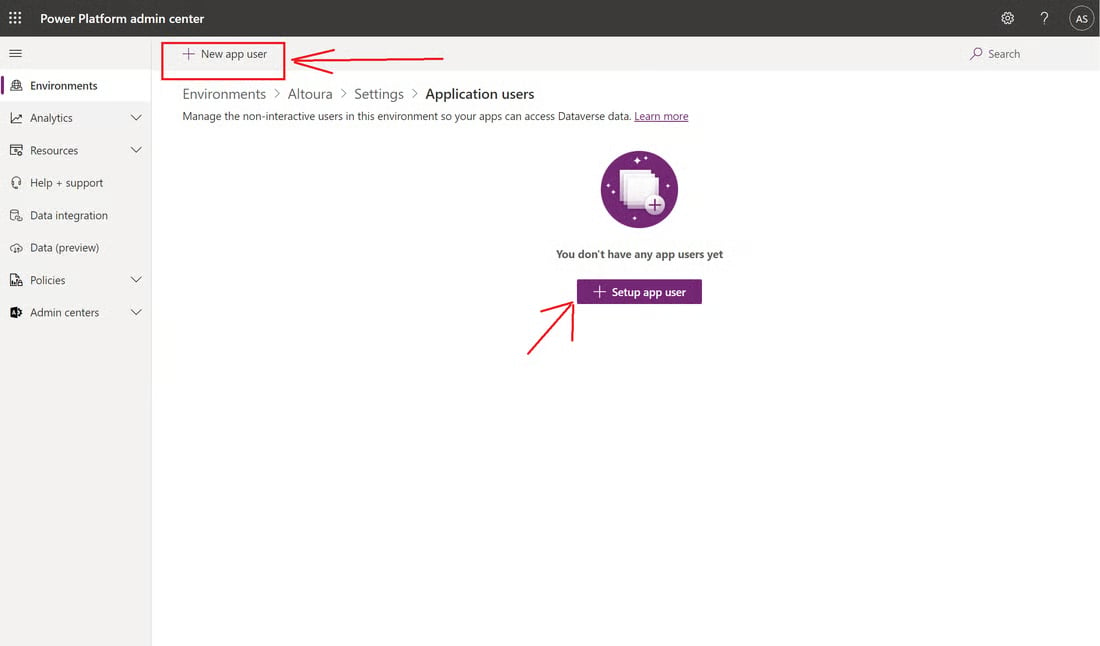
 13. The following page is displayed. Here click on the Setup app user button if there are no existing users or click on the New app user button.
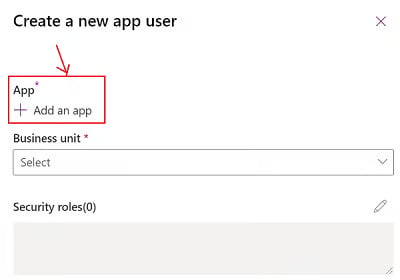
 14. The following window is displayed. Click on the Add an app link.
 15. In the window displayed, search for the app that was registered and click on the Add button.
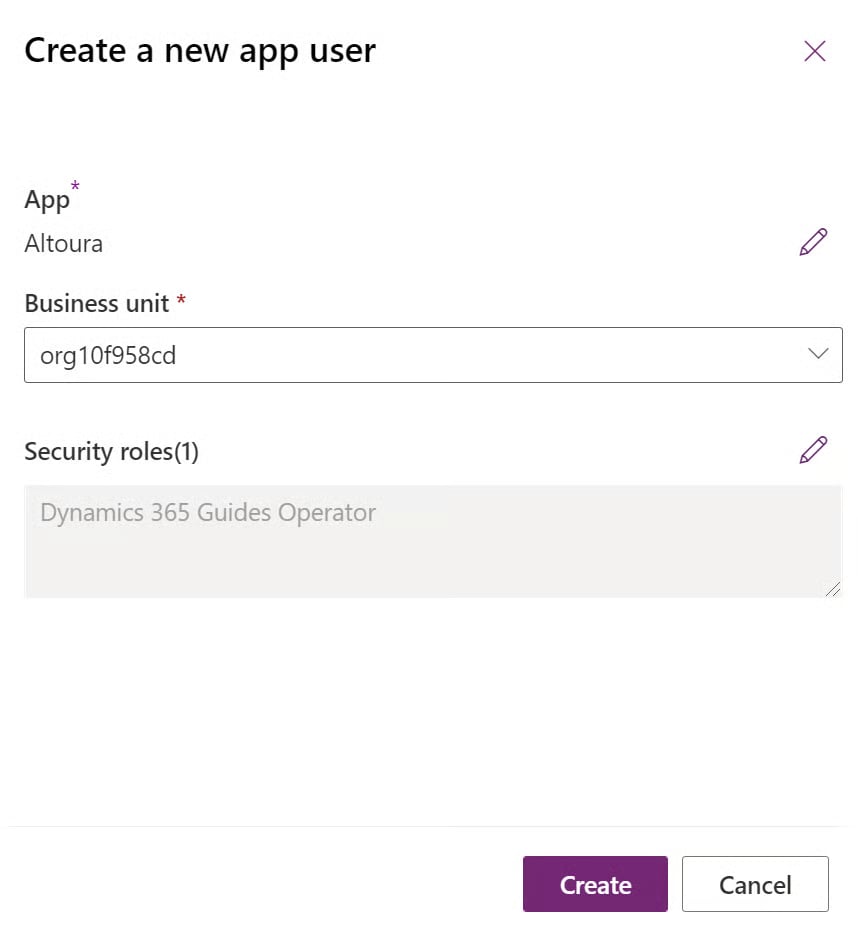
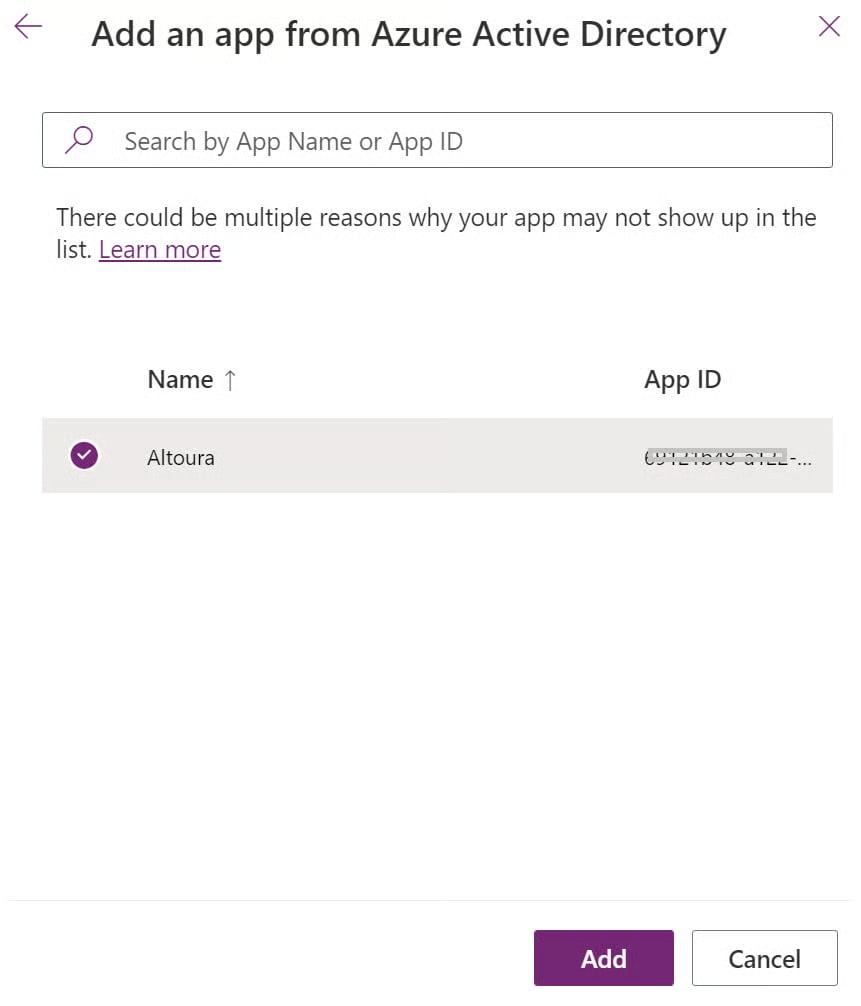 16. The app is added, and the user is taken back to the Create a new app user window. Here select the business unit. Click on the edit icon against the Security roles.
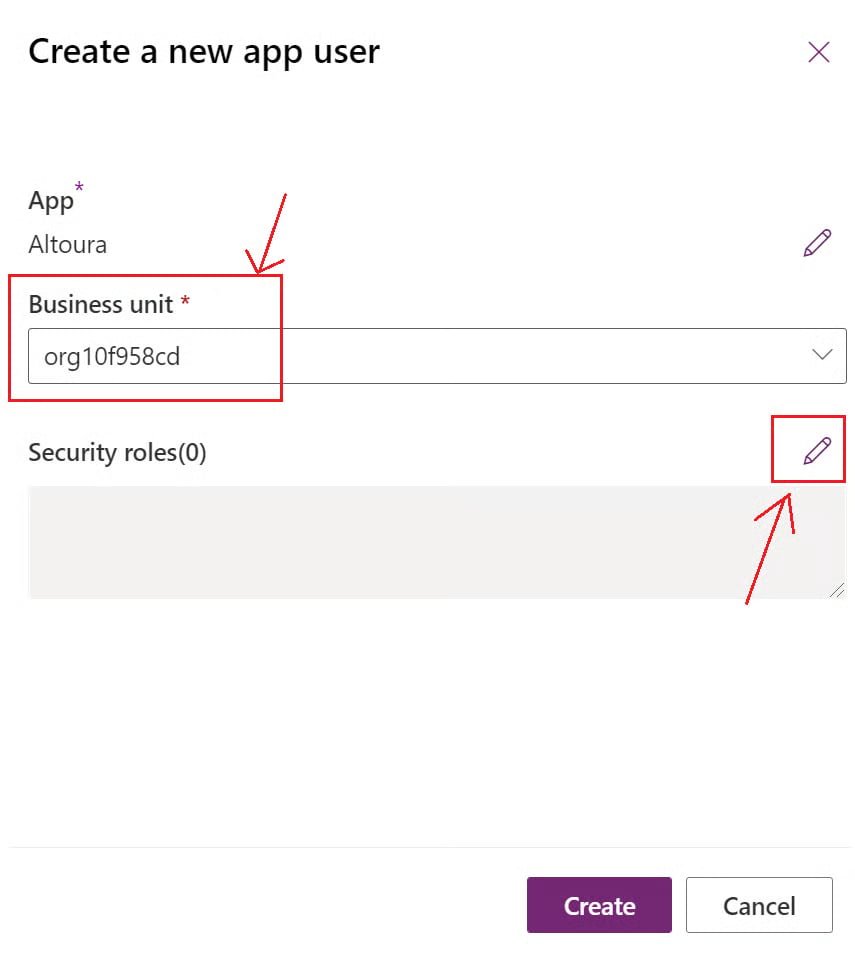 17. Add security roles page is displayed.
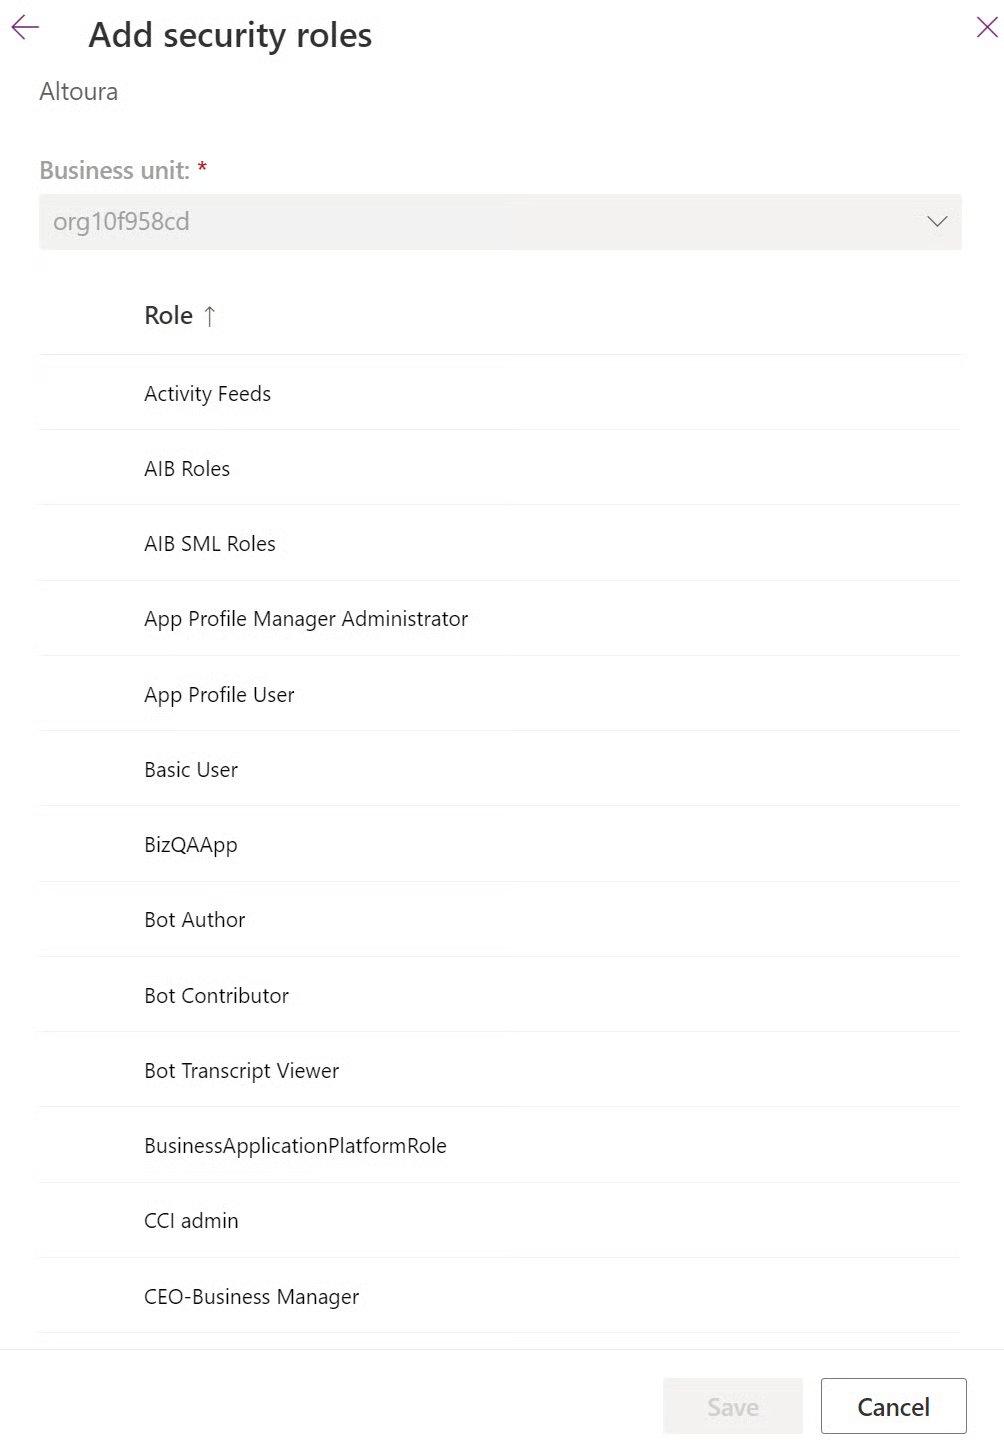 18. Scroll down and select the role Dynamics 365 Guides Operator.
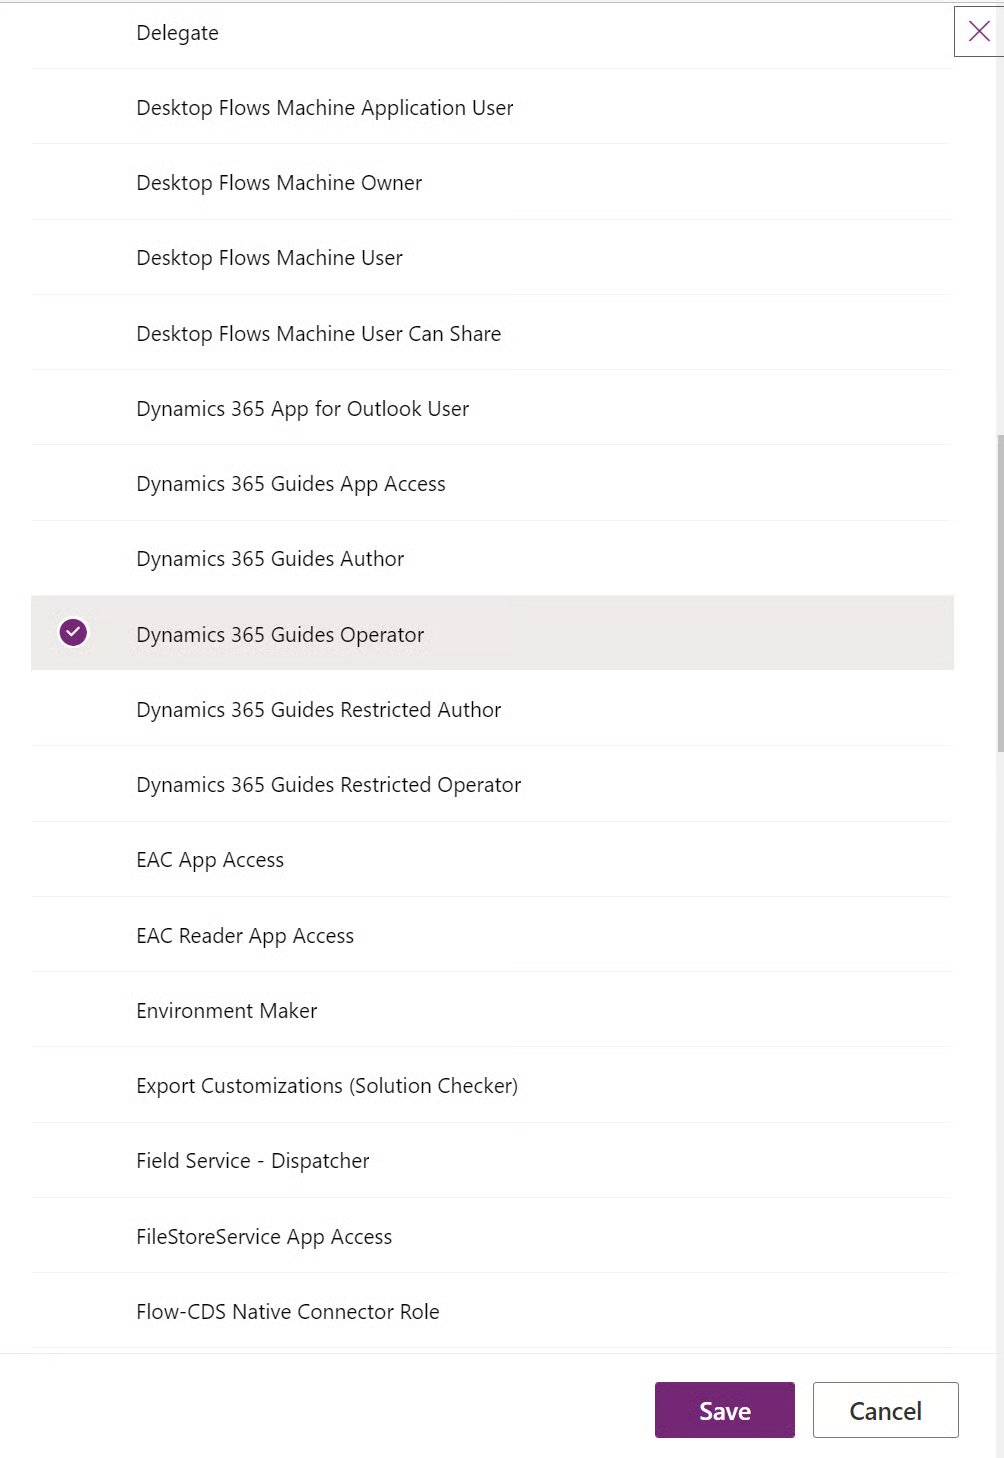 19. If you want to export your experiences created in Altoura to Dynamics 365 Guides, then select the role Dynamics 365 Guides Author.
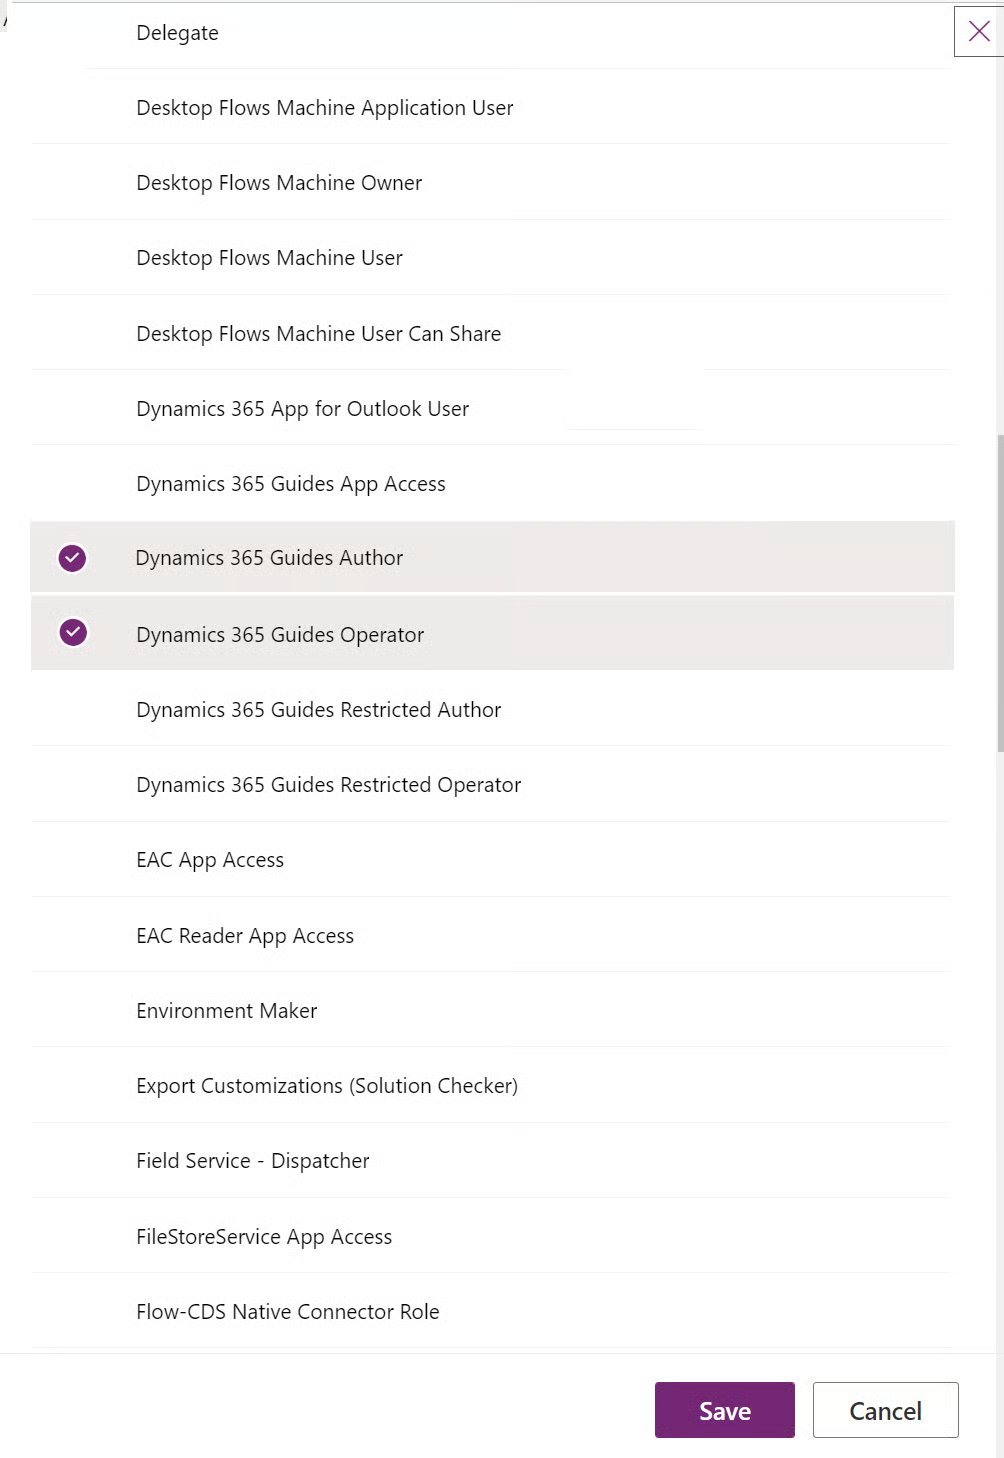 20. Click on the Save button.
21. The roles are added, and the user is taken back to the Create a new app user window. Here click on the Create button.
20. Click on the Save button.
21. The roles are added, and the user is taken back to the Create a new app user window. Here click on the Create button.
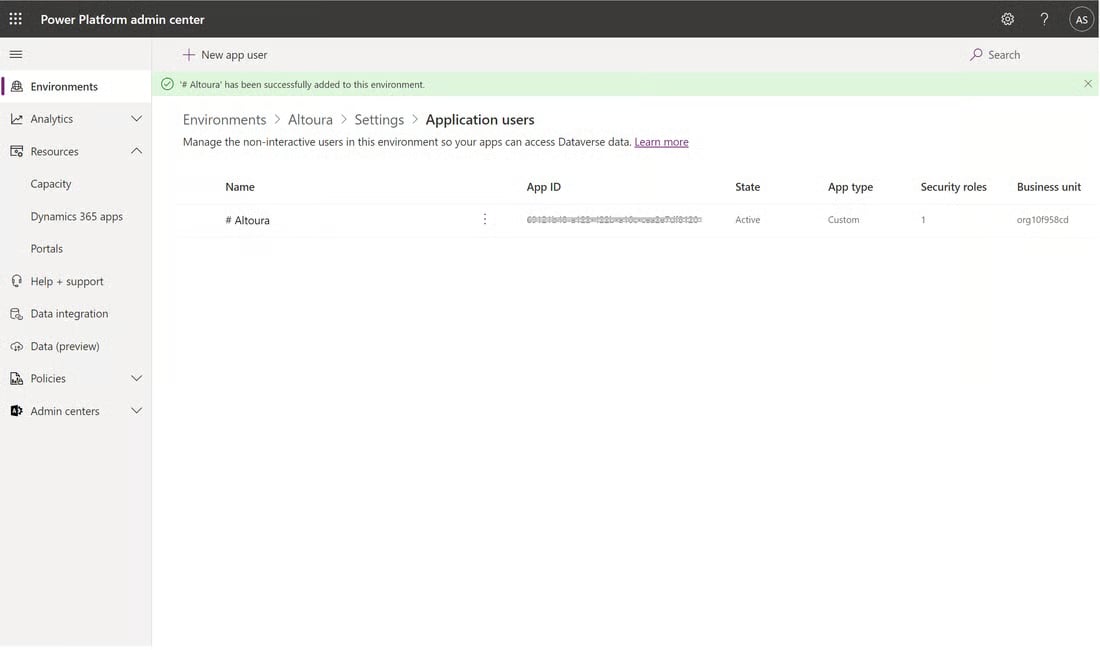
 22. The Application user is added to the environment with the right role.
 ### **Details Required by the Altoura Team to Process Guides**
The following values have to be shared with the Altoura team.
| **Description** | | |
| :----------------------- | :--------------- | :------------- |
| Application (client) ID | Refer to Step 4 | SHARE VALUE 01 |
| OAuth 2.0 token endpoint | Refer to Step 6 | SHARE VALUE 02 |
| Client Secret | Refer to Step 10 | SHARE VALUE 03 |
| Environment URL | Refer to Step 12 | SHARE VALUE 04 |
### **Details Required by the Altoura Team to Process Guides**
The following values have to be shared with the Altoura team.
| **Description** | | |
| :----------------------- | :--------------- | :------------- |
| Application (client) ID | Refer to Step 4 | SHARE VALUE 01 |
| OAuth 2.0 token endpoint | Refer to Step 6 | SHARE VALUE 02 |
| Client Secret | Refer to Step 10 | SHARE VALUE 03 |
| Environment URL | Refer to Step 12 | SHARE VALUE 04 |