> ## Documentation Index
> Fetch the complete documentation index at: https://docs.altoura.com/llms.txt
> Use this file to discover all available pages before exploring further.
# Assets & Media
> Add images, videos, and 3D models to procedure steps using the Assets panel.
## Overview
Steps can be enriched with images, videos, and 3D (GLB) models to improve clarity. All assets are managed from the **Assets panel** on the right side of Edit Mode.
The panel supports browsing built-in models, uploading and organizing your own media, and previewing assets before adding them to steps.
***
## Assets Panel
The Assets panel sits on the right side of Edit Mode and has three tabs: **System**, **Custom**, and **Properties**.
 ### System
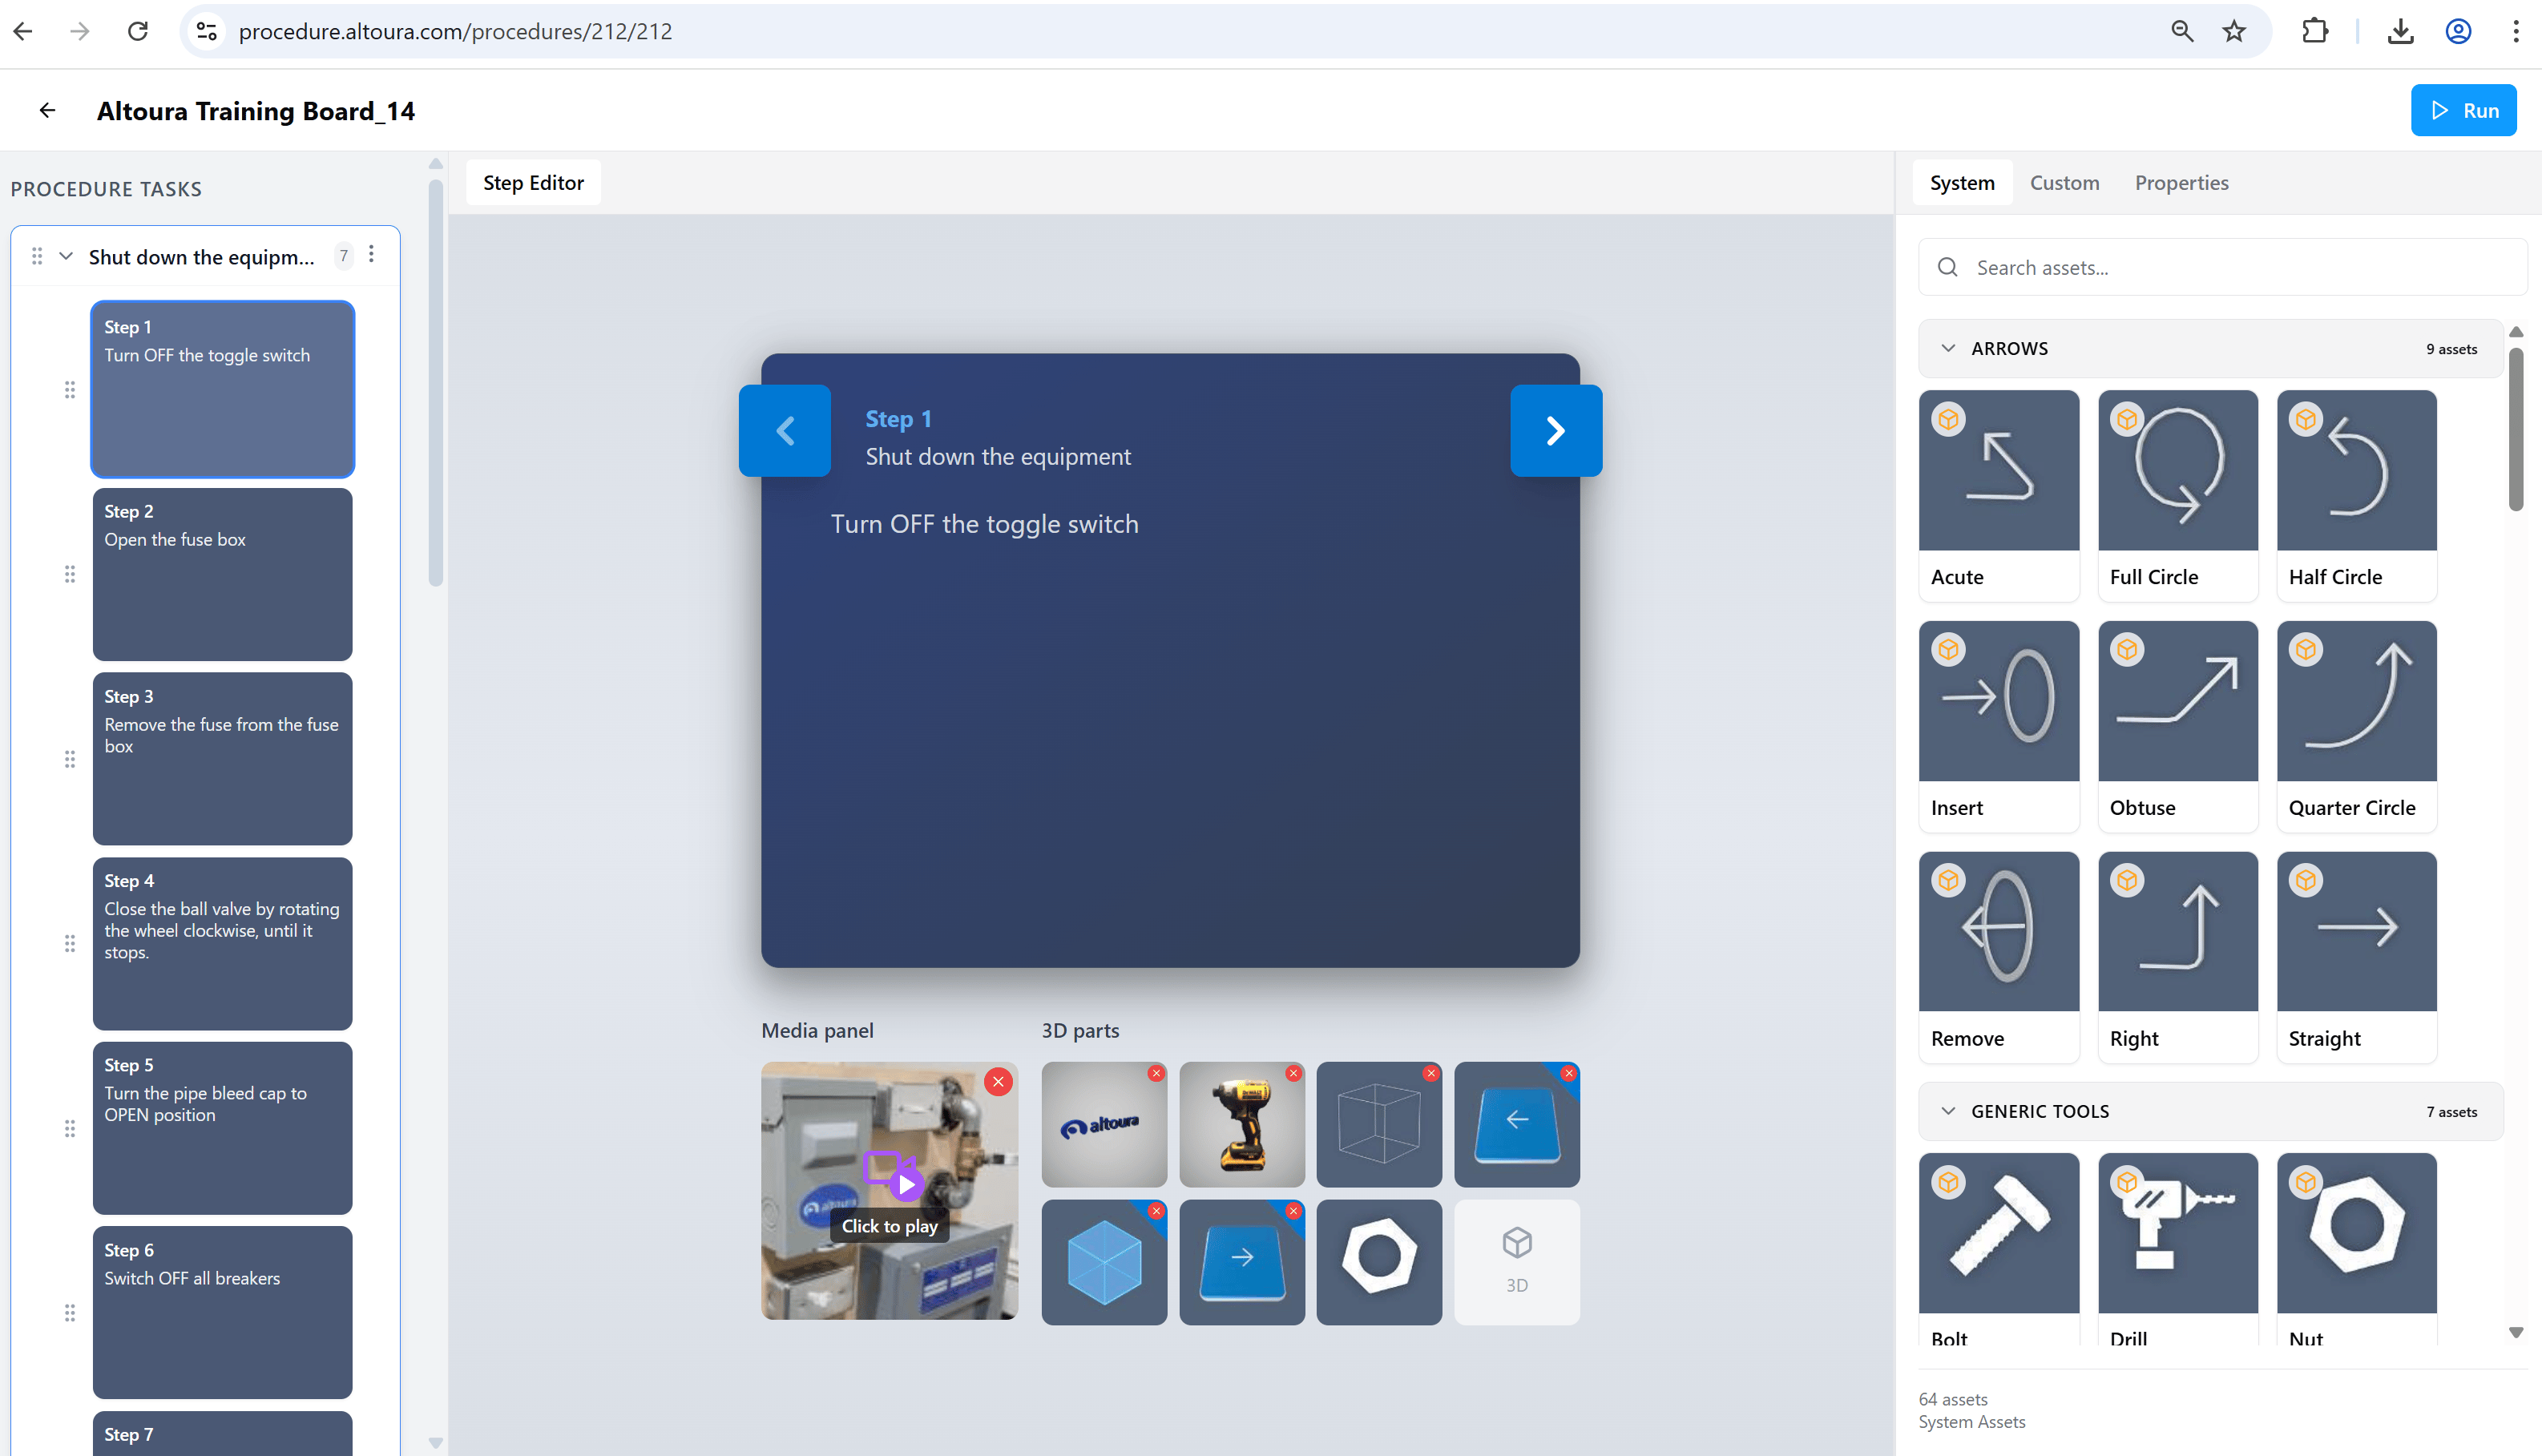
The **System** tab contains built-in 3D (GLB) models that are available to every organization across the platform. These assets are read-only and can be reused across any number of procedures.
System assets are organized into categories such as **Arrows**, **Generic Tools**, **Symbols**, and **Zones**. Each category shows its asset count next to its name, and the total asset count for the tab appears at the bottom (for example, *64 assets · System Assets*).
### System
The **System** tab contains built-in 3D (GLB) models that are available to every organization across the platform. These assets are read-only and can be reused across any number of procedures.
System assets are organized into categories such as **Arrows**, **Generic Tools**, **Symbols**, and **Zones**. Each category shows its asset count next to its name, and the total asset count for the tab appears at the bottom (for example, *64 assets · System Assets*).
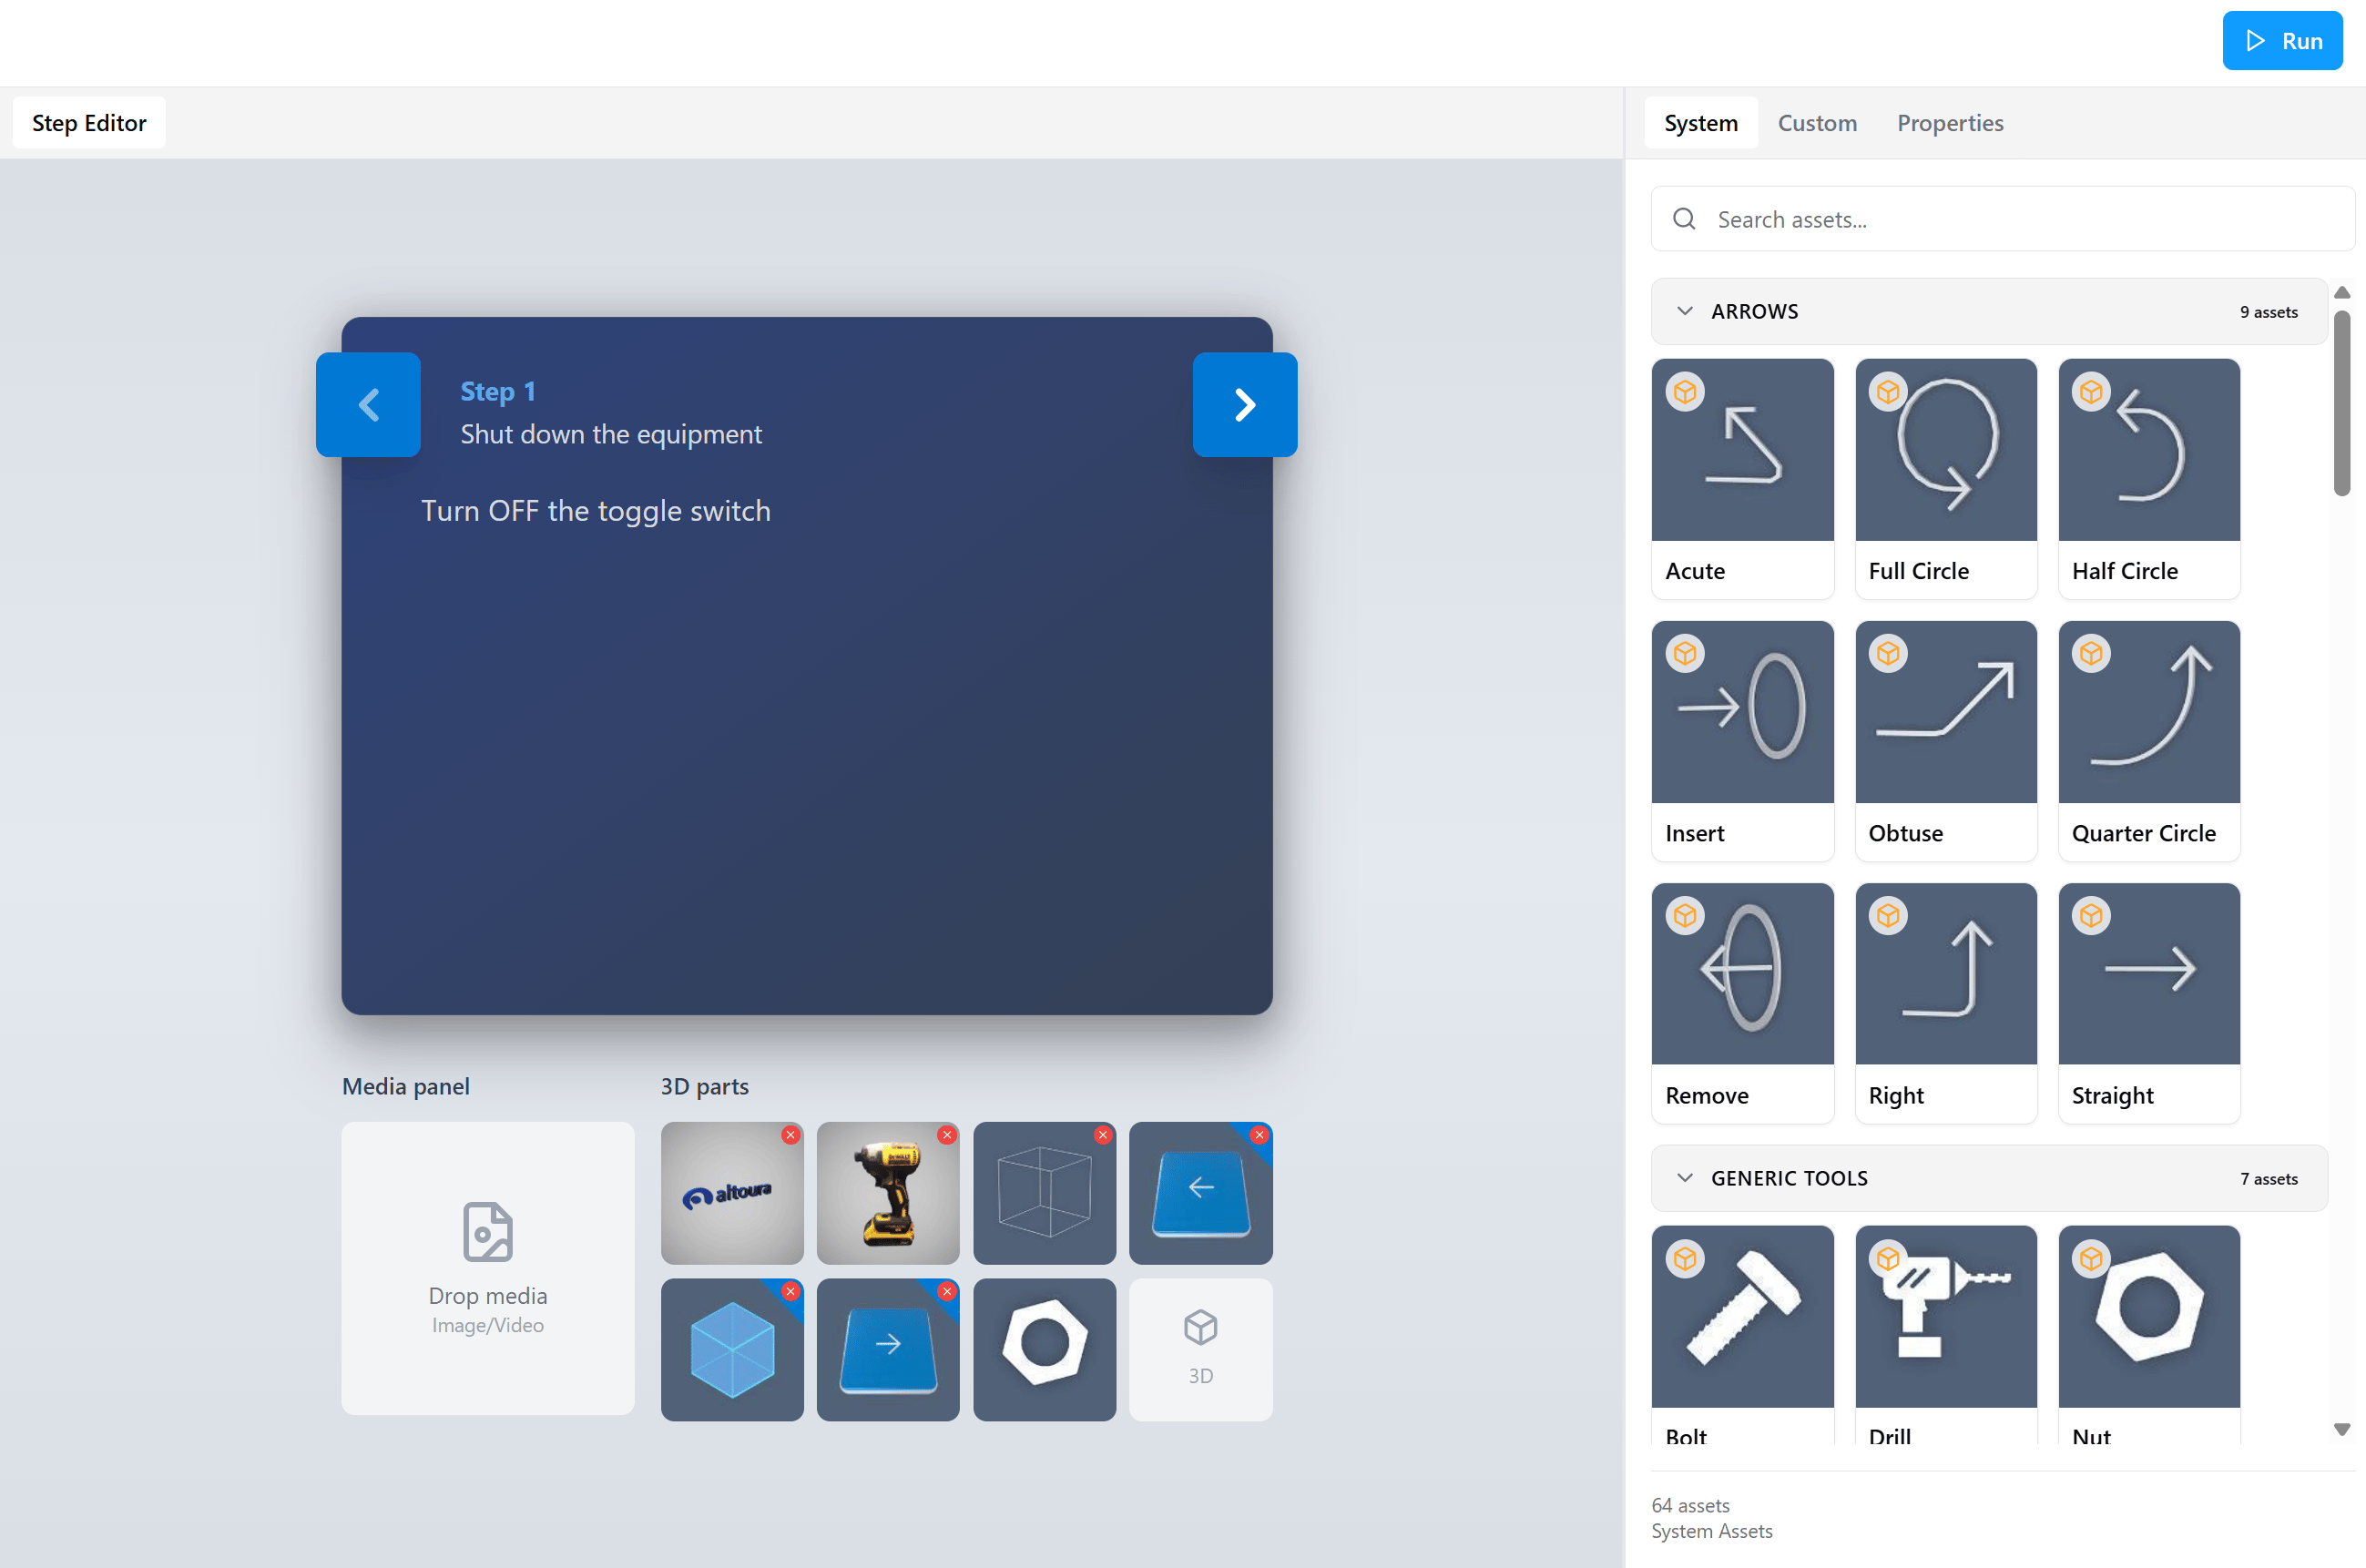 Use the search bar at the top of the tab to filter system assets by name across all categories.
 ### Custom
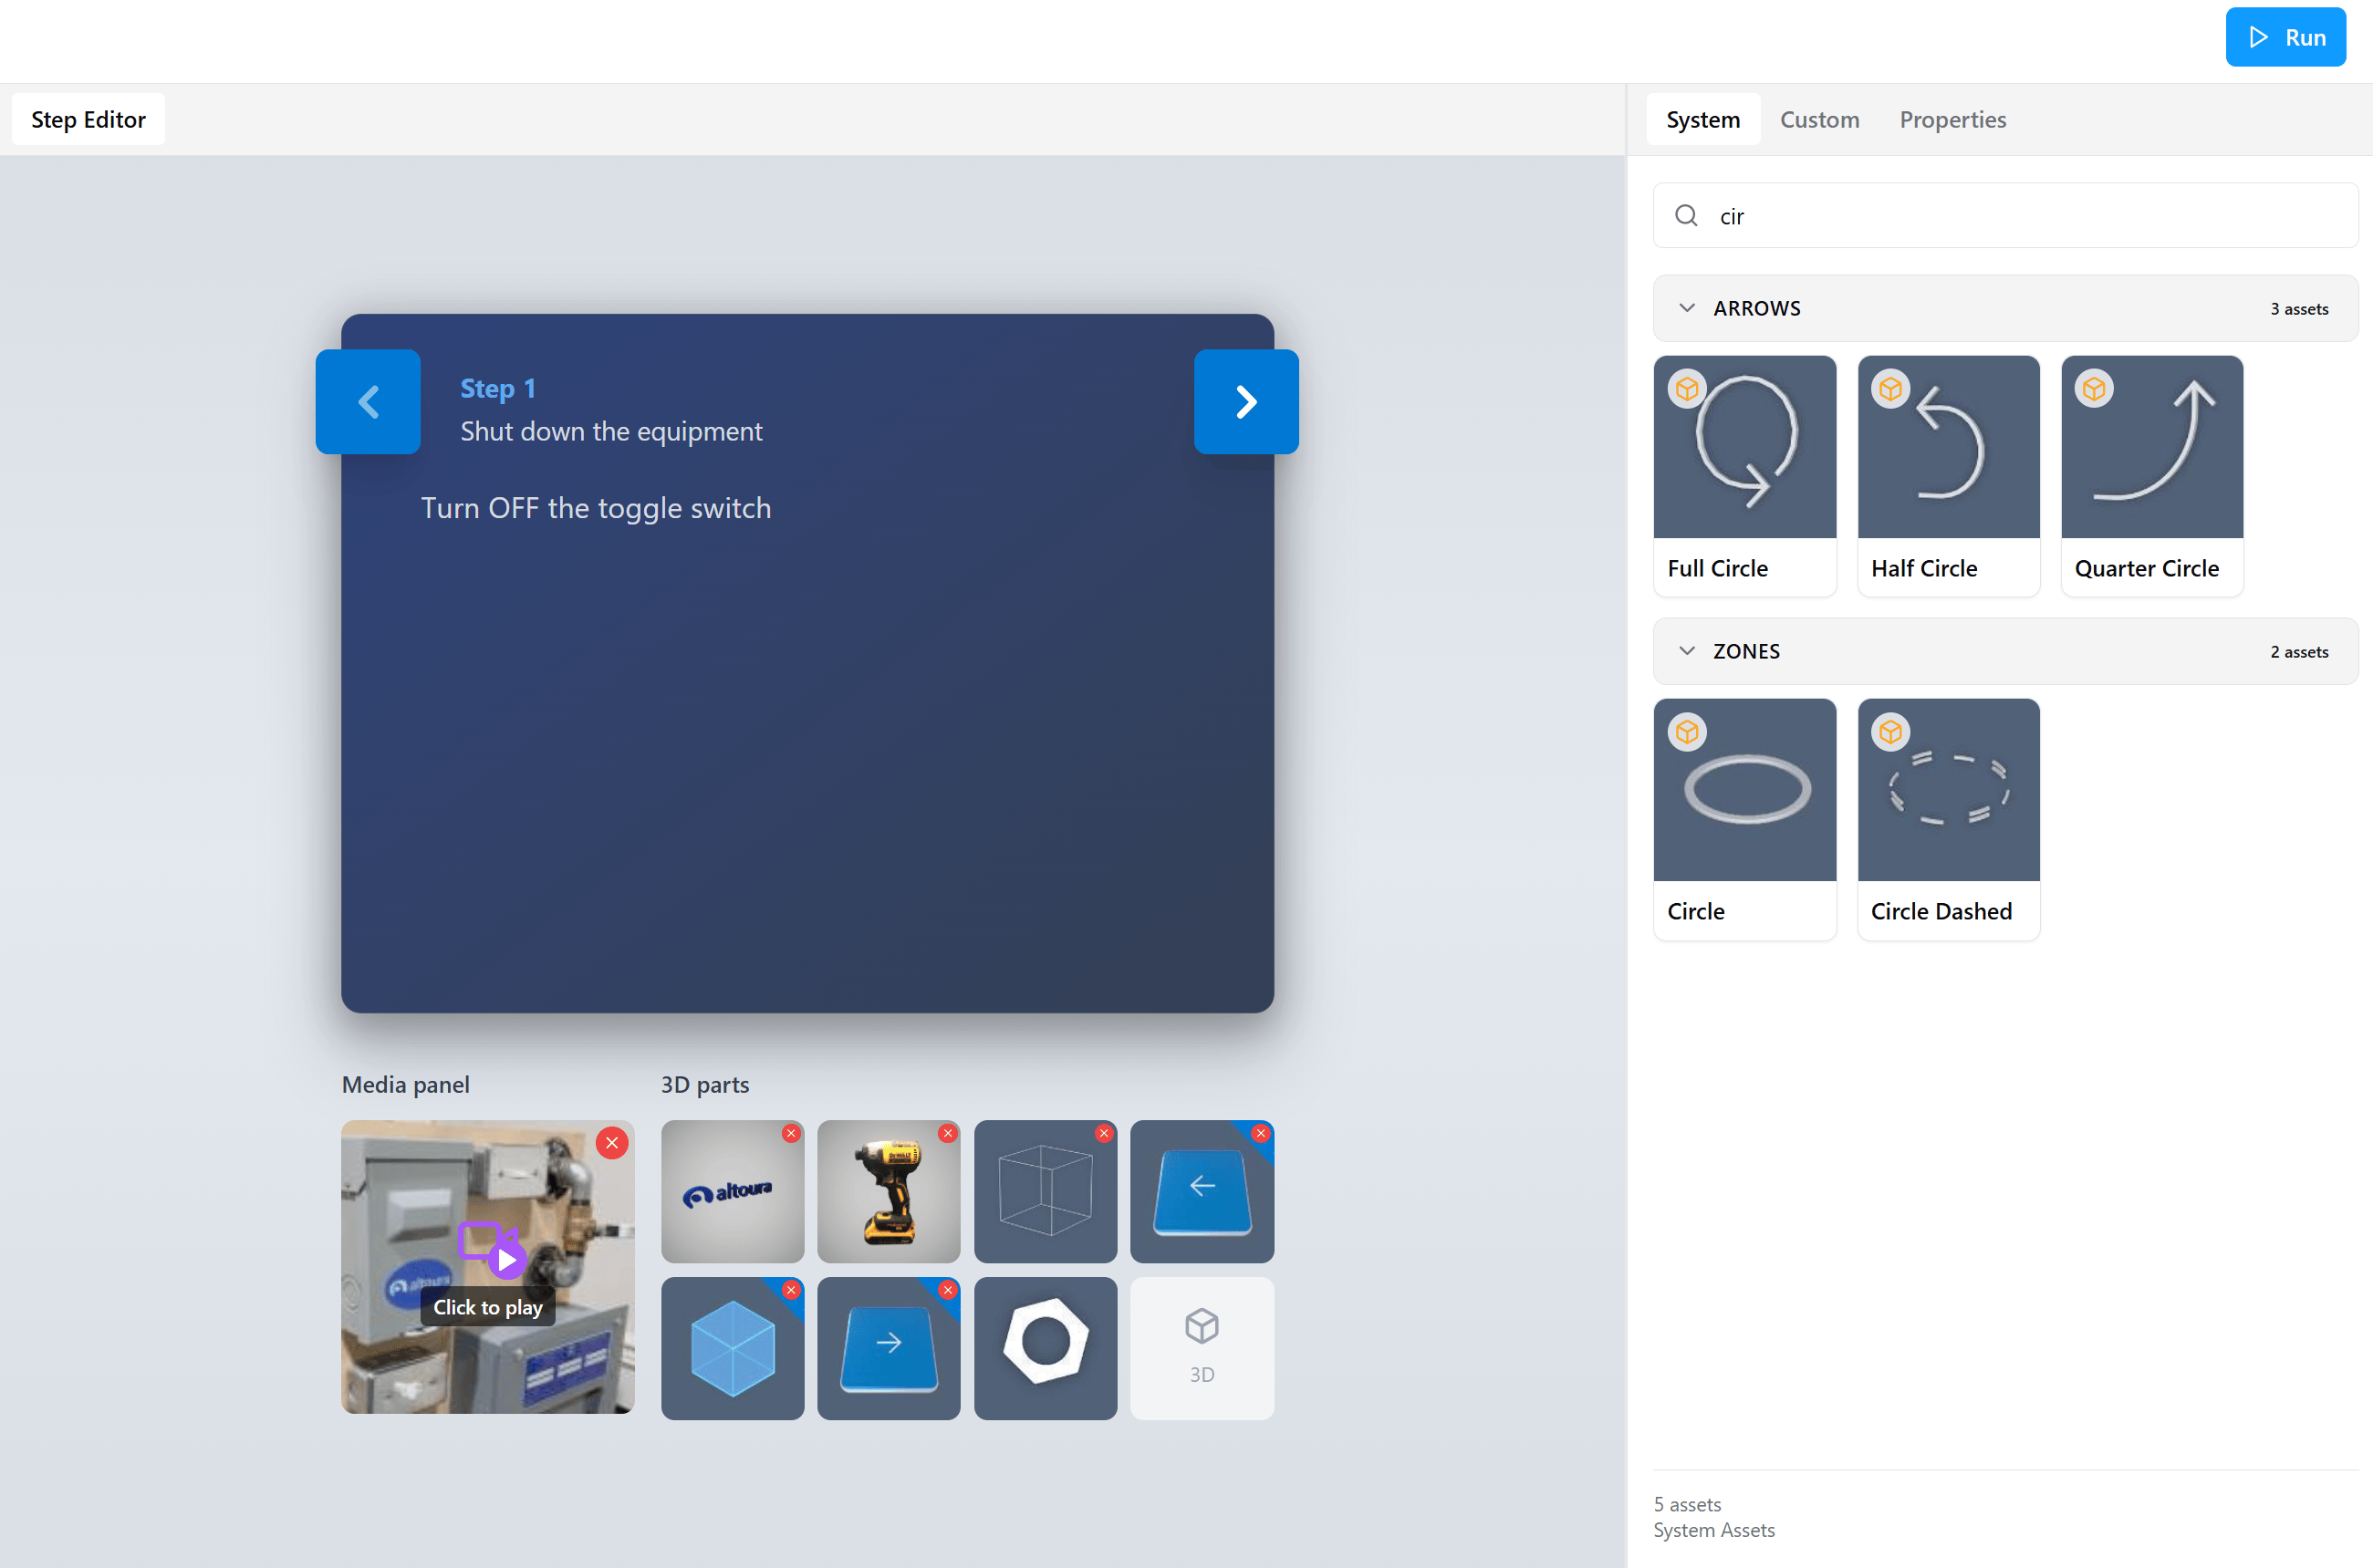
The **Custom** tab contains assets uploaded by your organization. It supports images, videos, and GLB (3D model) files, and is scoped to the **currently selected organization**. The total count and organization name are shown at the bottom of the tab (for example, *91 assets · Guides Procedures*).
Each thumbnail displays a small badge indicating the asset type:
* **Image**: picture icon
* **Video**: camera with play icon
* **3D model**: 3D cube icon
### Custom
The **Custom** tab contains assets uploaded by your organization. It supports images, videos, and GLB (3D model) files, and is scoped to the **currently selected organization**. The total count and organization name are shown at the bottom of the tab (for example, *91 assets · Guides Procedures*).
Each thumbnail displays a small badge indicating the asset type:
* **Image**: picture icon
* **Video**: camera with play icon
* **3D model**: 3D cube icon
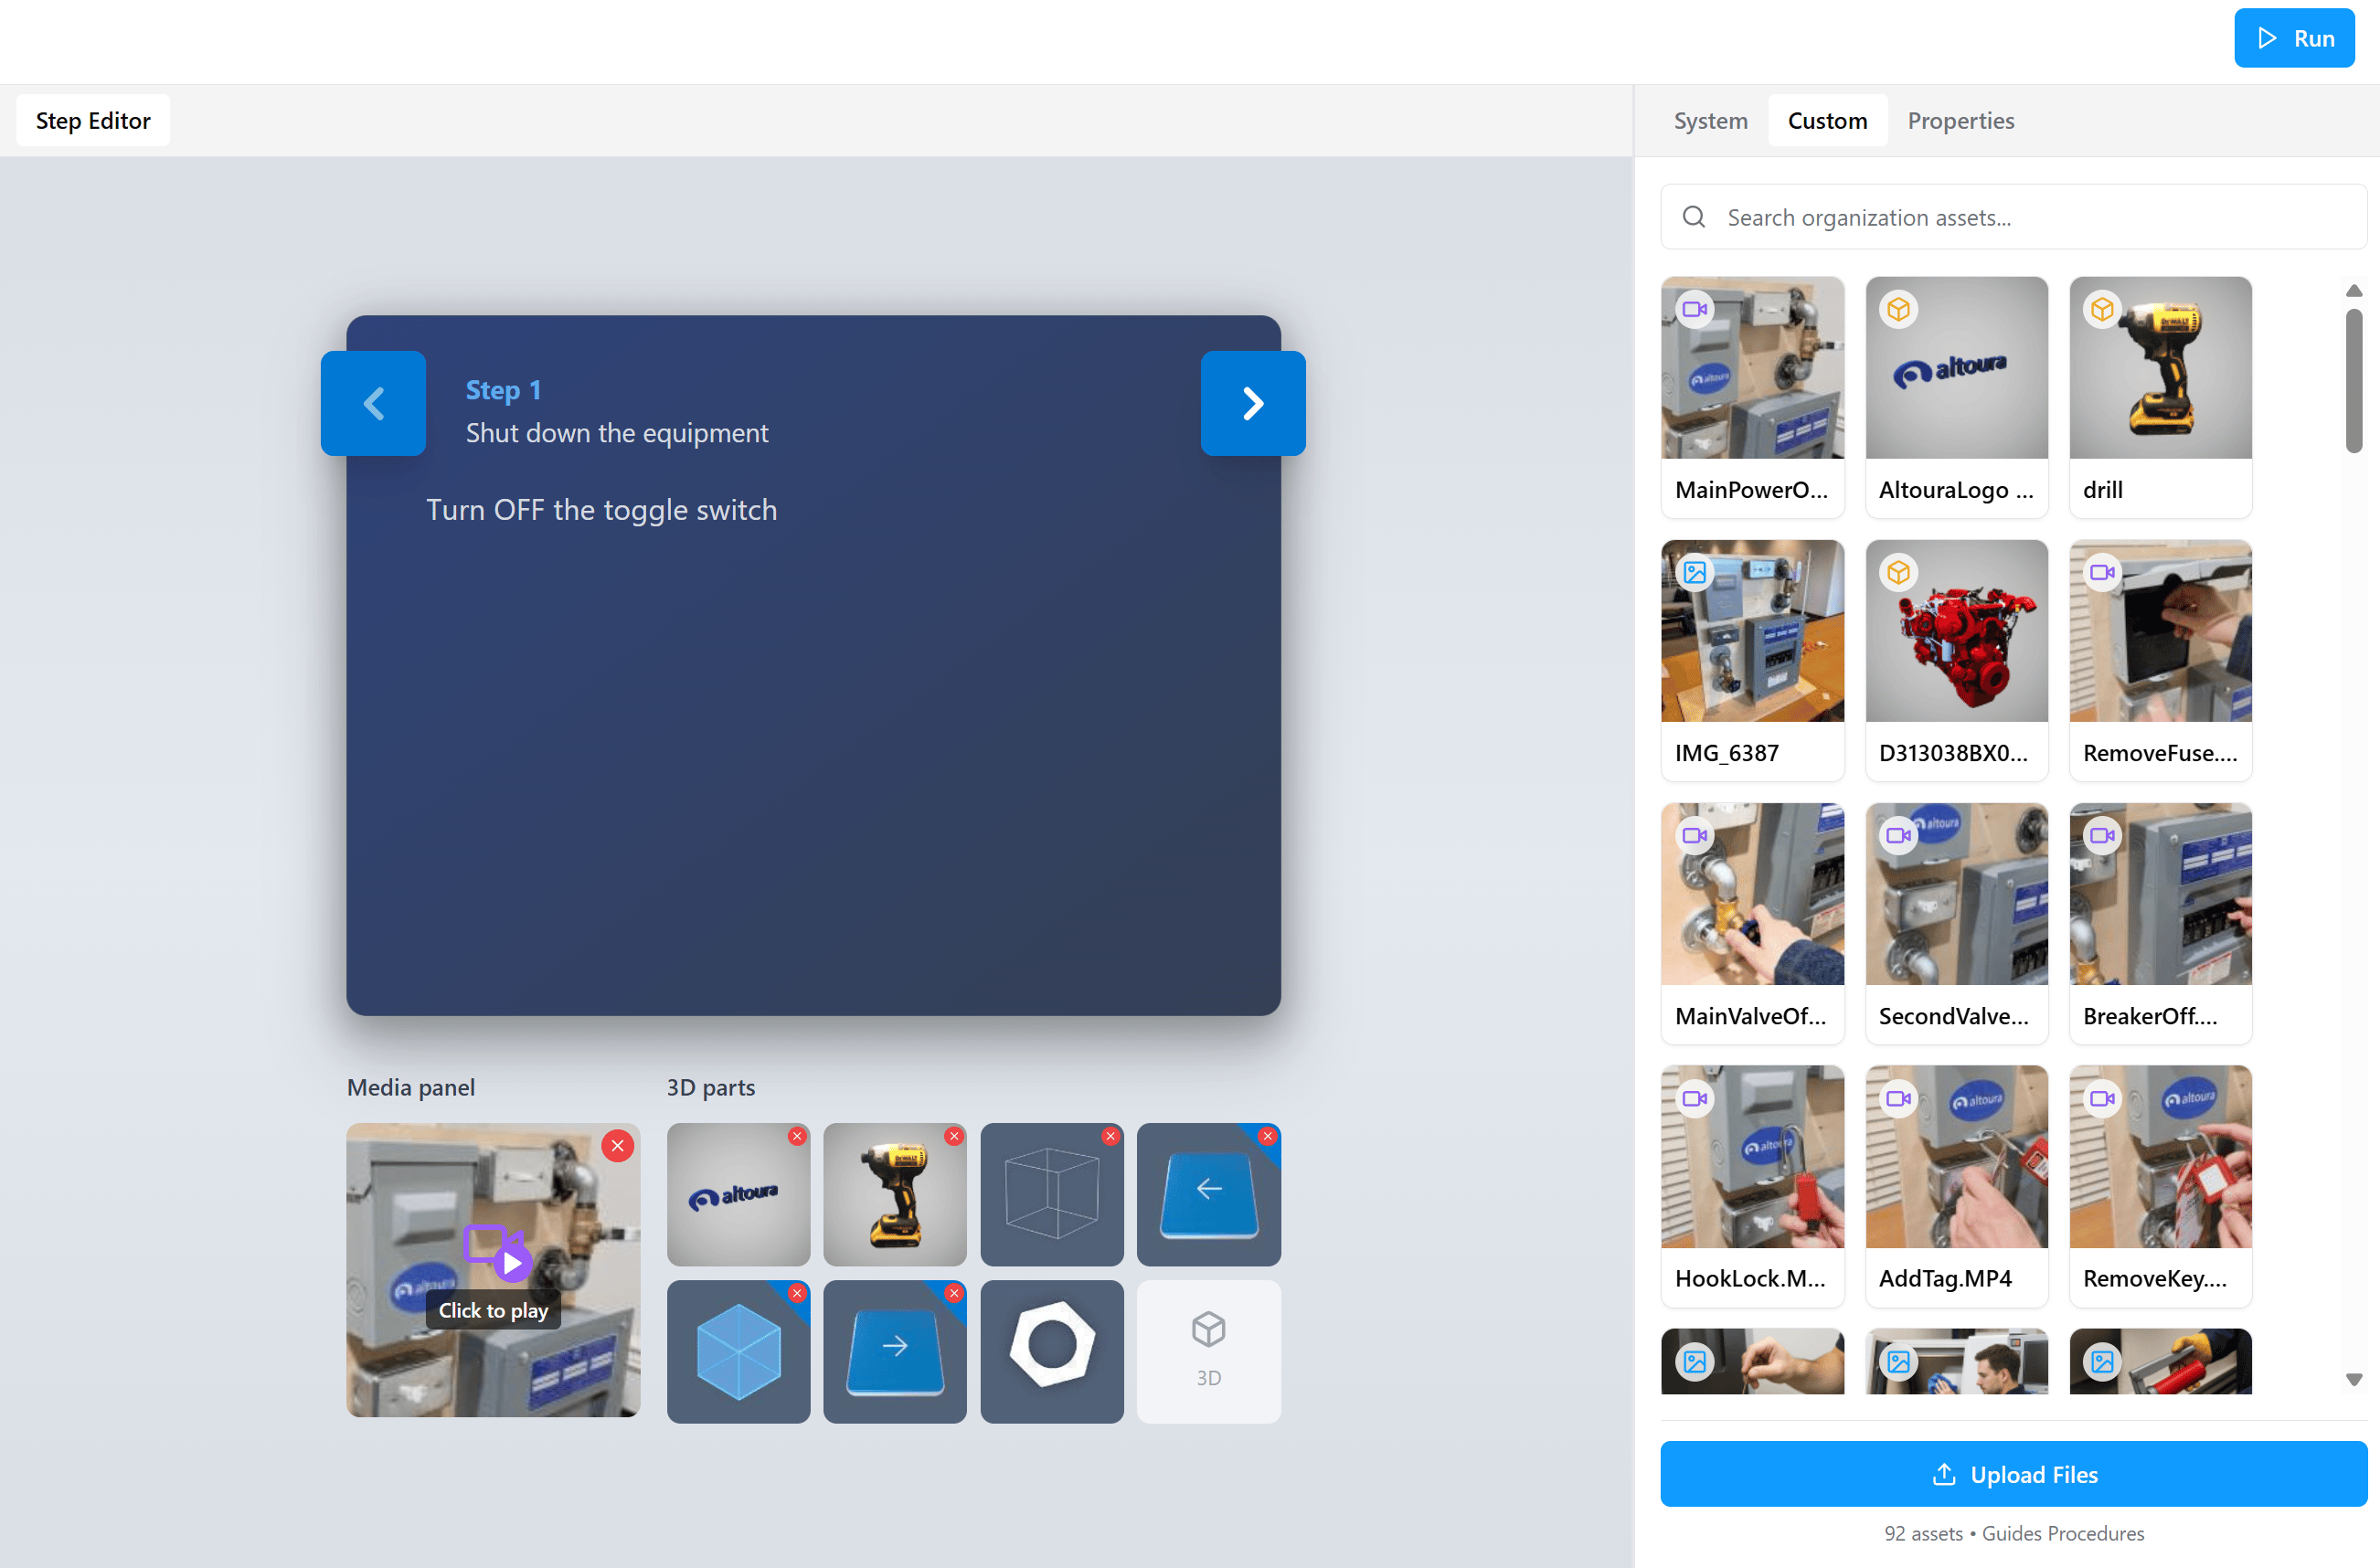 Use the search bar at the top to filter organization assets by name.
#### Upload Custom Assets
1. Open the **Custom** tab.
2. Select **Upload Files** at the bottom of the panel.
3. Your system **file browser** opens. Choose one or more **image**, **video**, or **GLB (3D model)** files from your device and confirm.
4. The upload begins immediately. In-progress uploads show a percentage indicator on the asset tile.
Use the search bar at the top to filter organization assets by name.
#### Upload Custom Assets
1. Open the **Custom** tab.
2. Select **Upload Files** at the bottom of the panel.
3. Your system **file browser** opens. Choose one or more **image**, **video**, or **GLB (3D model)** files from your device and confirm.
4. The upload begins immediately. In-progress uploads show a percentage indicator on the asset tile.
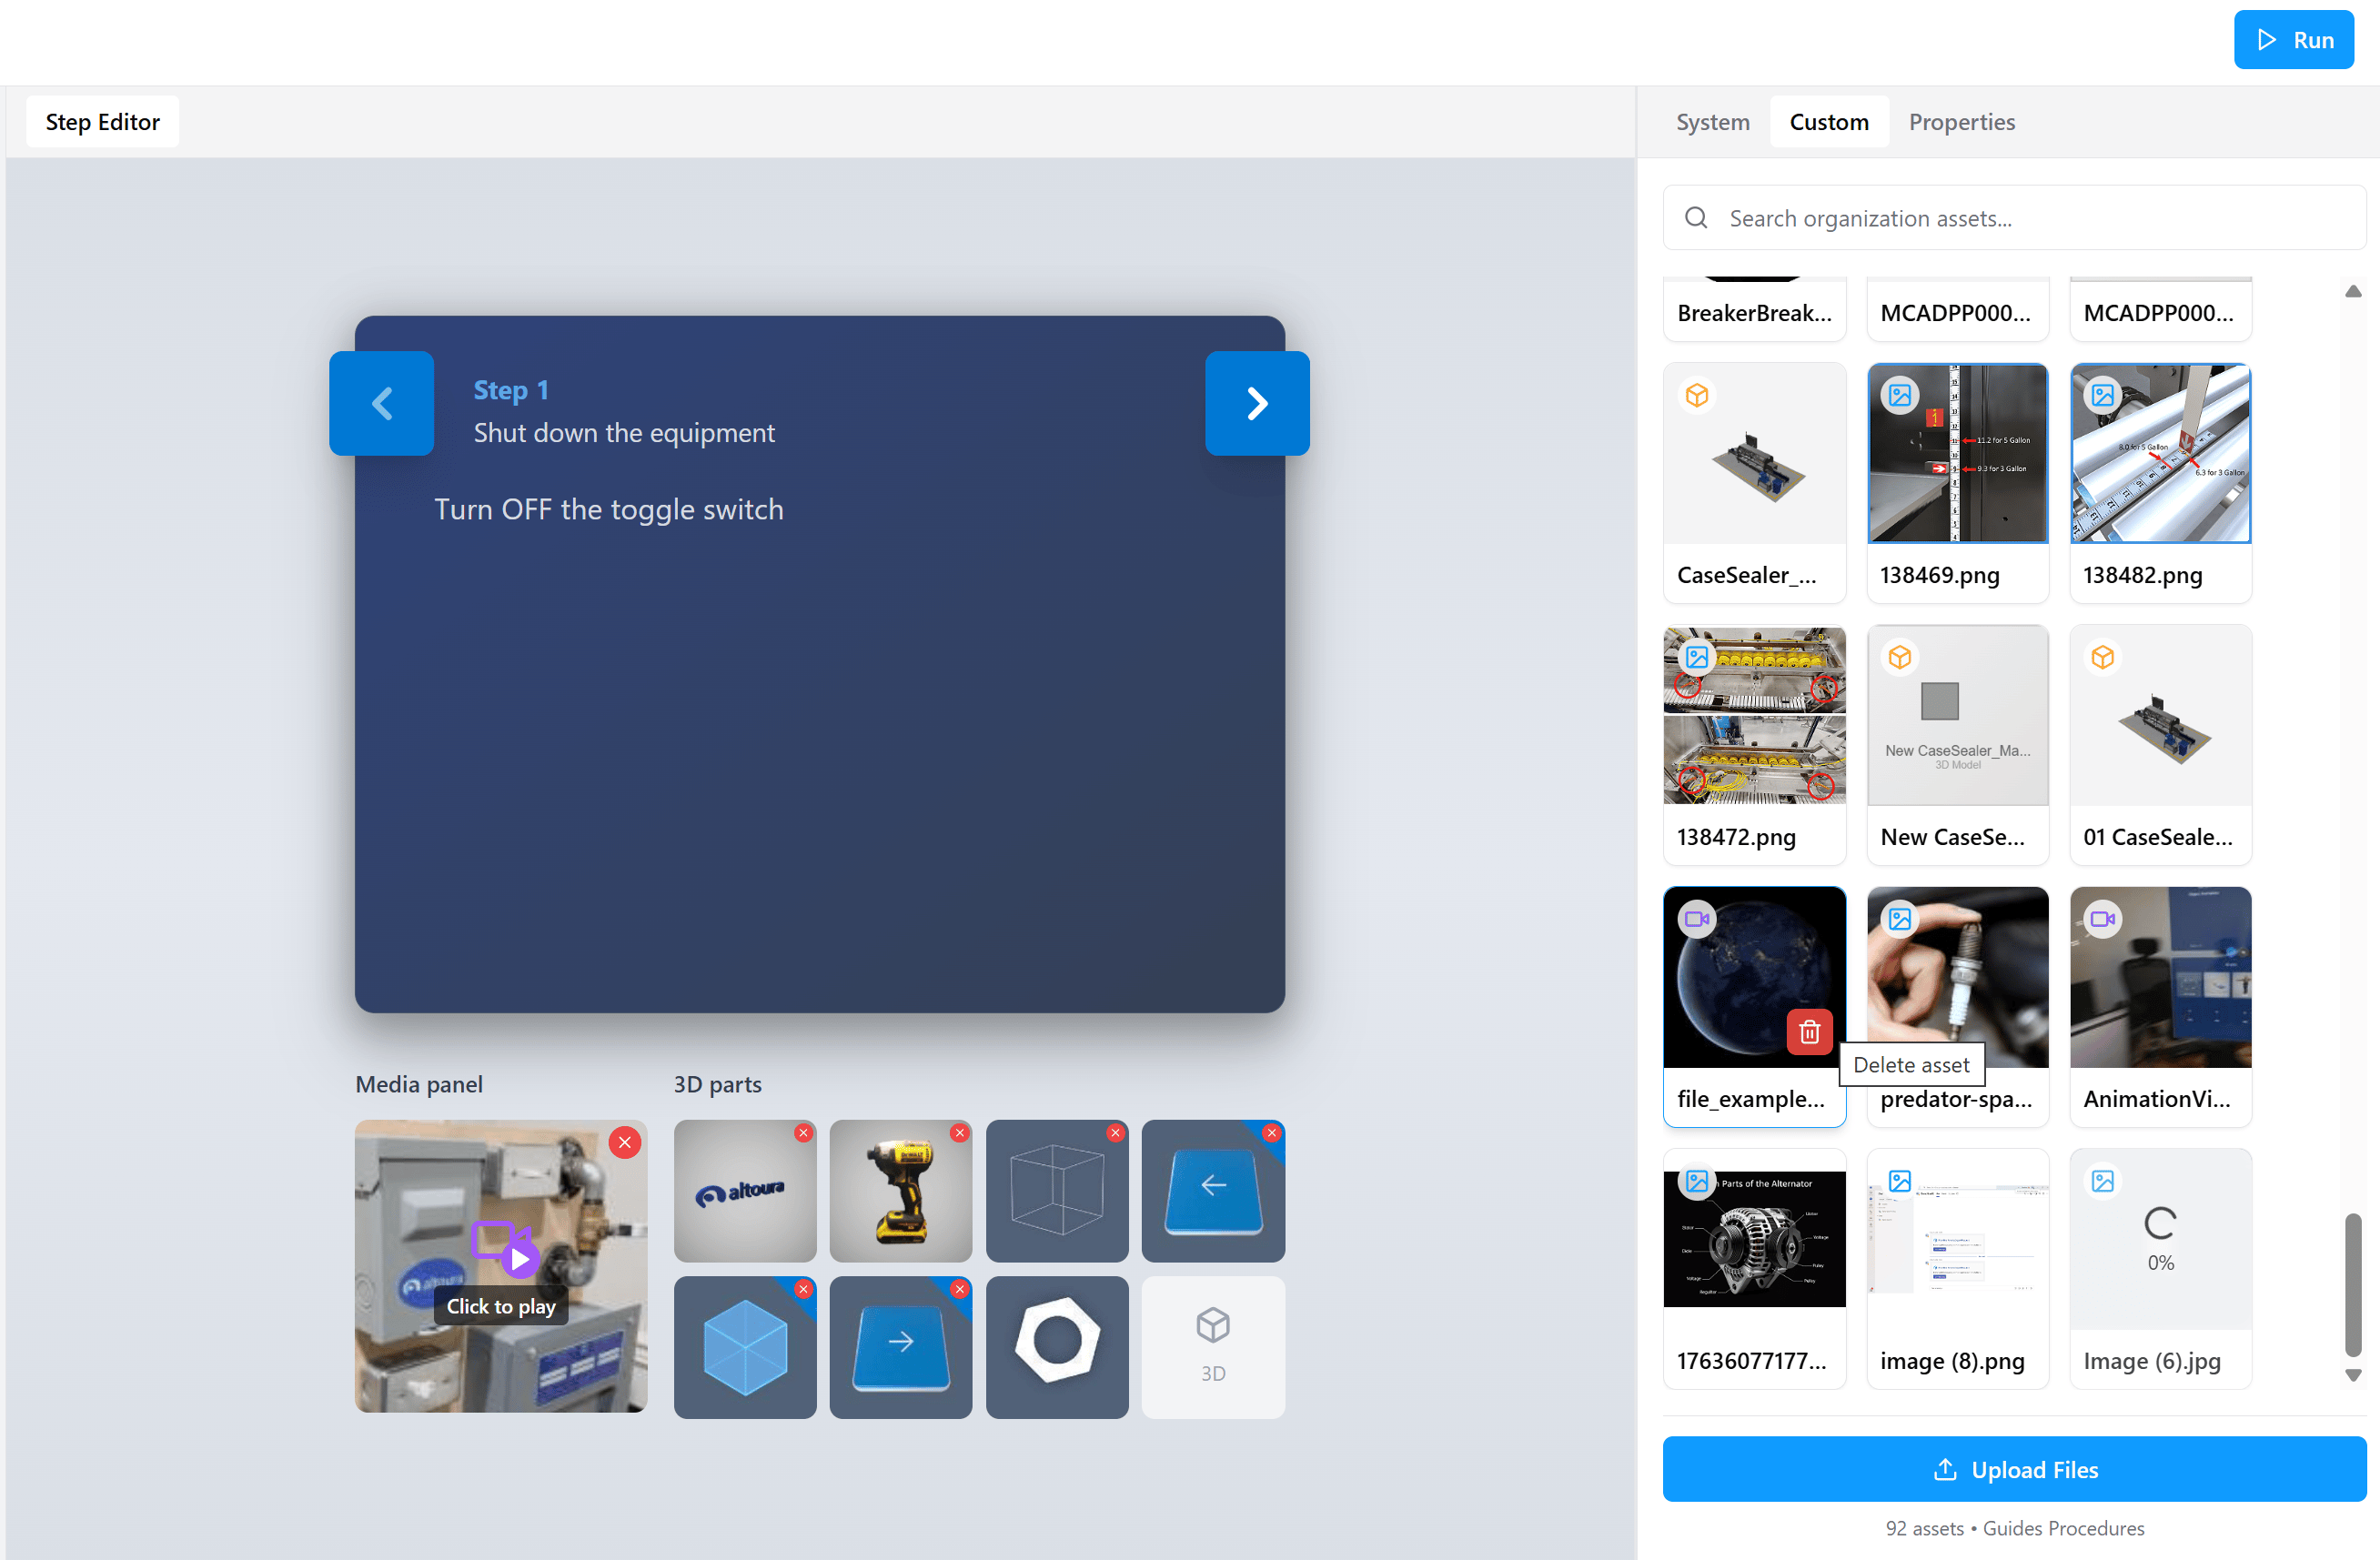 Once an upload completes, the asset appears in the Custom library and is immediately ready to use. Drag it into any step using the [drag-and-drop flow](#adding-assets-to-steps) described below. Uploaded assets remain available for reuse across all procedures within the same organization.
You cannot drag files directly from your computer (or file explorer) onto a step's Media panel or 3D parts area. Assets must first be uploaded here through **Upload Files** in the **Custom** tab. Once they appear in the Custom library, you can drag them from the Custom tab into any step.
### Properties
The **Properties** tab is **context-aware**: its contents change based on what is currently selected:
* When an **asset** is selected, Properties shows an **Asset Preview** that lets you inspect the asset before or after adding it to a step.
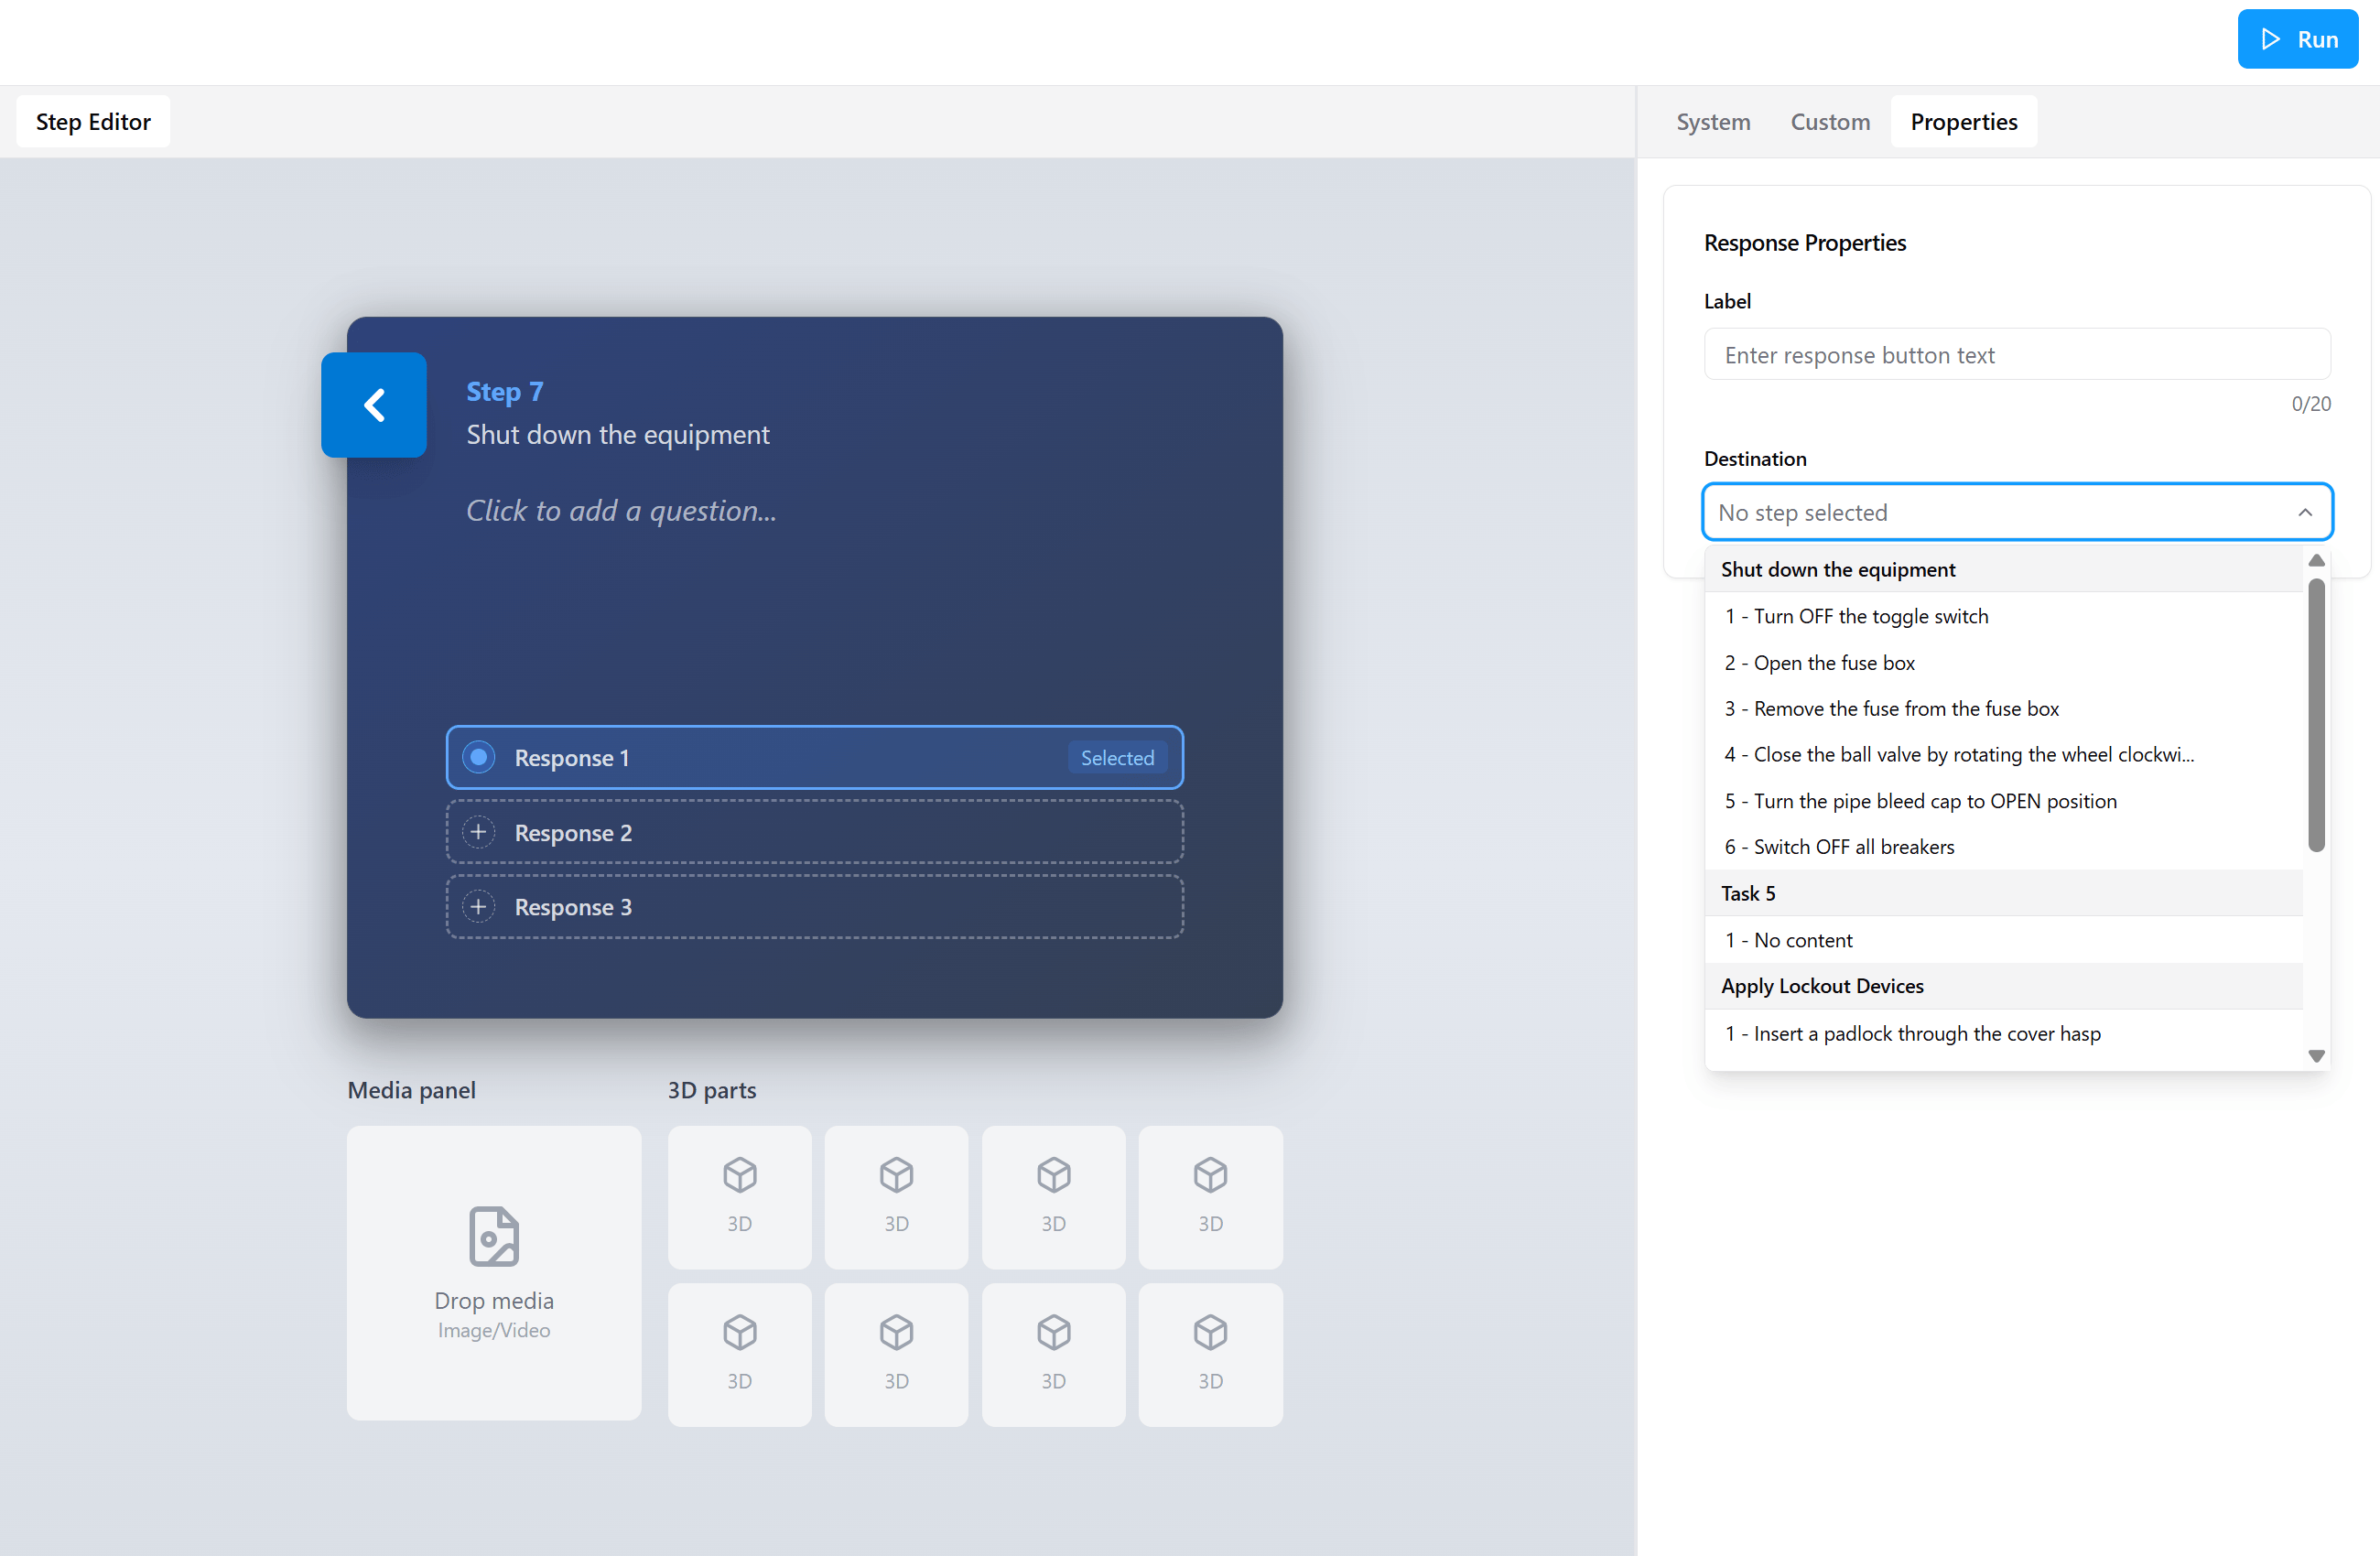
* When a **Question Step response** is selected, Properties shows **Response Properties** (Label and Destination) used to configure routing.
#### Asset Preview
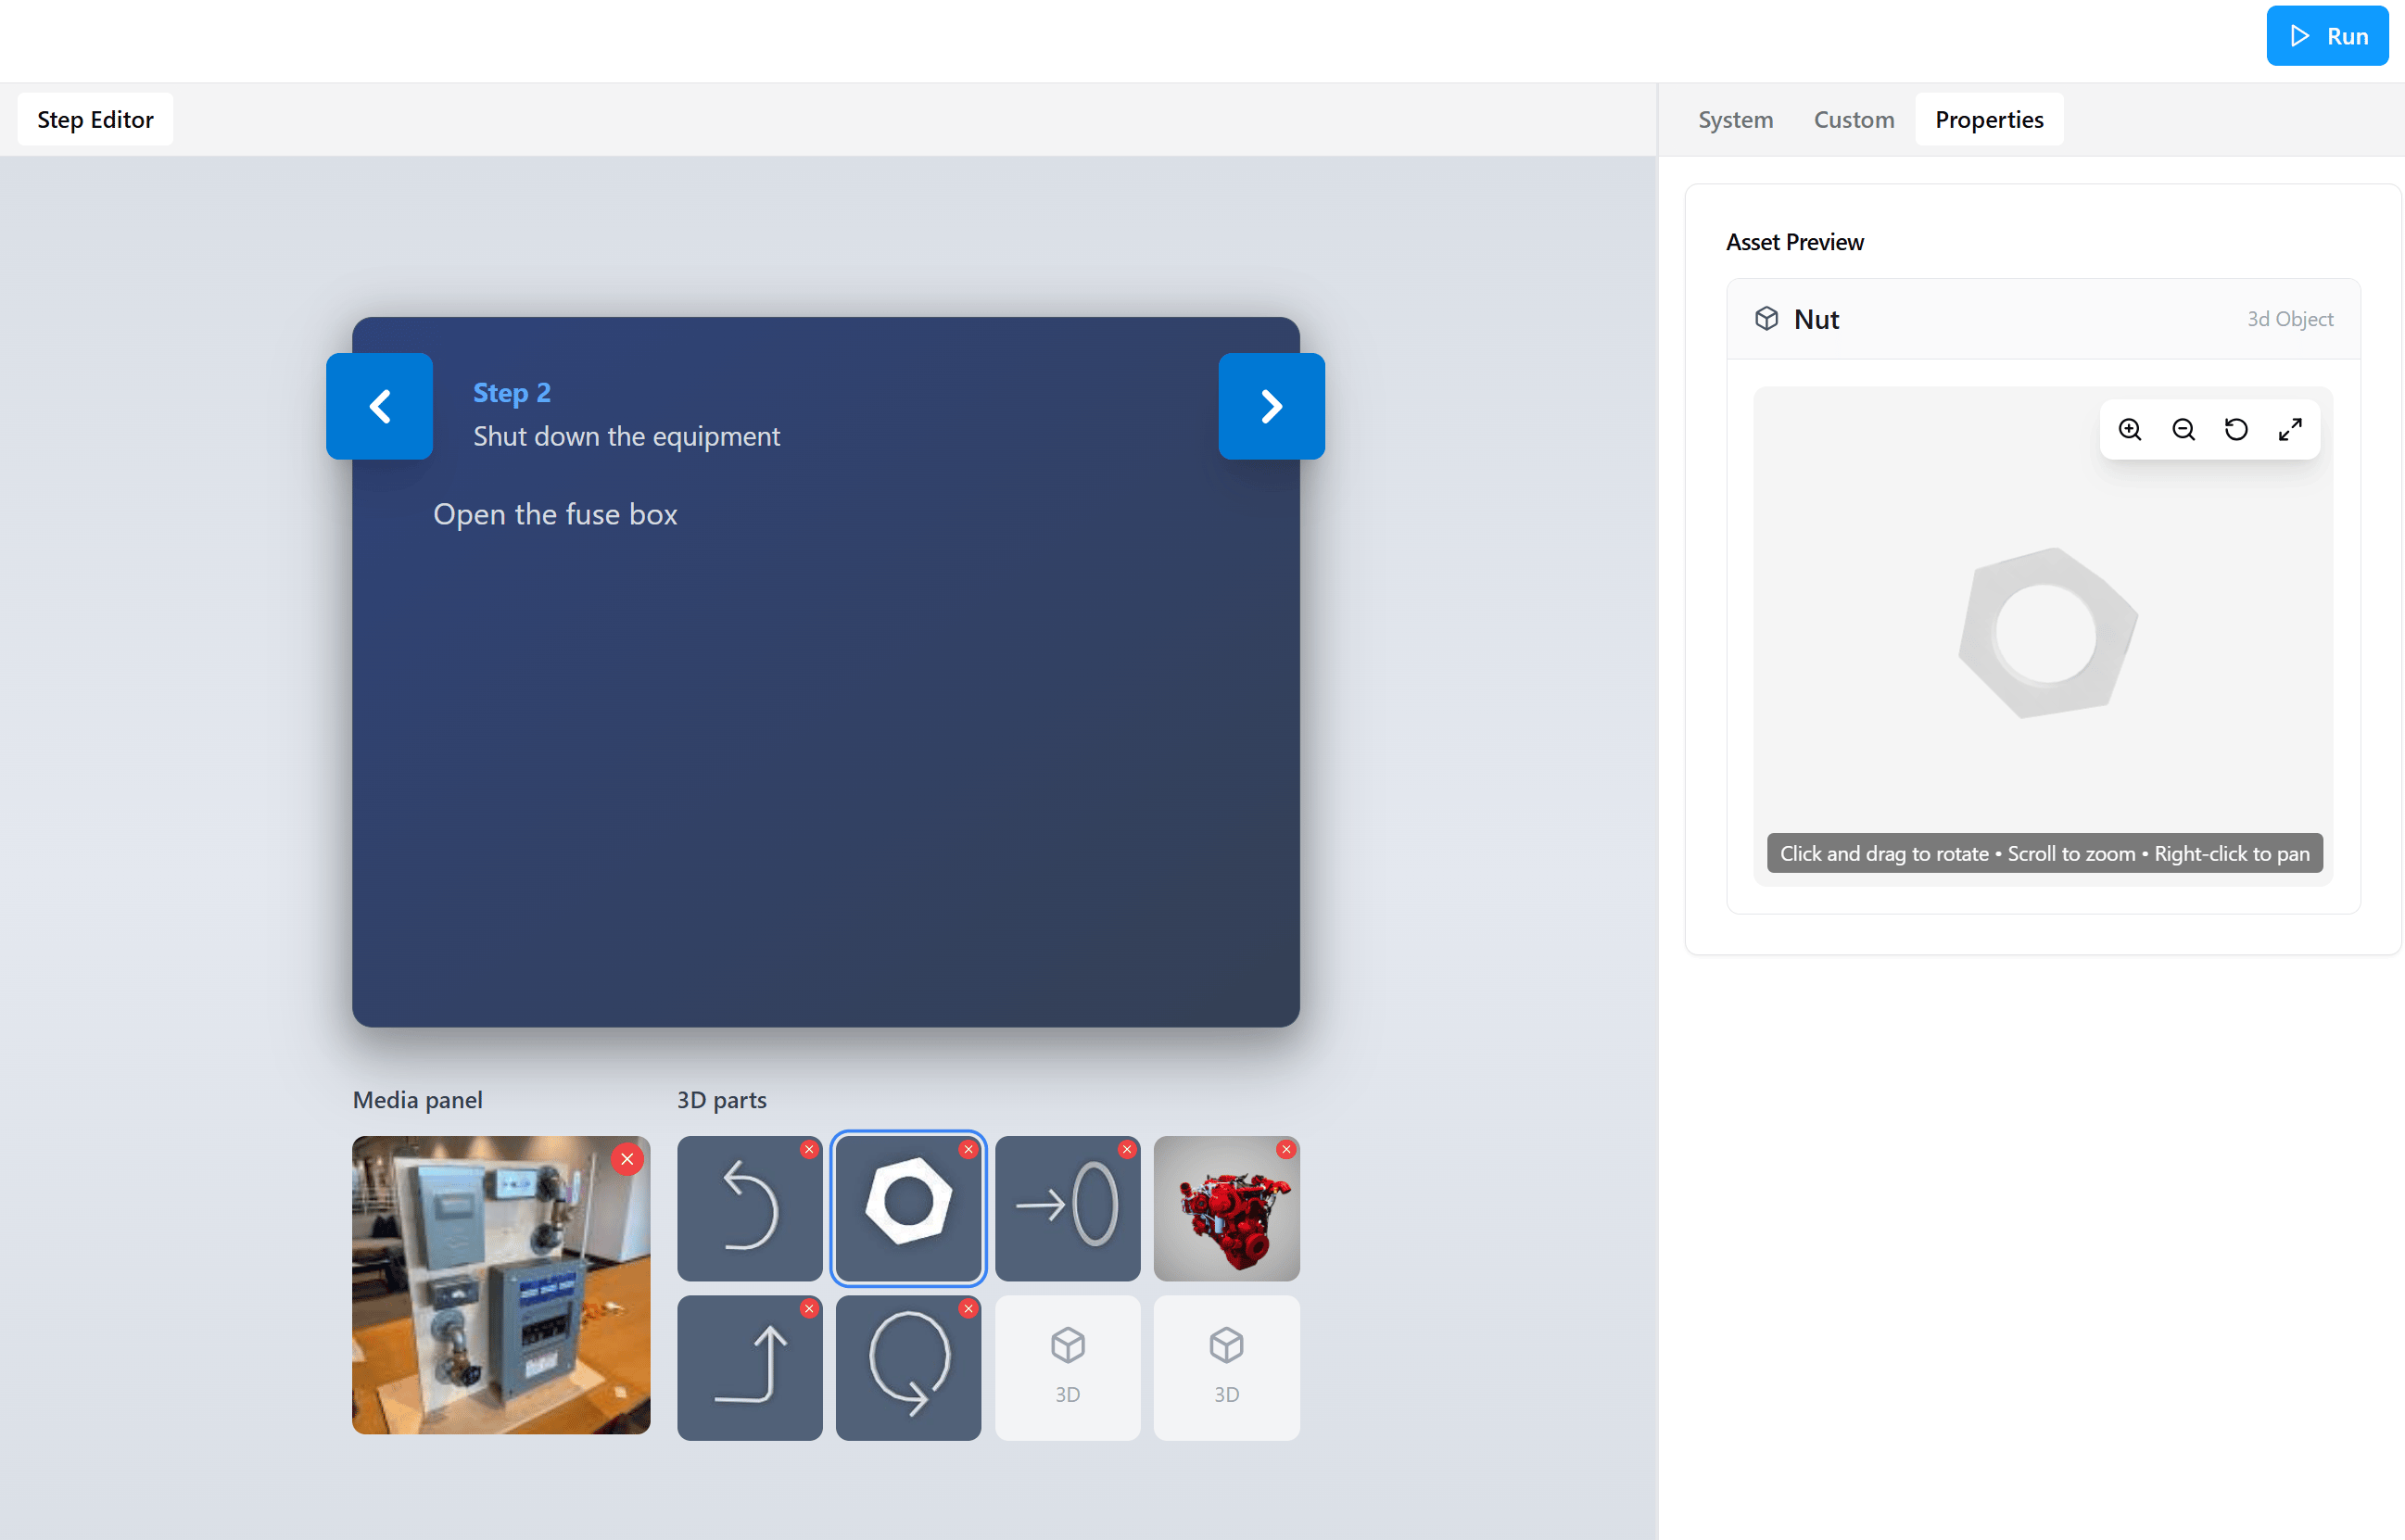
For **3D models**, the preview supports interactive rotation, zoom, reset, and fullscreen controls, useful for confirming model orientation and detail before placing it in a step. The on-screen hint reads *Click and drag to rotate · Scroll to zoom · Right-click to pan*.
Once an upload completes, the asset appears in the Custom library and is immediately ready to use. Drag it into any step using the [drag-and-drop flow](#adding-assets-to-steps) described below. Uploaded assets remain available for reuse across all procedures within the same organization.
You cannot drag files directly from your computer (or file explorer) onto a step's Media panel or 3D parts area. Assets must first be uploaded here through **Upload Files** in the **Custom** tab. Once they appear in the Custom library, you can drag them from the Custom tab into any step.
### Properties
The **Properties** tab is **context-aware**: its contents change based on what is currently selected:
* When an **asset** is selected, Properties shows an **Asset Preview** that lets you inspect the asset before or after adding it to a step.
* When a **Question Step response** is selected, Properties shows **Response Properties** (Label and Destination) used to configure routing.
#### Asset Preview
For **3D models**, the preview supports interactive rotation, zoom, reset, and fullscreen controls, useful for confirming model orientation and detail before placing it in a step. The on-screen hint reads *Click and drag to rotate · Scroll to zoom · Right-click to pan*.
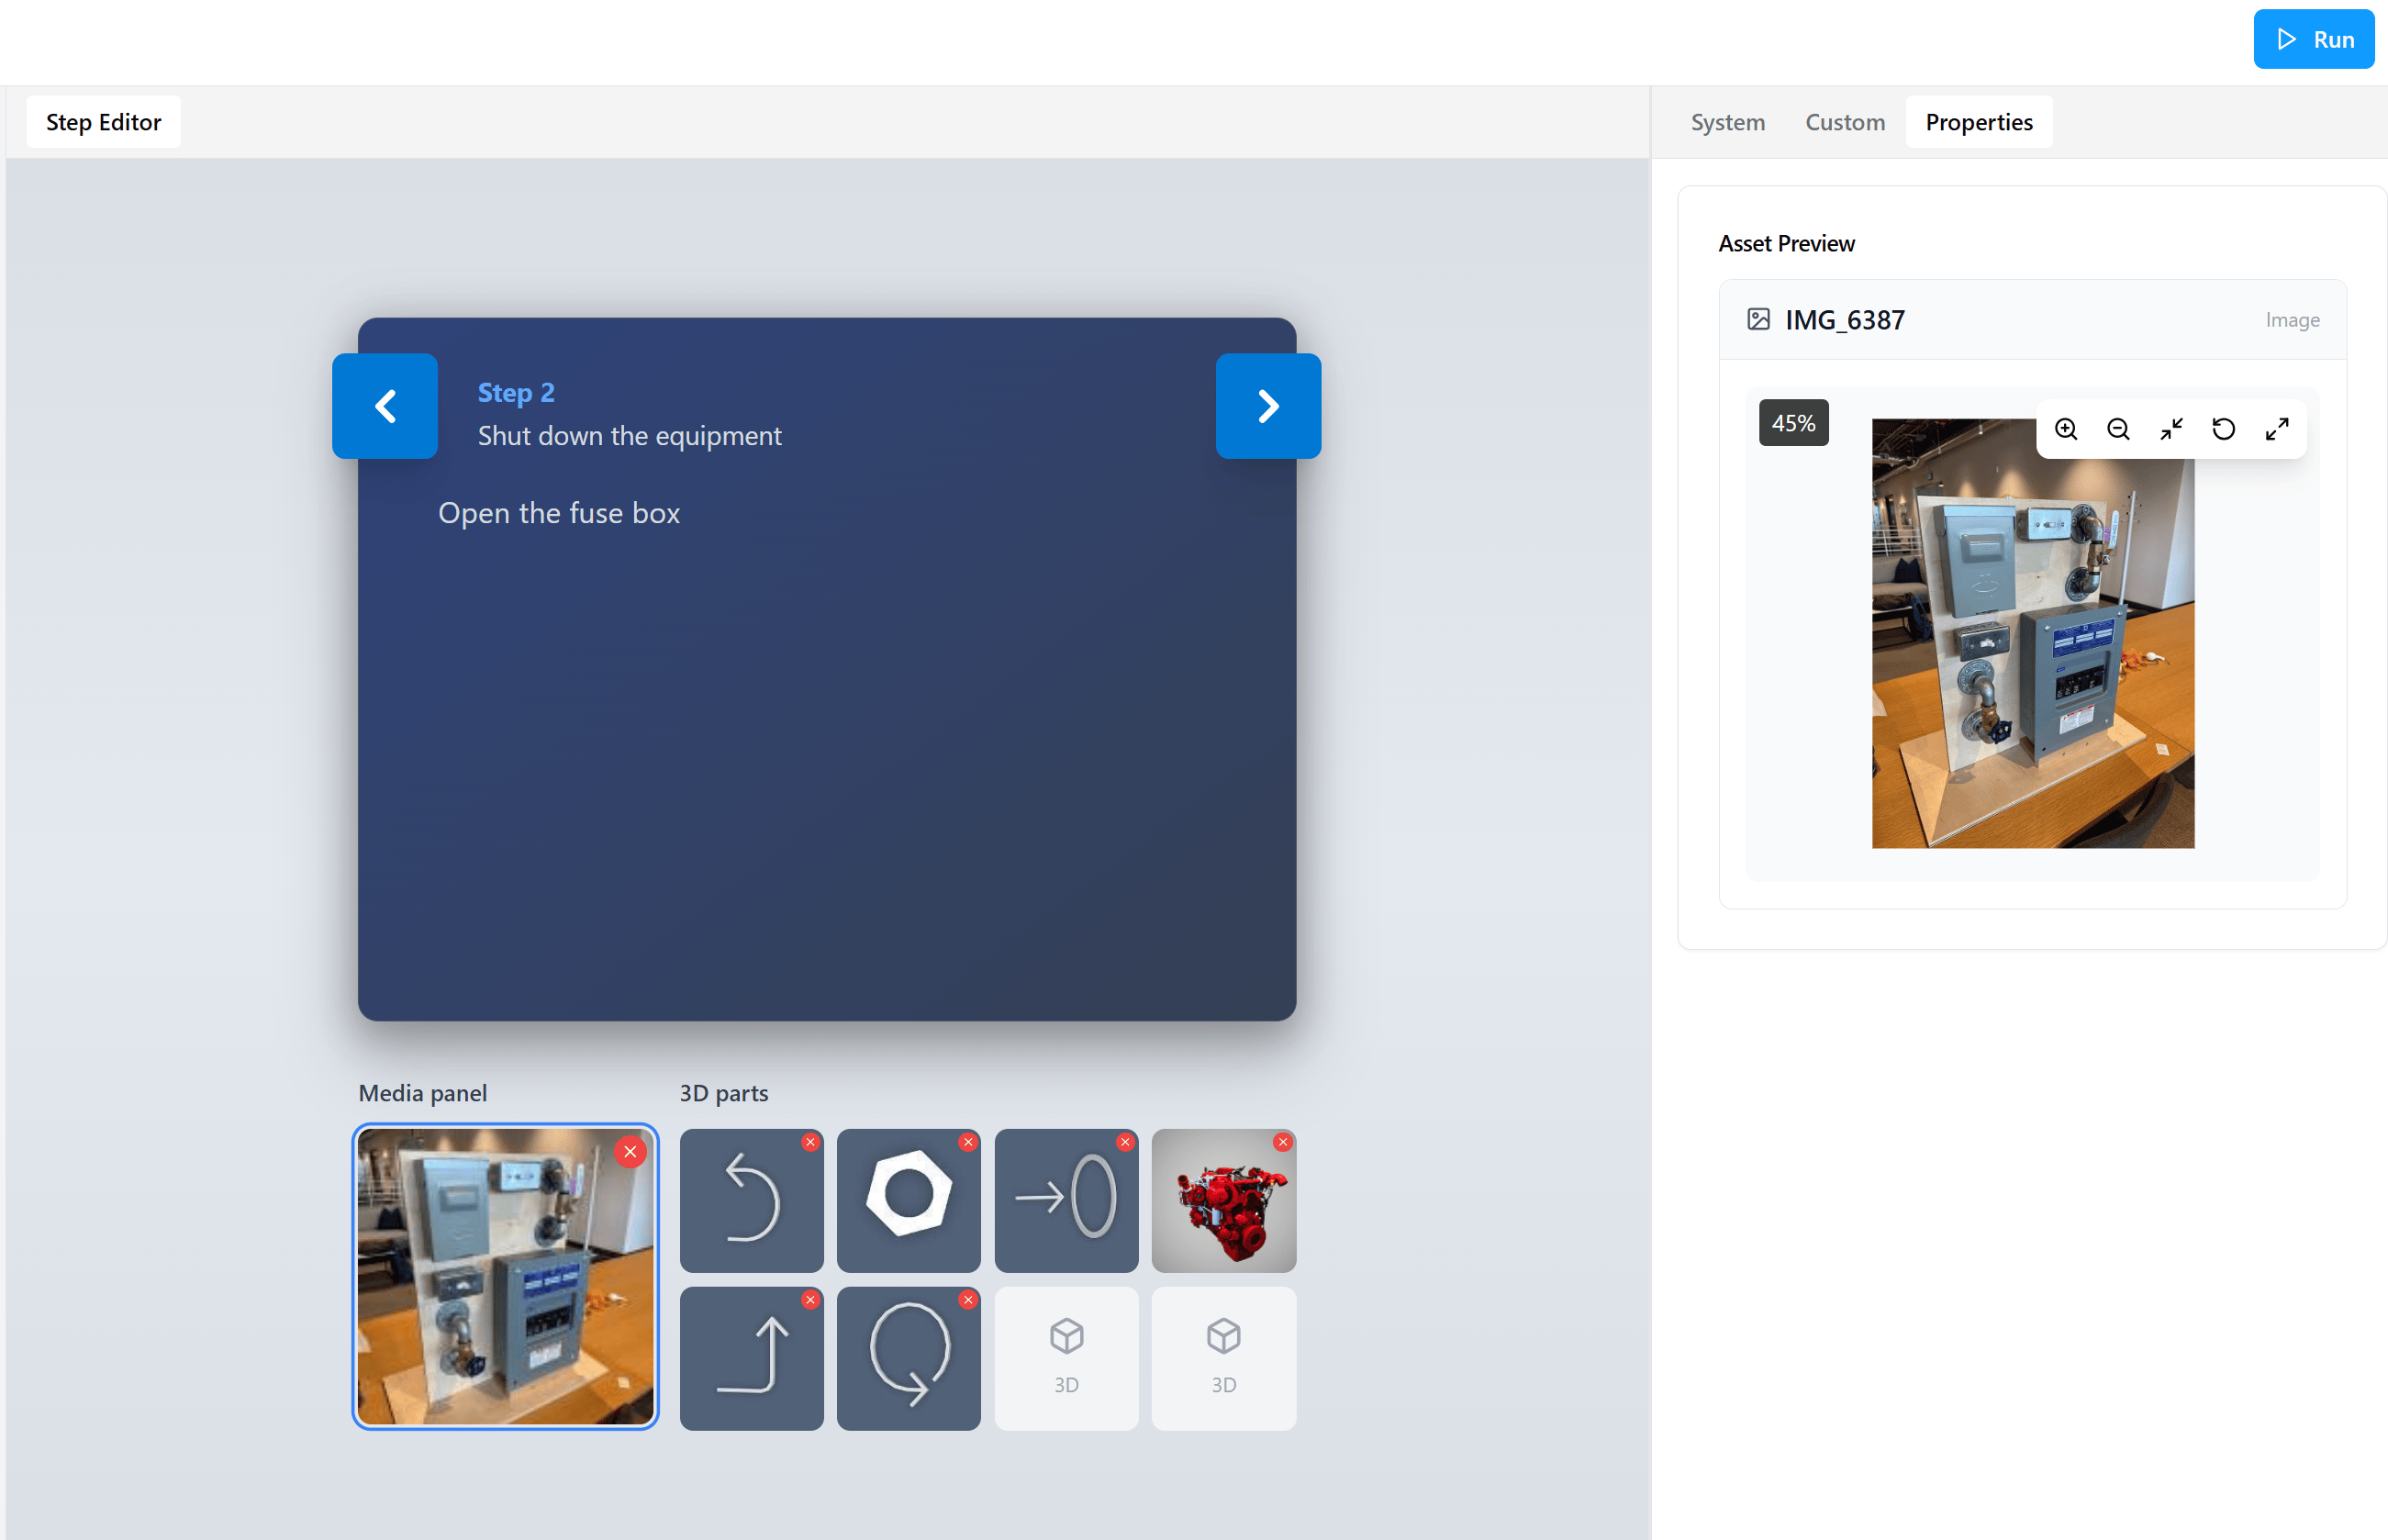
 For **images**, the preview displays the visual along with a zoom percentage so you can verify clarity at different scales.
 #### Response Properties (Question Steps)
When a Question Step response is selected, the same Properties tab switches to the **Response Properties** view for configuring the response **Label** and **Destination** step. See [Configure Question Steps](/frontline/procedures-portal/authoring#configure-question-steps) for full details.
#### Response Properties (Question Steps)
When a Question Step response is selected, the same Properties tab switches to the **Response Properties** view for configuring the response **Label** and **Destination** step. See [Configure Question Steps](/frontline/procedures-portal/authoring#configure-question-steps) for full details.
 ***
## Adding Assets to Steps
Assets are added using **drag and drop**.
### Step-by-Step Instructions
1. Select the step you want to enrich in the **Procedure Tasks** panel.
2. Drag an asset from the **System** or **Custom** tab.
3. Drop it into the step's **Media panel** (for images and videos) or **3D parts** area (for GLB models).
The Media panel and 3D parts area appear at the bottom of the Step Editor. When a step has no media attached yet, the Media panel shows a **Drop media (Image/Video)** placeholder indicating the drop target.
### What Happens Next
* The asset becomes part of the procedure step.
* The same asset can be reused in multiple steps.
* Removing it from one step does not delete it from the system.
***
## Reusing and Removing Assets
### Reuse Assets
* Drag the same asset into any number of steps.
* No re-upload is required. Assets are referenced from the Custom or System library.
### Remove Assets from a Step
1. Select the asset inside the step's **Media panel** or **3D parts** area.
2. Click the **Remove** (red X) icon in the top-right corner of the asset tile.
This only removes the asset from that step. It remains available in the Assets panel for use in other steps.
***
## Adding Assets to Steps
Assets are added using **drag and drop**.
### Step-by-Step Instructions
1. Select the step you want to enrich in the **Procedure Tasks** panel.
2. Drag an asset from the **System** or **Custom** tab.
3. Drop it into the step's **Media panel** (for images and videos) or **3D parts** area (for GLB models).
The Media panel and 3D parts area appear at the bottom of the Step Editor. When a step has no media attached yet, the Media panel shows a **Drop media (Image/Video)** placeholder indicating the drop target.
### What Happens Next
* The asset becomes part of the procedure step.
* The same asset can be reused in multiple steps.
* Removing it from one step does not delete it from the system.
***
## Reusing and Removing Assets
### Reuse Assets
* Drag the same asset into any number of steps.
* No re-upload is required. Assets are referenced from the Custom or System library.
### Remove Assets from a Step
1. Select the asset inside the step's **Media panel** or **3D parts** area.
2. Click the **Remove** (red X) icon in the top-right corner of the asset tile.
This only removes the asset from that step. It remains available in the Assets panel for use in other steps.