> ## Documentation Index
> Fetch the complete documentation index at: https://docs.altoura.com/llms.txt
> Use this file to discover all available pages before exploring further.
# Authoring Procedures
> Build and maintain procedures in Edit Mode: structure tasks, define steps, add decision logic, and enrich content.
## Overview
Authoring is the process of building and maintaining procedures in Altoura Frontline.
In Authoring mode, you structure tasks, define steps, add decision logic, and enrich steps with media and 3D content.
All authoring is done in **Edit Mode**, which auto-saves your changes as you work.
***
## Entering Edit Mode
### Step-by-Step Instructions
1. Open the **Procedures** page.
2. Locate the procedure you want to work on.
3. Hover over the procedure card and select the **Edit** (pencil) icon.
### What Happens Next
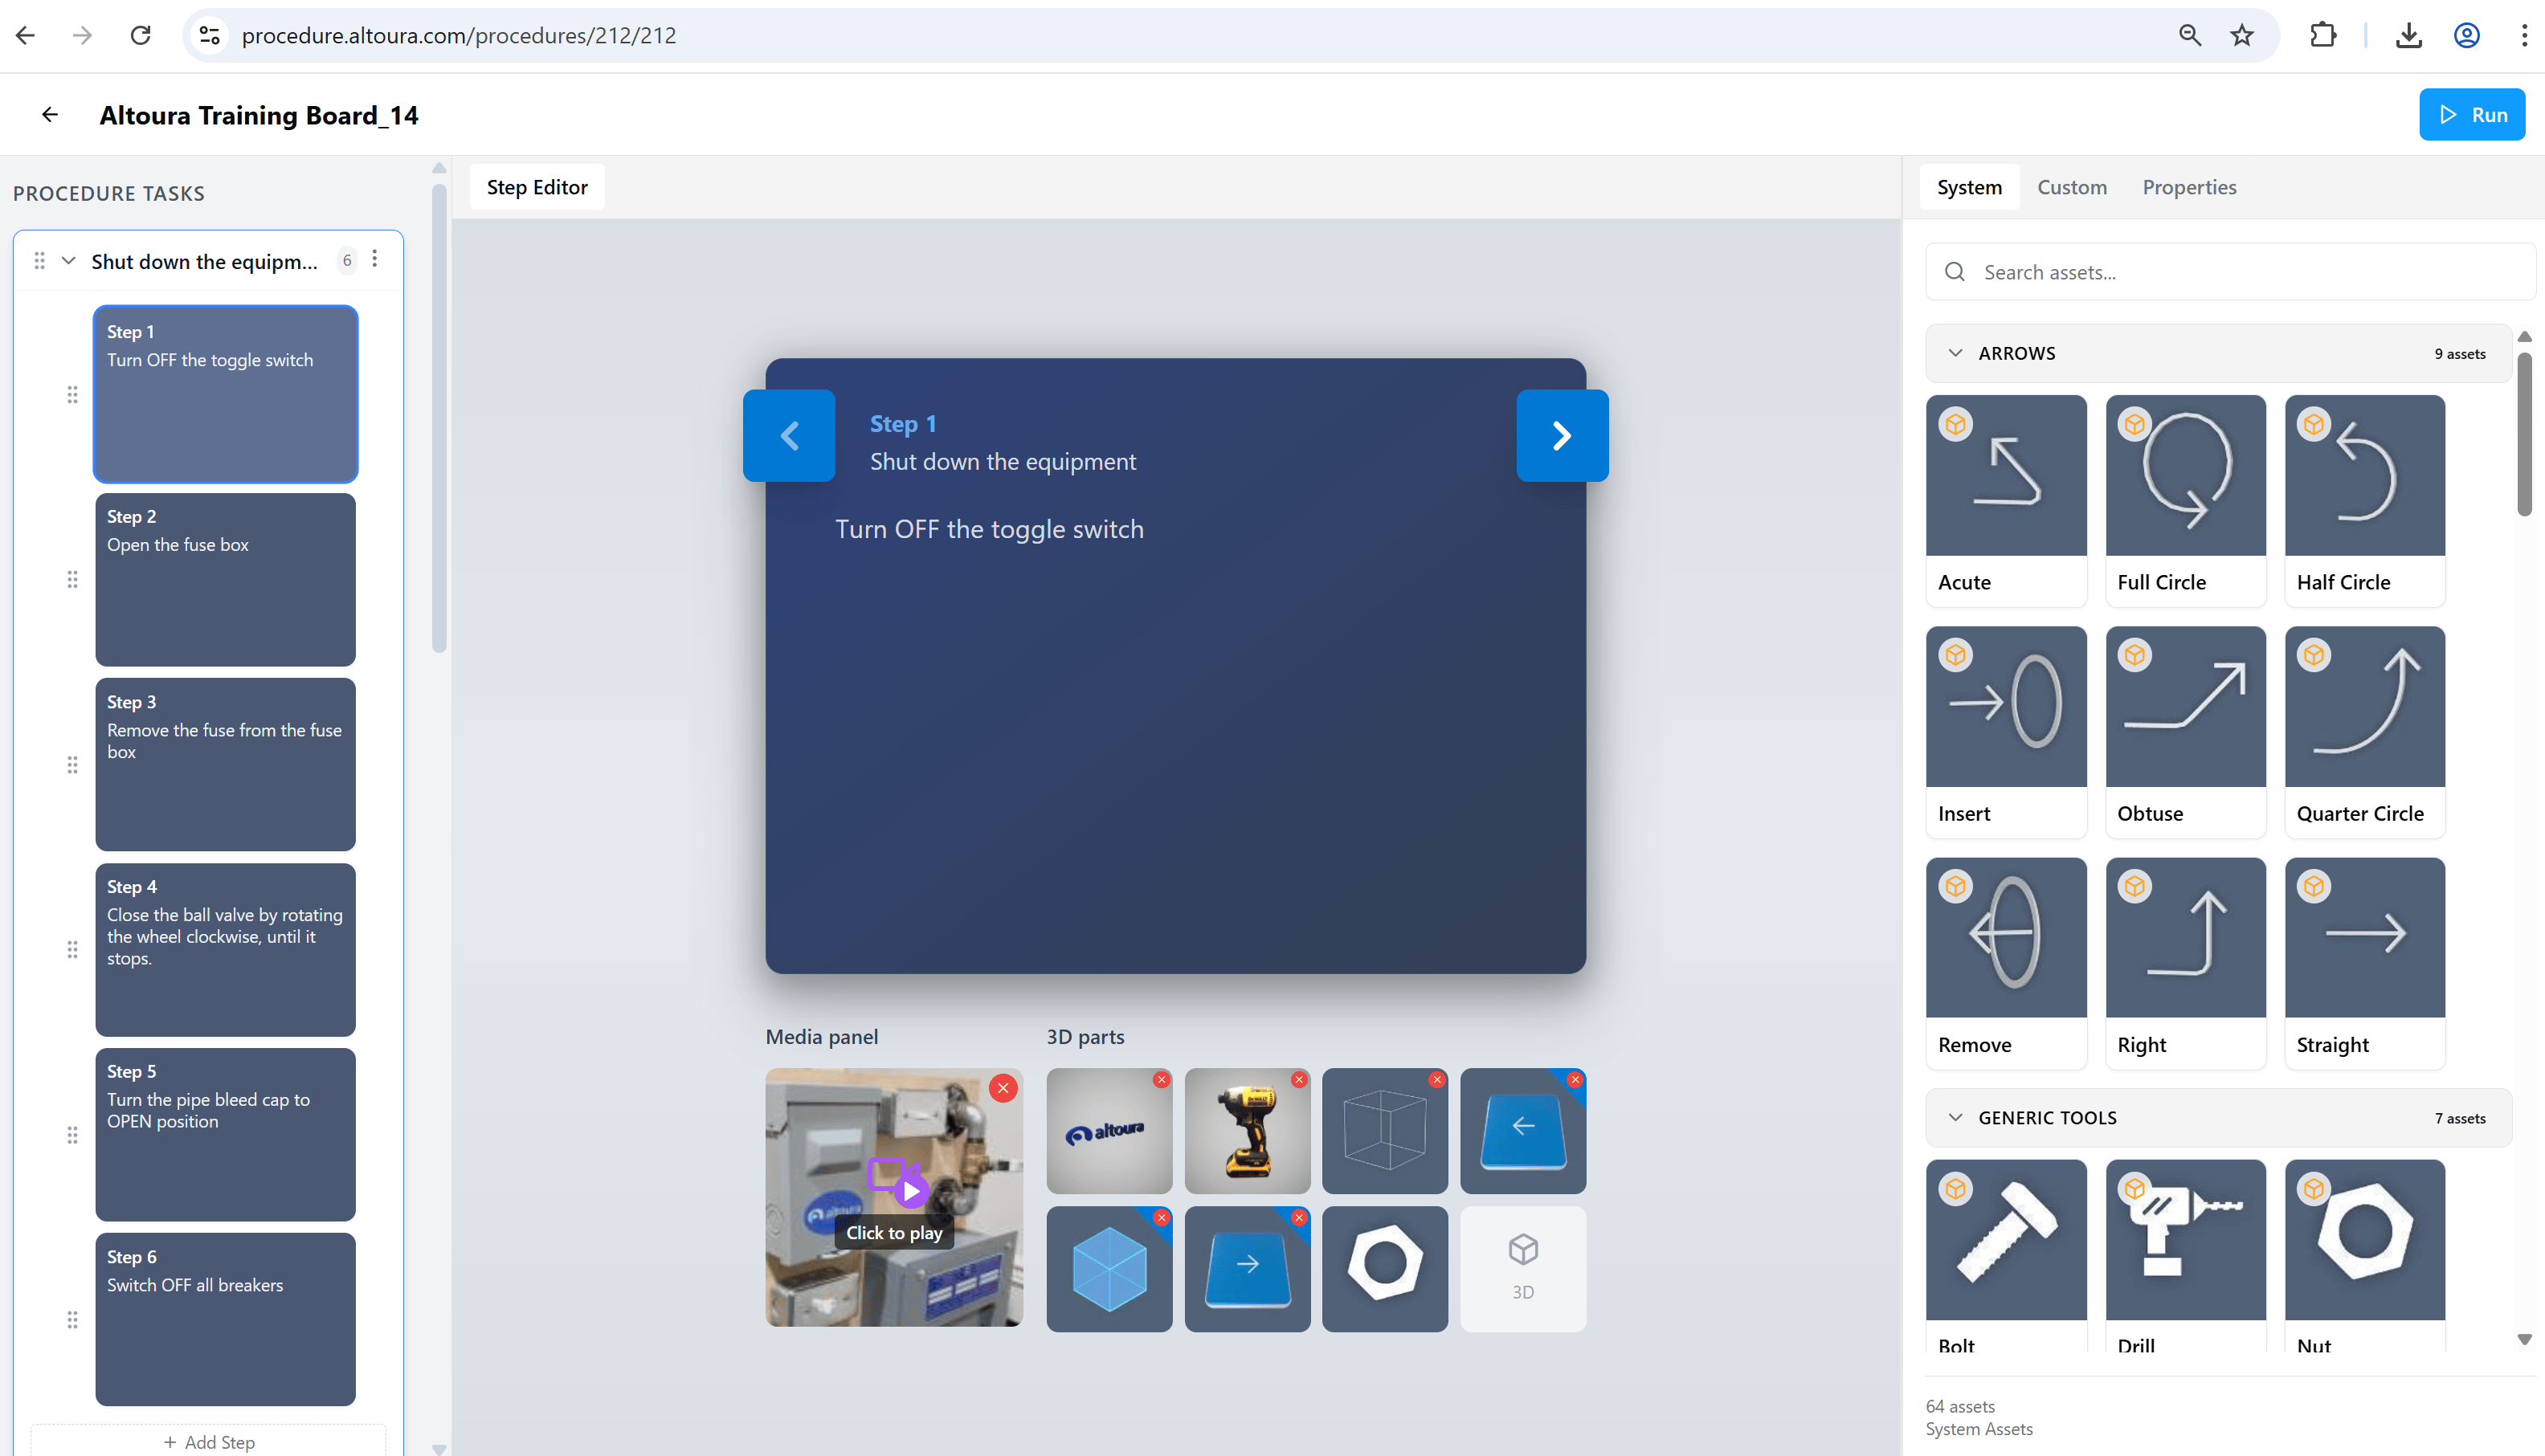
The procedure opens in **Edit Mode** in a three-panel layout, where all changes can be made.
 Use the **Run** button in the top-right of Edit Mode to launch [Run Mode](/frontline/procedures-portal/run-mode) at any time and test your procedure without leaving the editor.
***
## Authoring Layout
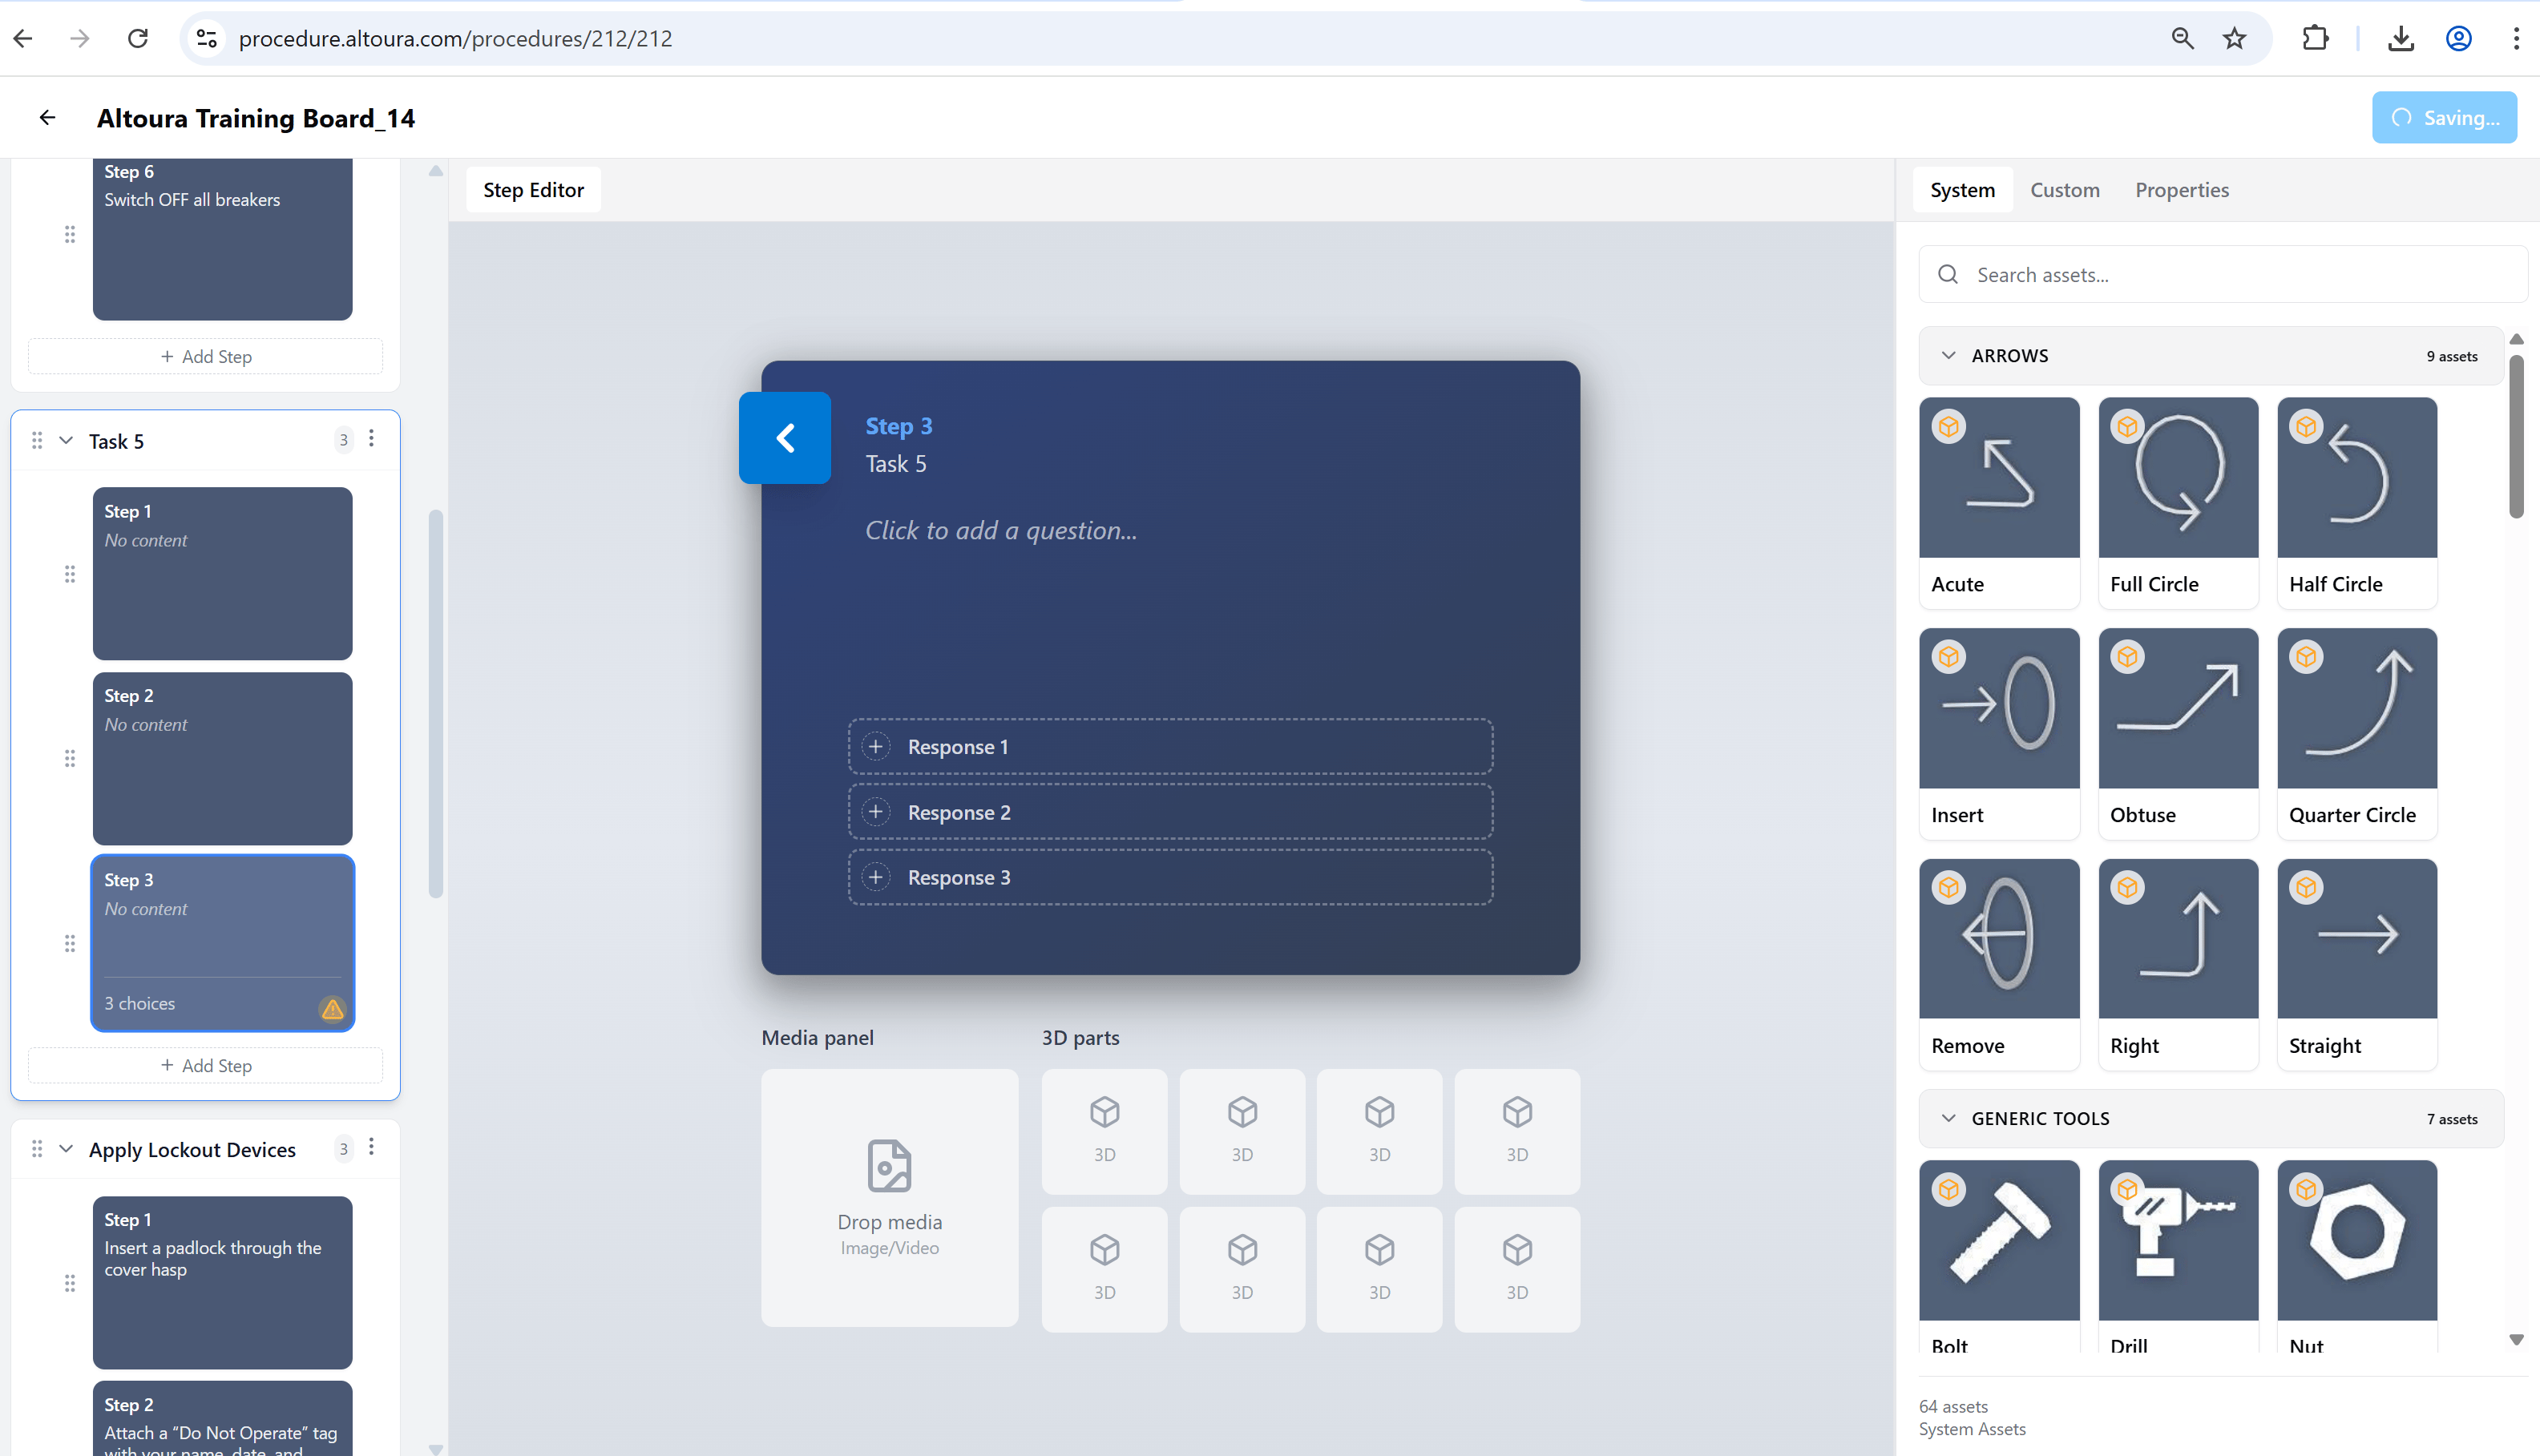
Edit Mode is organized into three main areas:
Used to manage tasks and steps. Shows the structure and flow of the procedure. Supports reordering and quick navigation.
Displays the selected step. Used to author step text and view how it will appear during execution.
Used to browse, upload, and manage media and 3D assets. Includes **System**, **Custom**, and **Properties** tabs.
Changes are saved automatically. A **Saving…** indicator appears in the top-right while changes are being persisted.
***
## Working with Tasks
Tasks group related steps together and help organize longer procedures.
Each task in the **Procedure Tasks** panel shows:
* A **drag handle** (six-dot icon) for reordering
* The task name
* A **step count badge** indicating the number of steps the task contains
* A **three-dot menu** for task actions
### Open the Task Menu
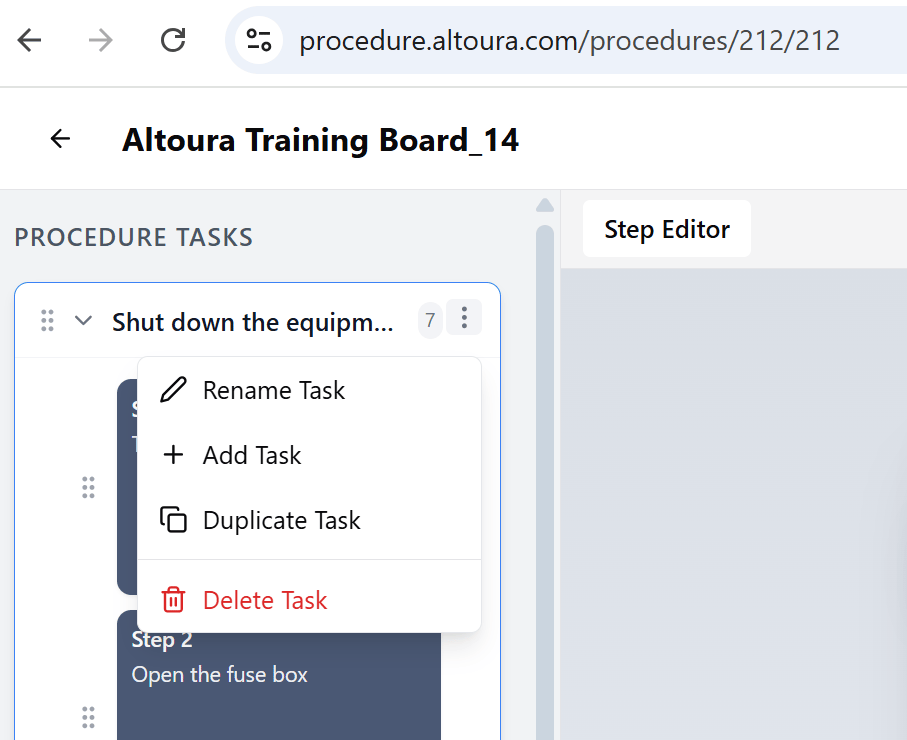
Select the **three-dot icon** on the right of a task to open the task menu. The menu includes **Rename Task**, **Add Task**, **Duplicate Task**, and **Delete Task**.
Use the **Run** button in the top-right of Edit Mode to launch [Run Mode](/frontline/procedures-portal/run-mode) at any time and test your procedure without leaving the editor.
***
## Authoring Layout
Edit Mode is organized into three main areas:
Used to manage tasks and steps. Shows the structure and flow of the procedure. Supports reordering and quick navigation.
Displays the selected step. Used to author step text and view how it will appear during execution.
Used to browse, upload, and manage media and 3D assets. Includes **System**, **Custom**, and **Properties** tabs.
Changes are saved automatically. A **Saving…** indicator appears in the top-right while changes are being persisted.
***
## Working with Tasks
Tasks group related steps together and help organize longer procedures.
Each task in the **Procedure Tasks** panel shows:
* A **drag handle** (six-dot icon) for reordering
* The task name
* A **step count badge** indicating the number of steps the task contains
* A **three-dot menu** for task actions
### Open the Task Menu
Select the **three-dot icon** on the right of a task to open the task menu. The menu includes **Rename Task**, **Add Task**, **Duplicate Task**, and **Delete Task**.
 ### Add a Task
1. Open the task menu of any existing task, or scroll to the bottom of the task list.
2. Select **Add Task**.
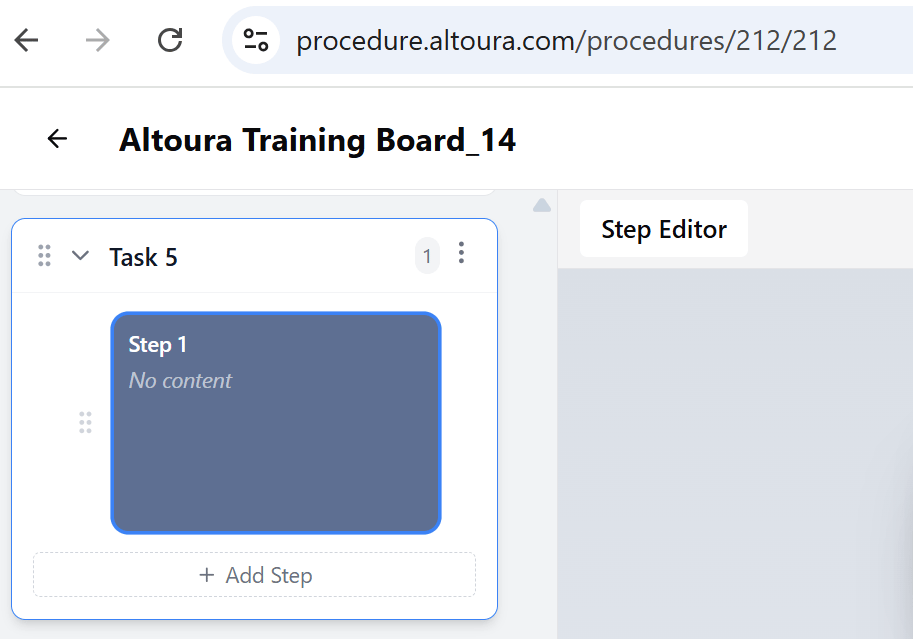
3. A new empty task is created at the end of the list with a single empty step, ready for content.
### Add a Task
1. Open the task menu of any existing task, or scroll to the bottom of the task list.
2. Select **Add Task**.
3. A new empty task is created at the end of the list with a single empty step, ready for content.
 ### Rename a Task
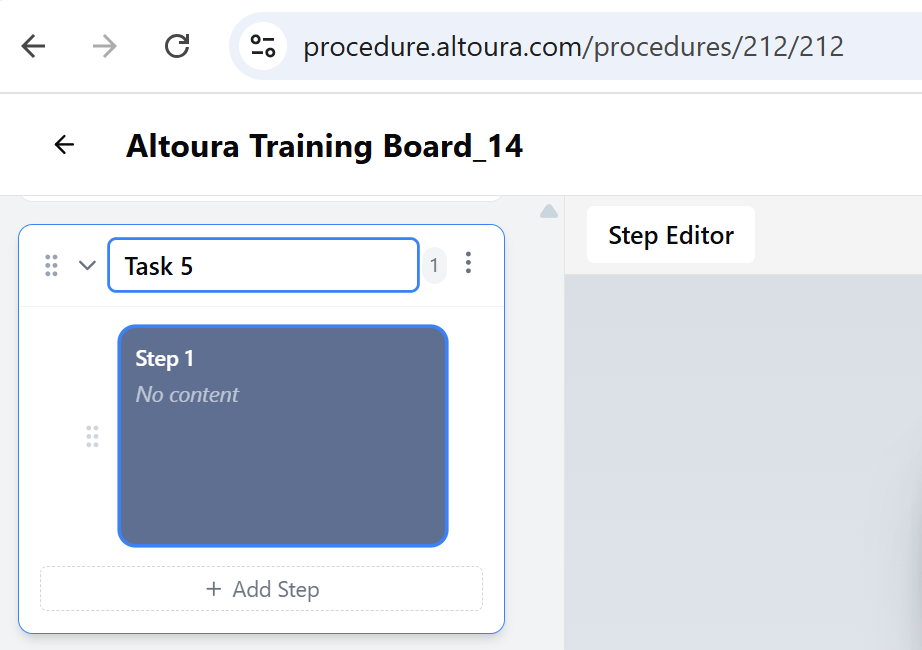
1. Open the task menu.
2. Select **Rename Task**.
3. Enter a new name and confirm.
### Rename a Task
1. Open the task menu.
2. Select **Rename Task**.
3. Enter a new name and confirm.
 ### Duplicate a Task
1. Open the task menu.
2. Select **Duplicate Task**.
3. A copy of the task and all its steps is created and added to the list.
### Delete a Task
1. Open the task menu.
2. Select **Delete Task** (shown in red).
3. Confirm the deletion in the **Delete Task** dialog.
### Duplicate a Task
1. Open the task menu.
2. Select **Duplicate Task**.
3. A copy of the task and all its steps is created and added to the list.
### Delete a Task
1. Open the task menu.
2. Select **Delete Task** (shown in red).
3. Confirm the deletion in the **Delete Task** dialog.
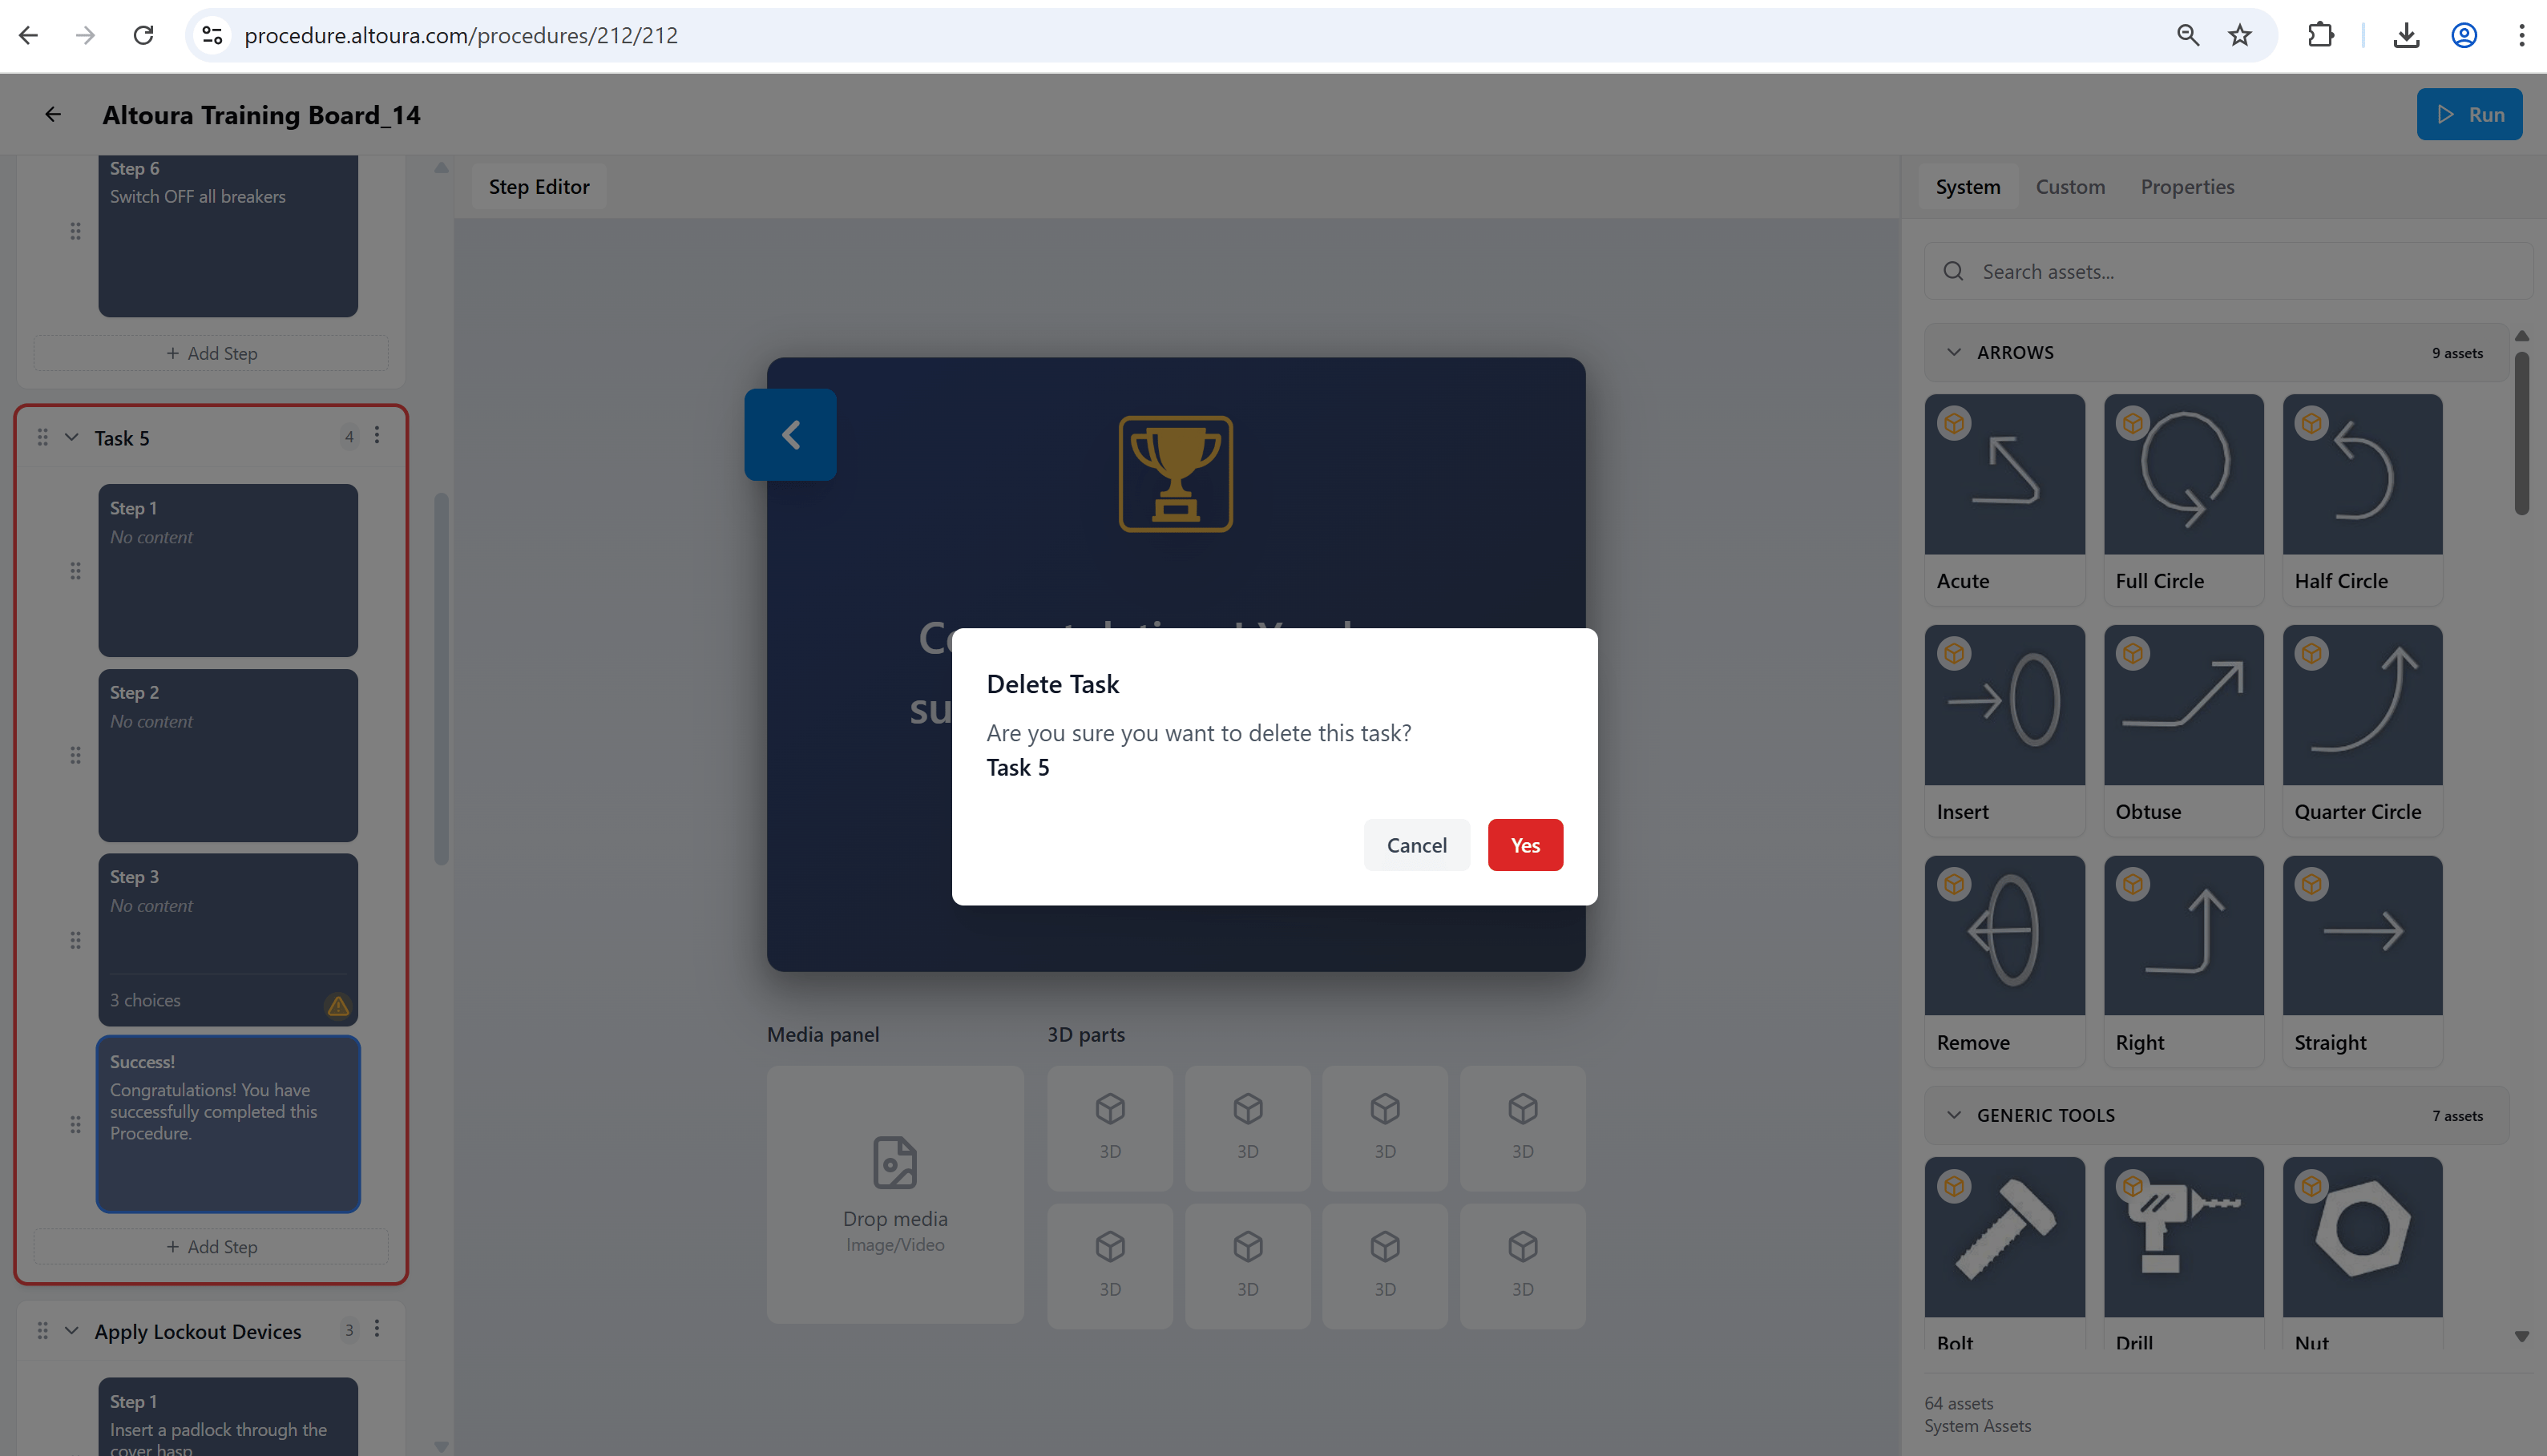 Deleting a task removes all steps inside it. This action cannot be undone.
***
## Working with Steps
Steps define the actual instructions or decisions within a task. Newly added steps show a **No content** placeholder until you add text.
### Add a Step
1. Expand a task.
2. Select **+ Add Step**.
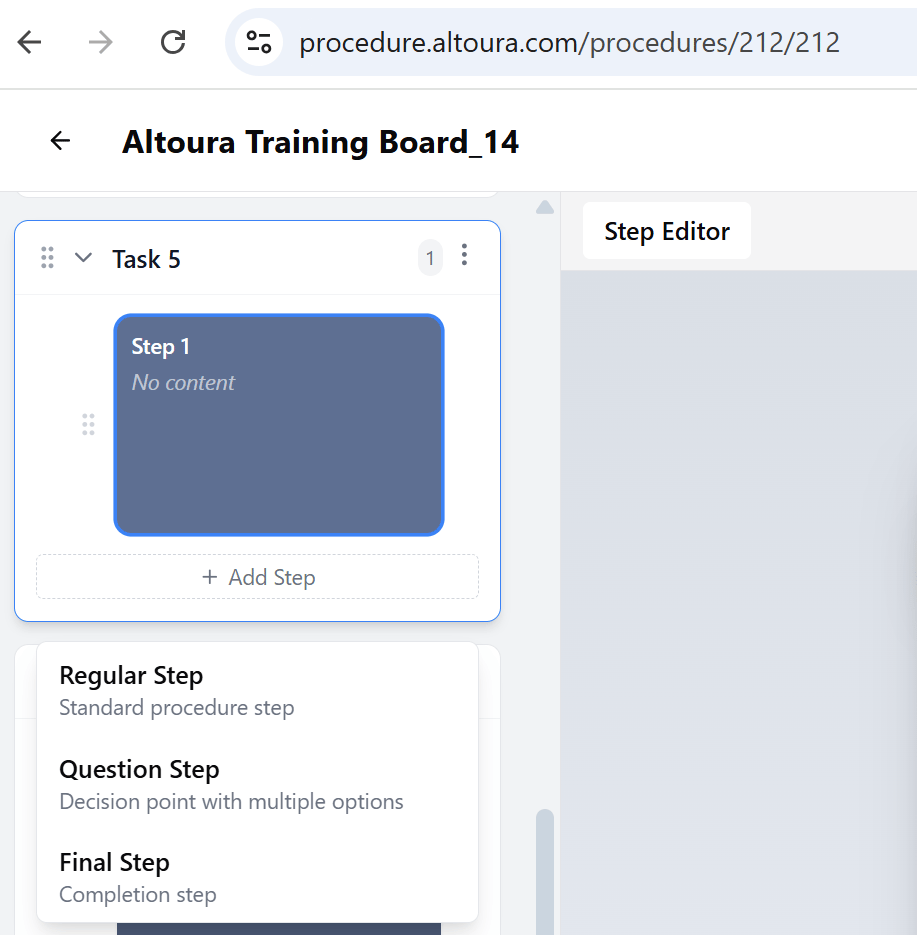
3. Choose a step type from the dropdown:
* **Regular Step**: Standard procedure step
* **Question Step**: Decision point with multiple options
* **Final Step**: Completion step
The step is added to the task at the end of the list.
Deleting a task removes all steps inside it. This action cannot be undone.
***
## Working with Steps
Steps define the actual instructions or decisions within a task. Newly added steps show a **No content** placeholder until you add text.
### Add a Step
1. Expand a task.
2. Select **+ Add Step**.
3. Choose a step type from the dropdown:
* **Regular Step**: Standard procedure step
* **Question Step**: Decision point with multiple options
* **Final Step**: Completion step
The step is added to the task at the end of the list.
 ### Edit Step Content
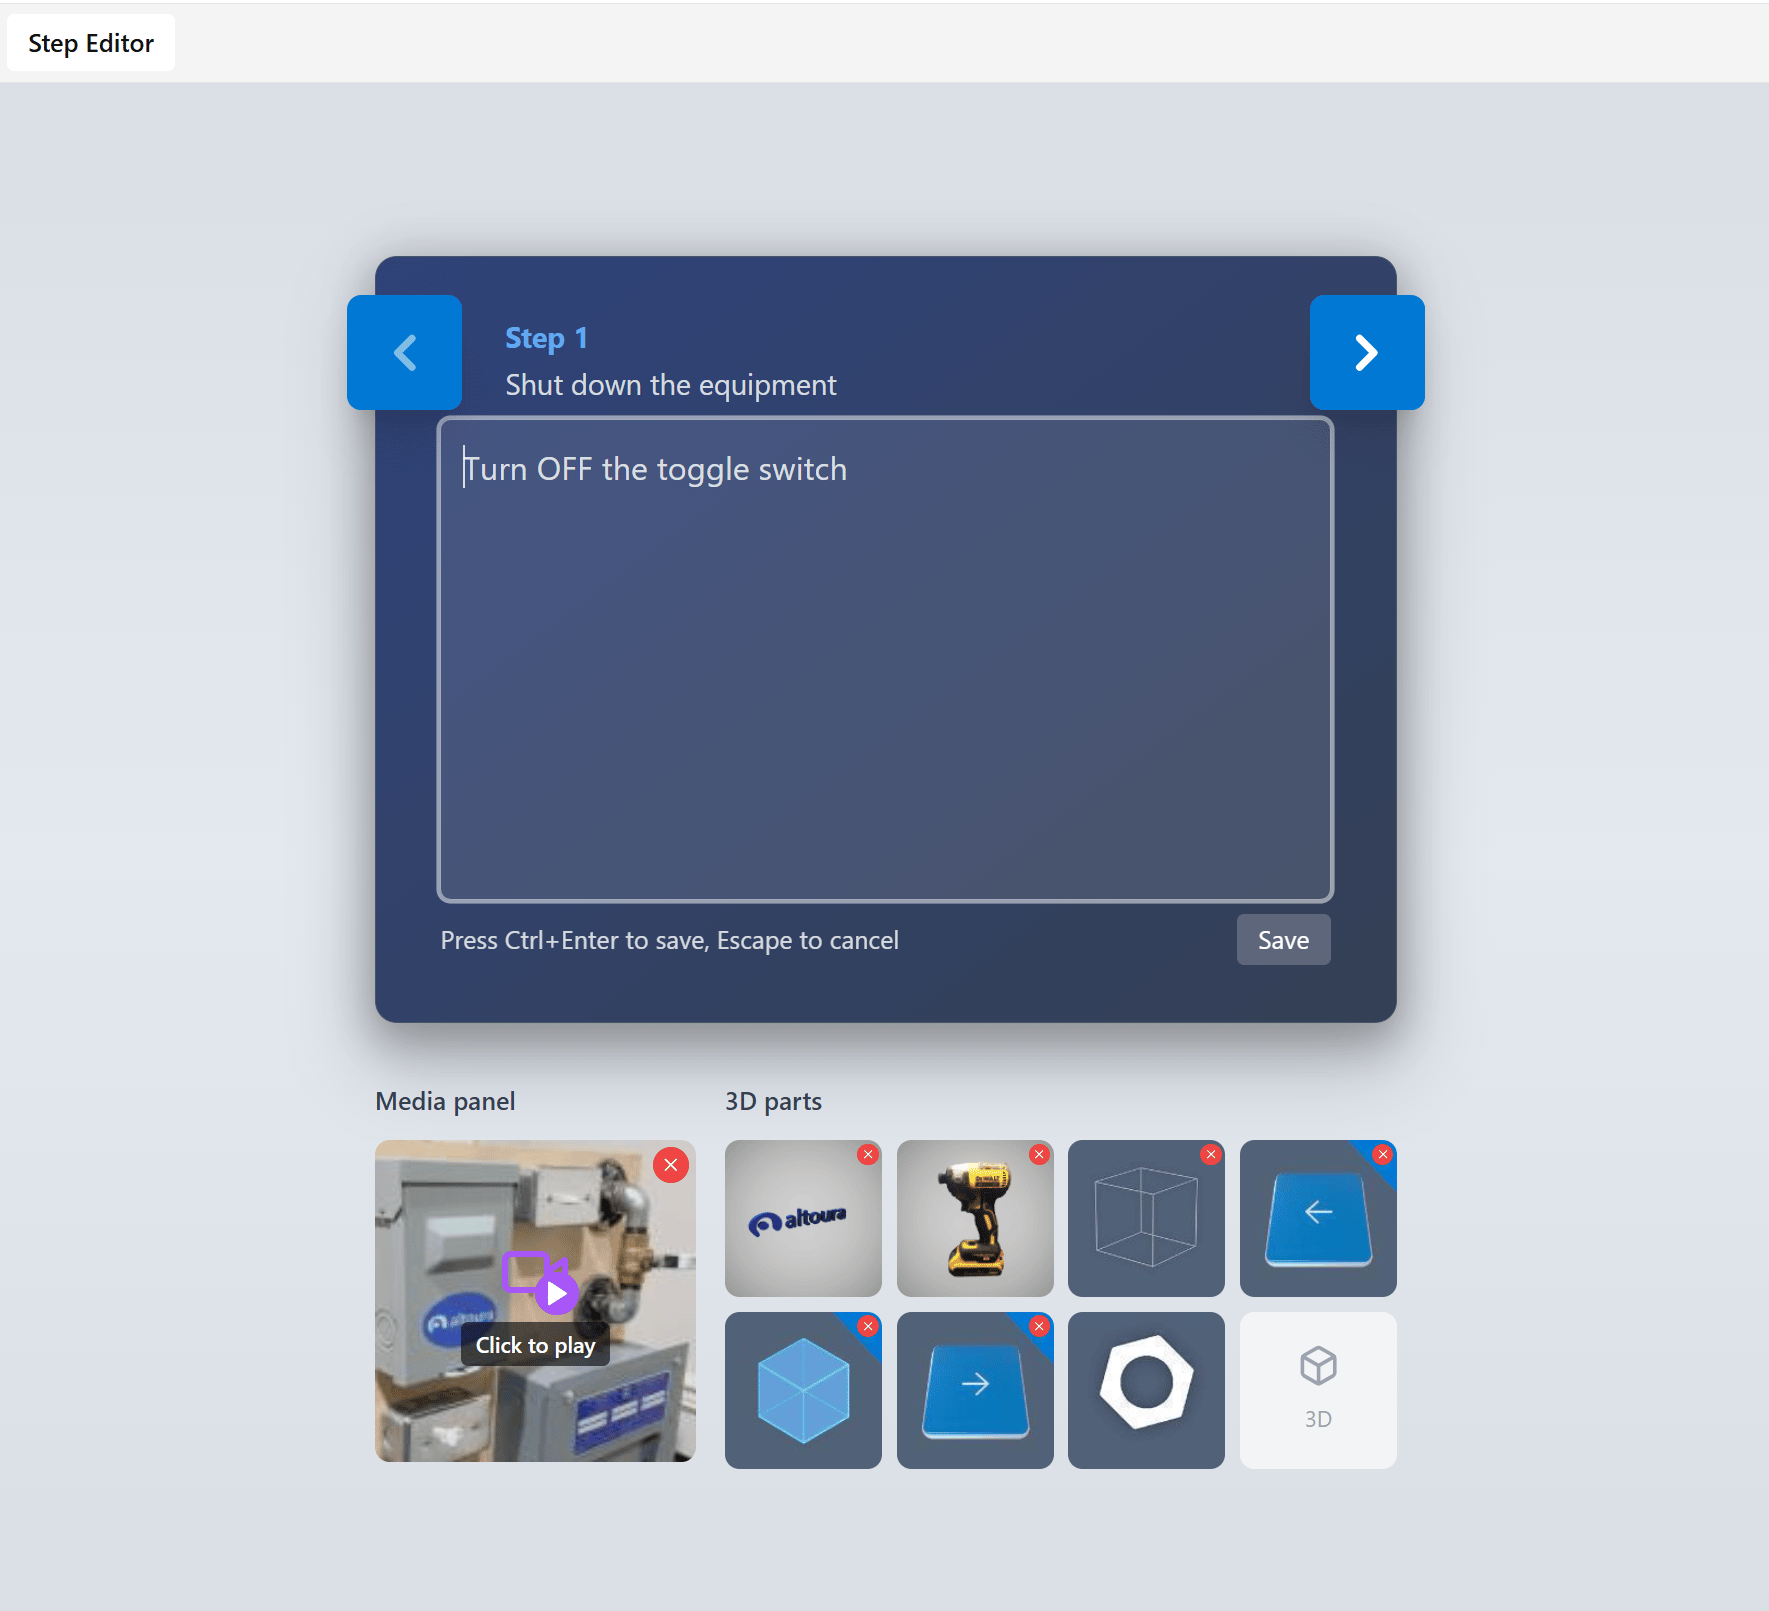
1. Select a step in the **Procedure Tasks** panel.
2. Click inside the **Step Editor** in the center.
3. Enter or update the step text.
4. Press **Ctrl + Enter** (or select **Save**) to save your changes, or press **Escape** to cancel.
### Edit Step Content
1. Select a step in the **Procedure Tasks** panel.
2. Click inside the **Step Editor** in the center.
3. Enter or update the step text.
4. Press **Ctrl + Enter** (or select **Save**) to save your changes, or press **Escape** to cancel.
 ### Reorder Steps
1. Use the **drag handle** (six-dot icon) next to a step.
2. Drag and drop to change the order.
Step order defines the execution flow.
### Duplicate or Delete a Step
1. Open the step menu.
2. Choose **Duplicate Step** or **Delete Step**.
***
## Enrich a Step with Media and 3D
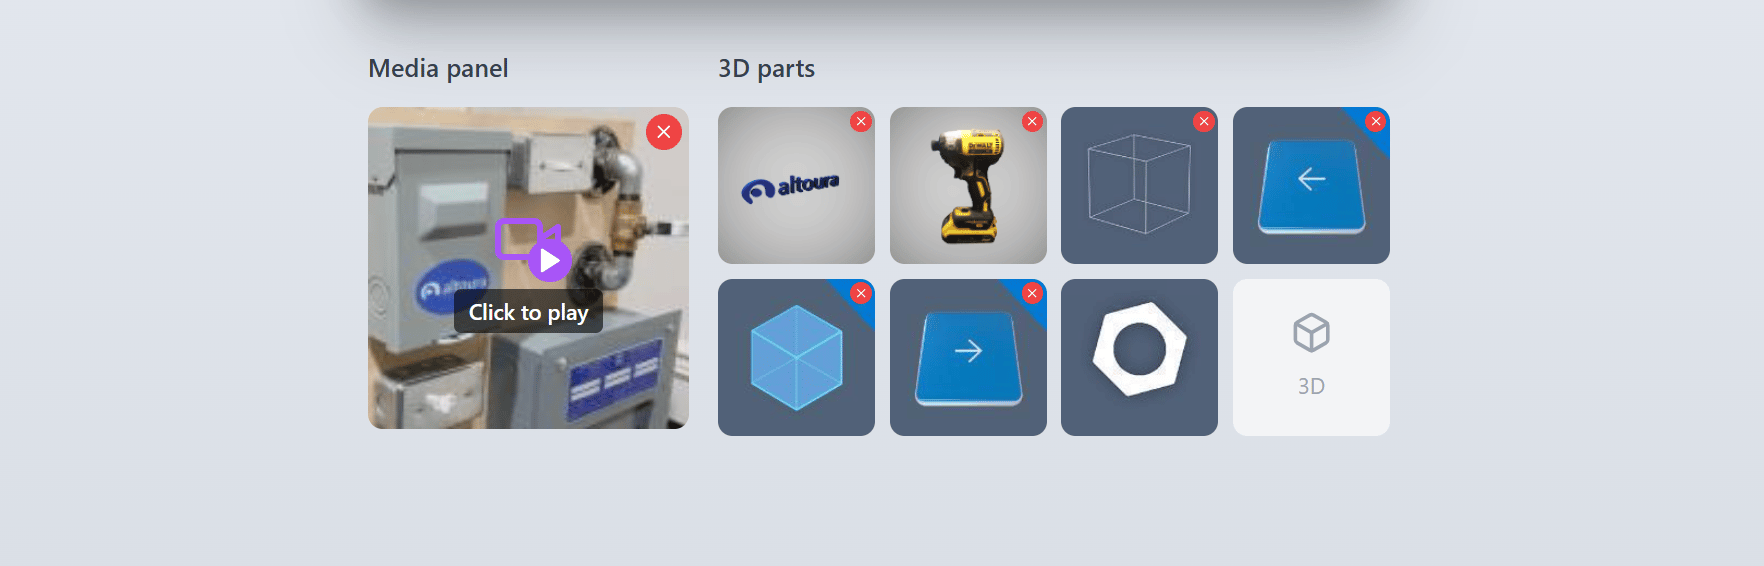
Each step can include images, video, and 3D parts. These appear inside the Step Editor and are also visible during execution in Run Mode.
The **Media panel** (bottom-left of the Step Editor) shows images or video attached to the current step. The **3D parts** grid next to it shows 3D assets attached to the step.
### Reorder Steps
1. Use the **drag handle** (six-dot icon) next to a step.
2. Drag and drop to change the order.
Step order defines the execution flow.
### Duplicate or Delete a Step
1. Open the step menu.
2. Choose **Duplicate Step** or **Delete Step**.
***
## Enrich a Step with Media and 3D
Each step can include images, video, and 3D parts. These appear inside the Step Editor and are also visible during execution in Run Mode.
The **Media panel** (bottom-left of the Step Editor) shows images or video attached to the current step. The **3D parts** grid next to it shows 3D assets attached to the step.
 To browse and attach assets, use the **Assets panel** on the right of Edit Mode, which is organized into:
* **System**: Built-in assets (Arrows, Generic Tools, and other categories)
* **Custom**: Assets uploaded for your organization
* **Properties**: Properties of the currently selected step or element
***
## Step Types
### Regular Step
Used for standard, linear instructions.
**Use when:**
* The workflow follows a fixed sequence
* No decision is required
### Question Step (Choice Step)
Used to create decision points in a procedure.
A Question Step includes:
* A question or prompt
* Multiple response options
* A destination step for each response
To browse and attach assets, use the **Assets panel** on the right of Edit Mode, which is organized into:
* **System**: Built-in assets (Arrows, Generic Tools, and other categories)
* **Custom**: Assets uploaded for your organization
* **Properties**: Properties of the currently selected step or element
***
## Step Types
### Regular Step
Used for standard, linear instructions.
**Use when:**
* The workflow follows a fixed sequence
* No decision is required
### Question Step (Choice Step)
Used to create decision points in a procedure.
A Question Step includes:
* A question or prompt
* Multiple response options
* A destination step for each response
 #### Configure Question Steps
For each response option:
1. Select the response in the Step Editor.
2. In the **Response Properties** panel on the right, enter a **Label** (what the user sees, up to 20 characters).
3. Open the **Destination** dropdown and select the step the response should route to. Destinations are grouped by task to make navigation easier.
4. Review the routing in the **Target Step Preview**.
#### Configure Question Steps
For each response option:
1. Select the response in the Step Editor.
2. In the **Response Properties** panel on the right, enter a **Label** (what the user sees, up to 20 characters).
3. Open the **Destination** dropdown and select the step the response should route to. Destinations are grouped by task to make navigation easier.
4. Review the routing in the **Target Step Preview**.
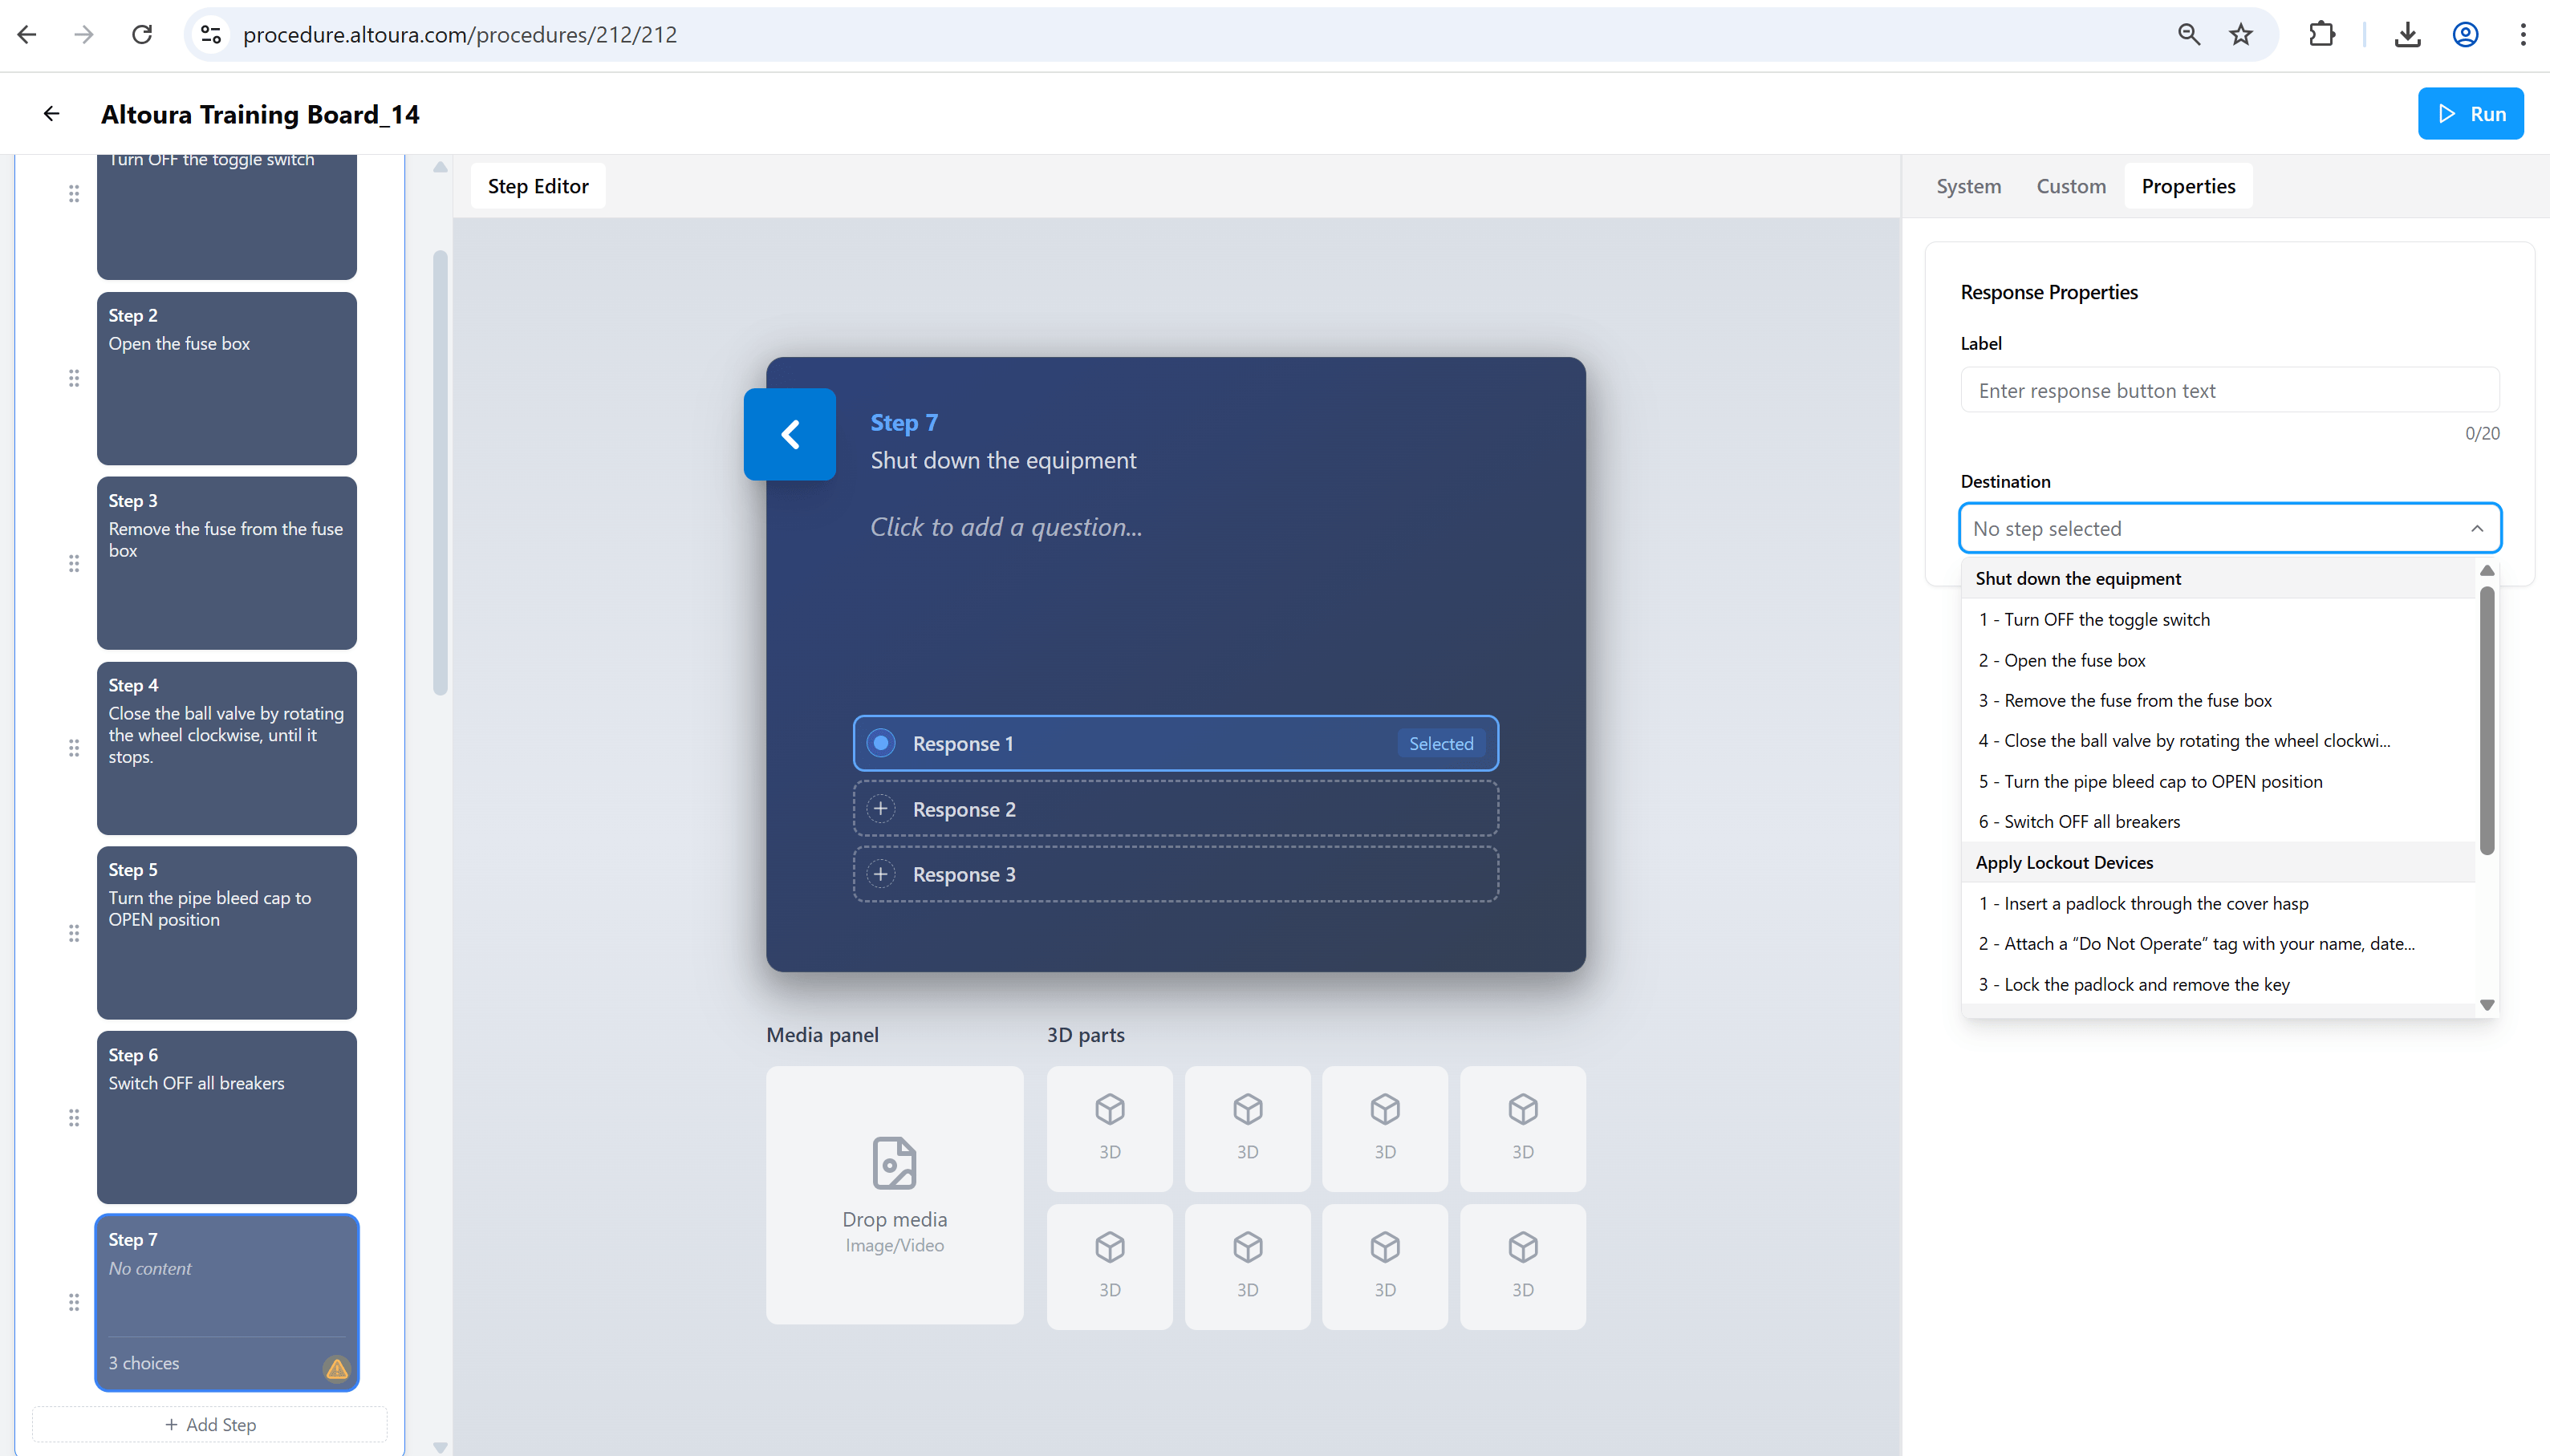 Each response routes the user to the selected step during execution.
Question Steps without destinations show a warning indicator in the task list and must be completed before execution.
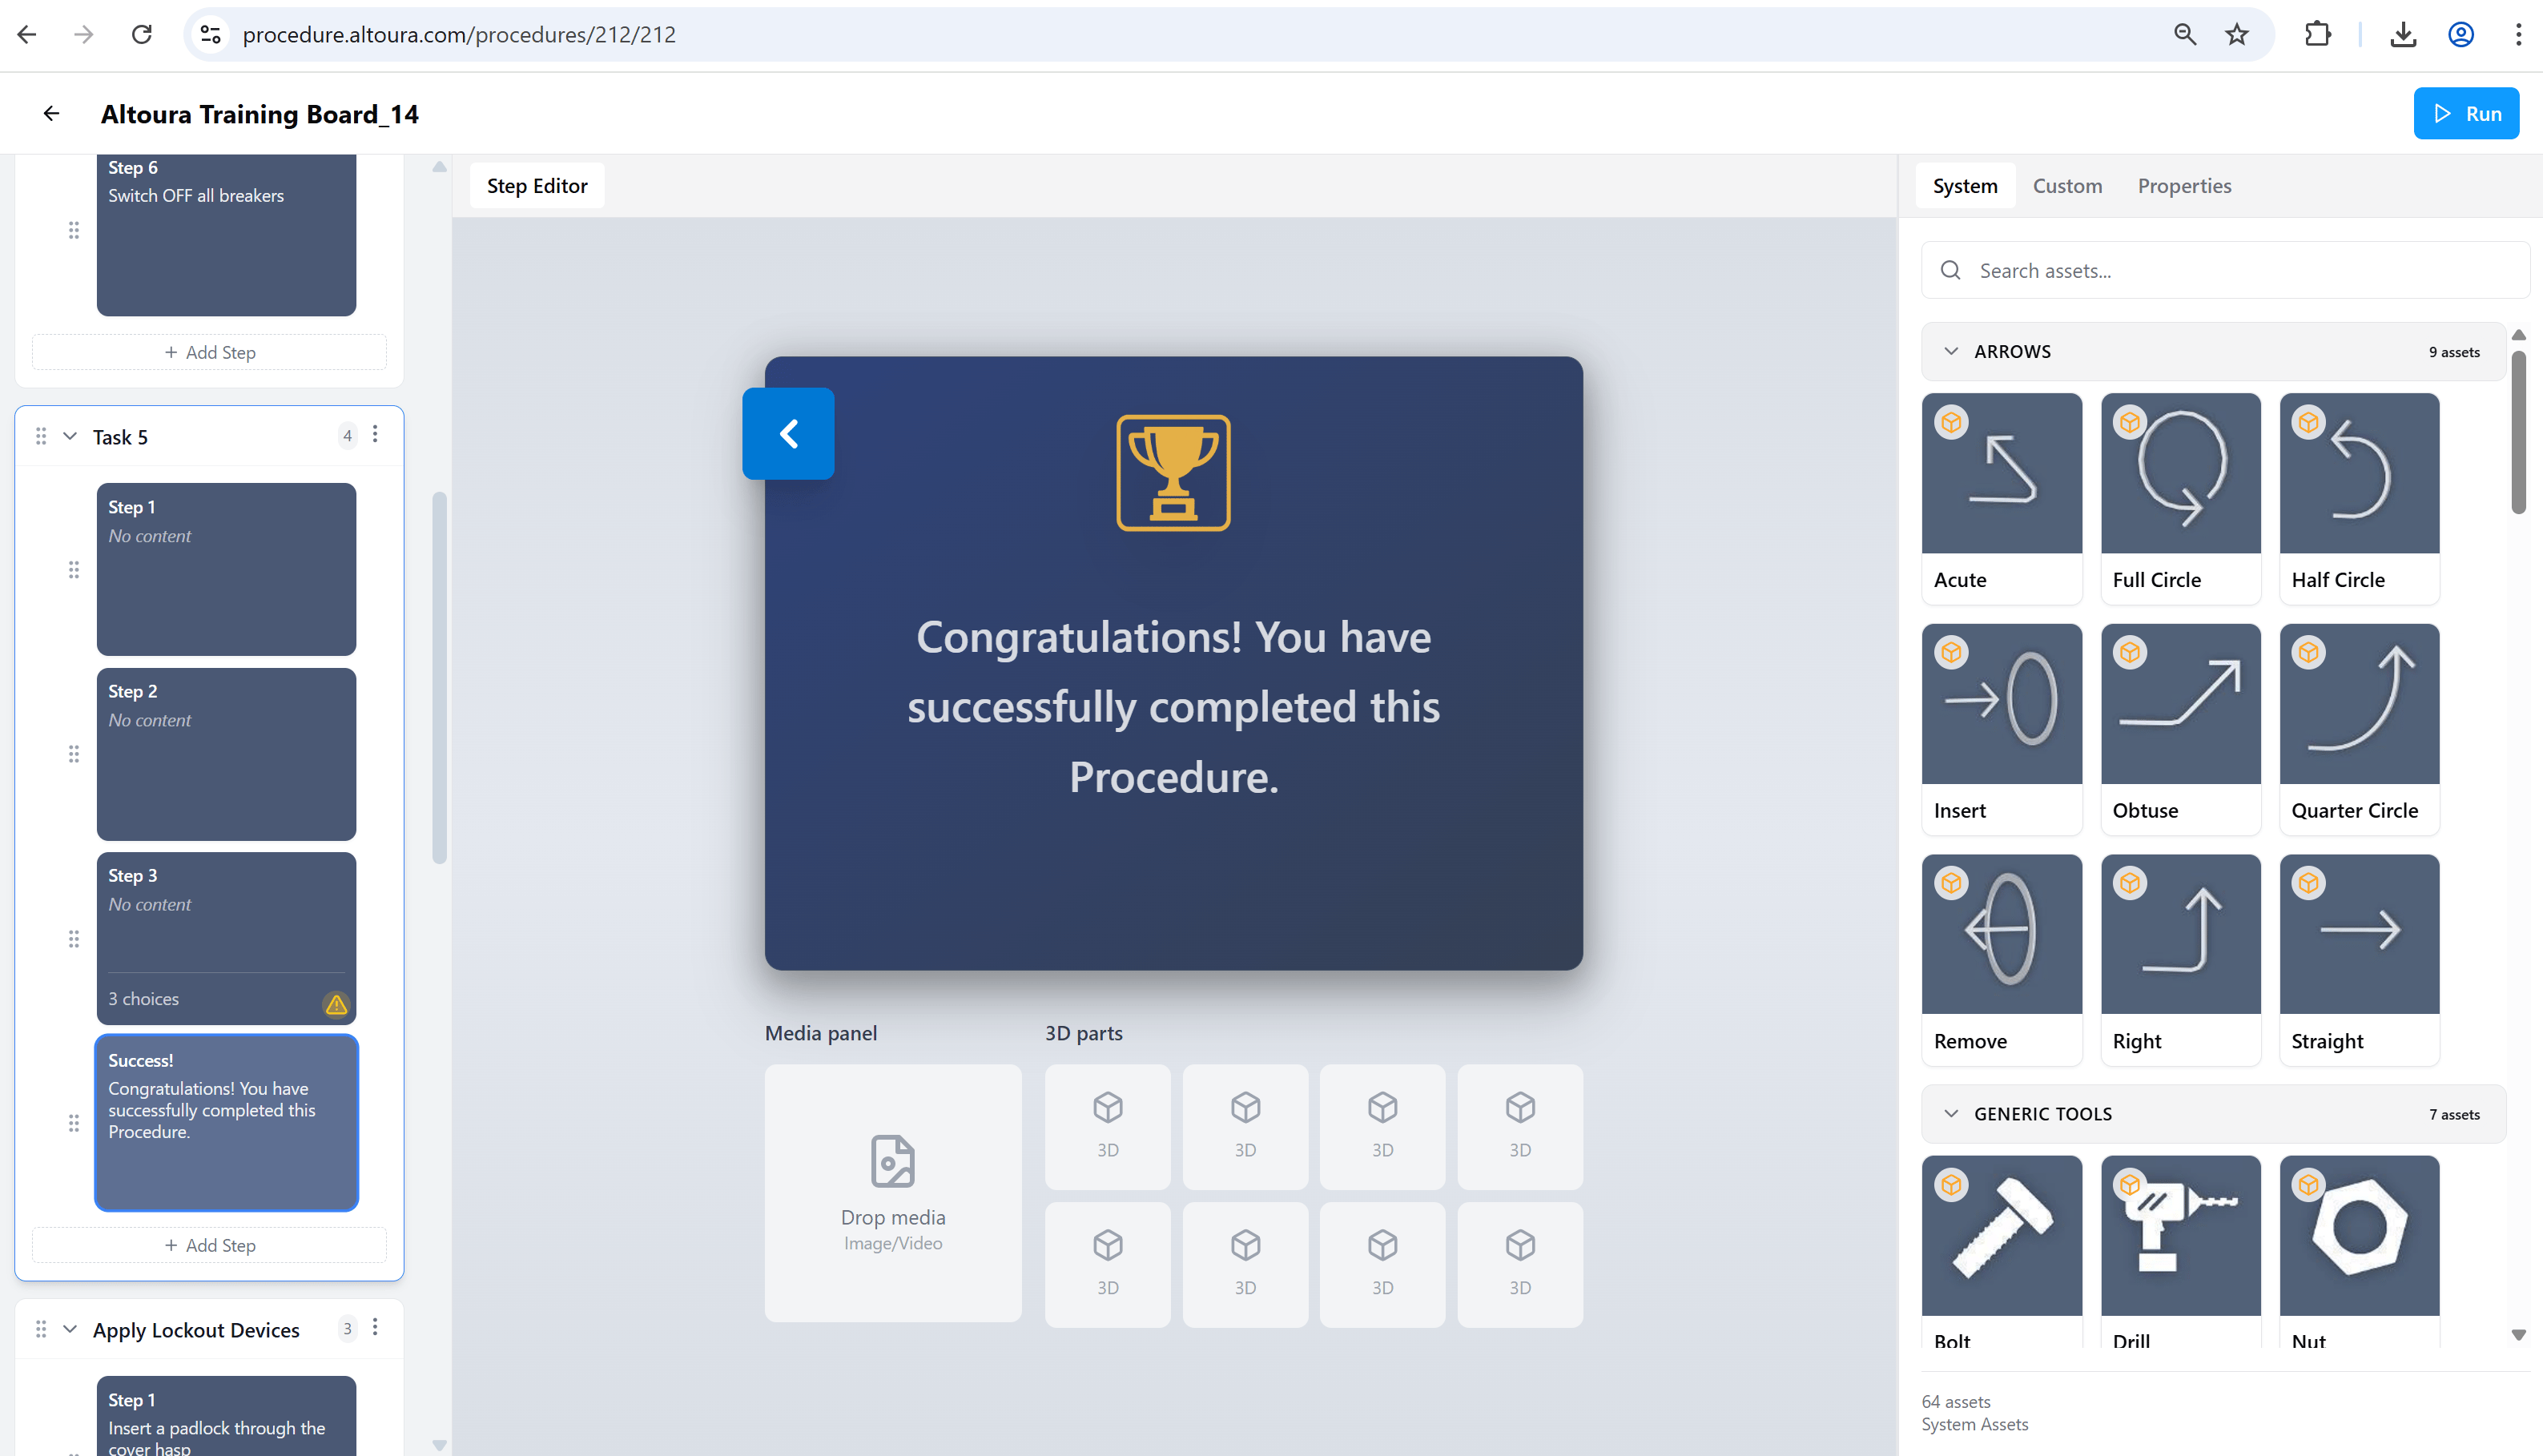
### Final Step
Used to mark the completion of a procedure. A Final Step displays a success message to the user when reached.
**Use when:**
* The procedure ends
* You want to show a success or completion message
Final Steps do not lead to additional steps.
Each response routes the user to the selected step during execution.
Question Steps without destinations show a warning indicator in the task list and must be completed before execution.
### Final Step
Used to mark the completion of a procedure. A Final Step displays a success message to the user when reached.
**Use when:**
* The procedure ends
* You want to show a success or completion message
Final Steps do not lead to additional steps.