> ## Documentation Index
> Fetch the complete documentation index at: https://docs.altoura.com/llms.txt
> Use this file to discover all available pages before exploring further.
# Default 3D Models
> Browse and add models from the built-in 3D model catalogue directly on the HoloLens, without opening the Procedures Portal.
## Overview
The **Default 3D Models** catalogue lets you add ready-made 3D models to a procedure step directly from the HoloLens, while authoring.
Previously, all 3D models had to be uploaded and attached to a step from the **Procedures Portal** before they could appear on the device. With the default catalogue, a curated library of models (arrows, generic tools, hands, and other common assets) is now available on the HMD itself, so you can build out a step without leaving Author mode.
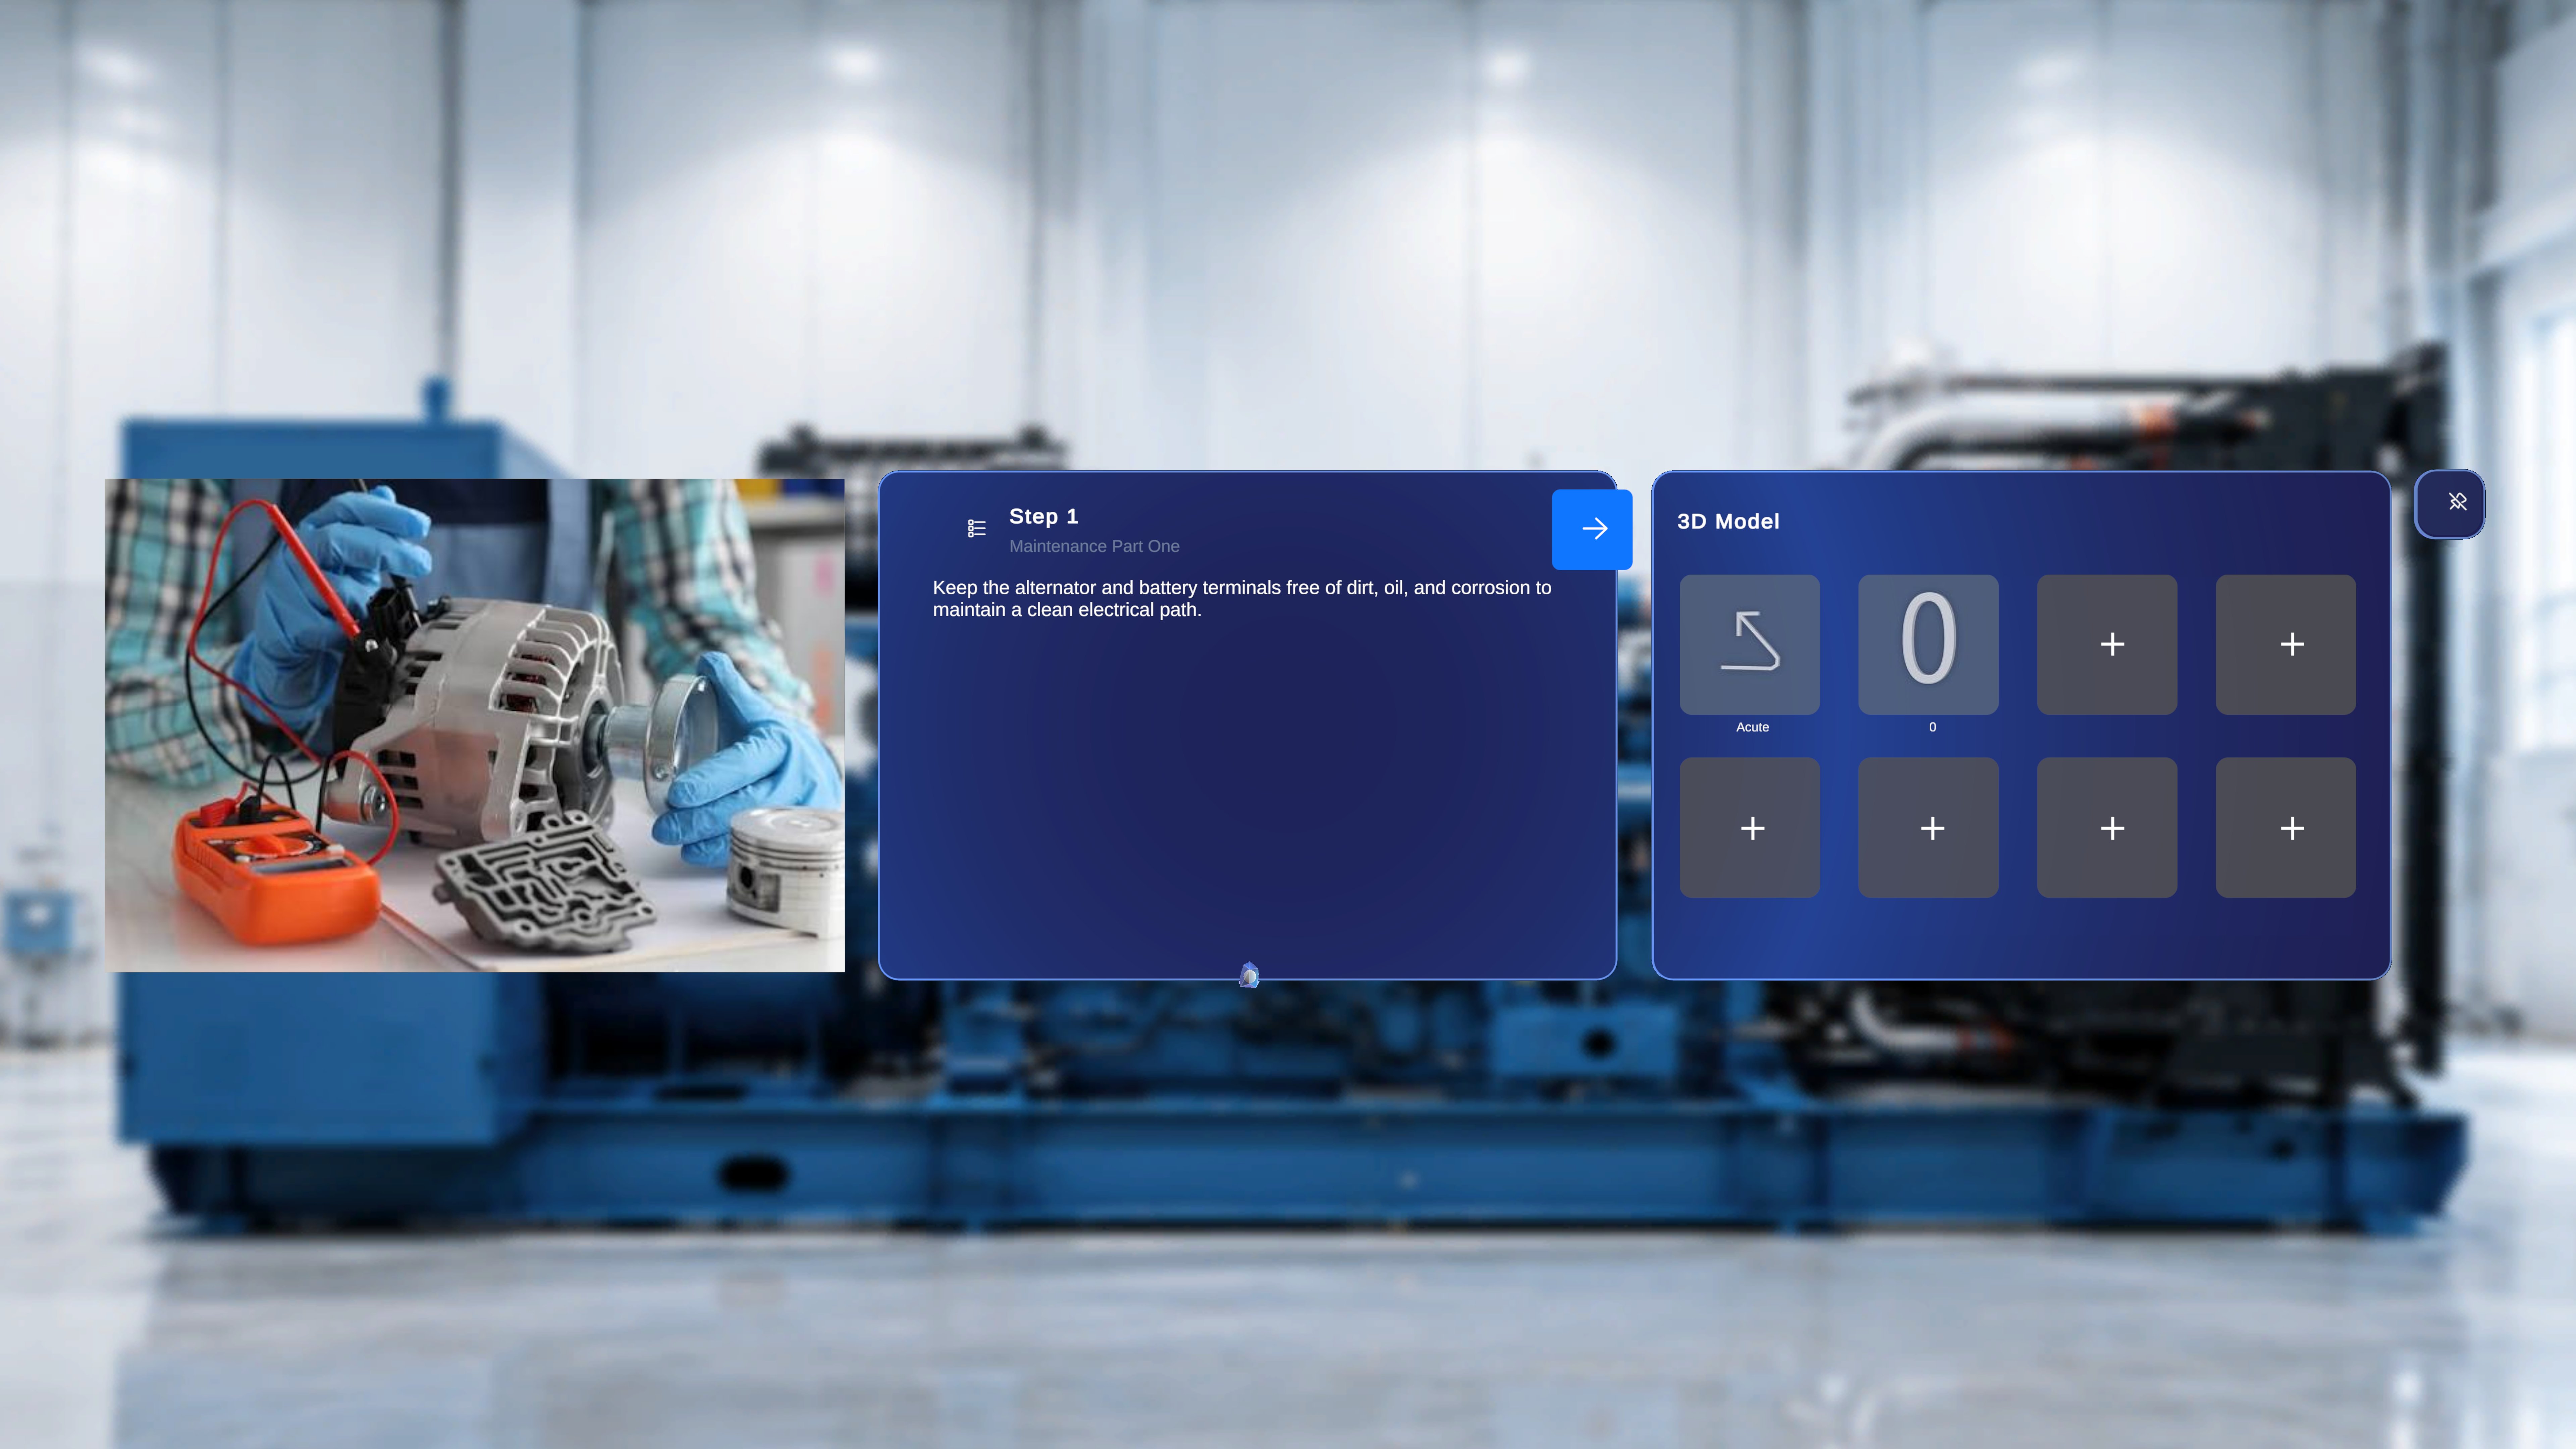 Models added from the HMD stay in sync with the same procedure in the Procedures Portal, and vice versa.
***
## When to Use This Feature
Use the default 3D model catalogue in Author mode to:
* Add commonly used models (arrows, markers, tools, hand poses) to a step on the fly
* Fill empty 3D Model panel slots without switching to the Procedures Portal
* Iterate on step content directly in the physical environment
* Keep the authoring flow inside the HMD when the model you need already exists in the catalogue
***
## Open the Catalogue from an Empty Slot
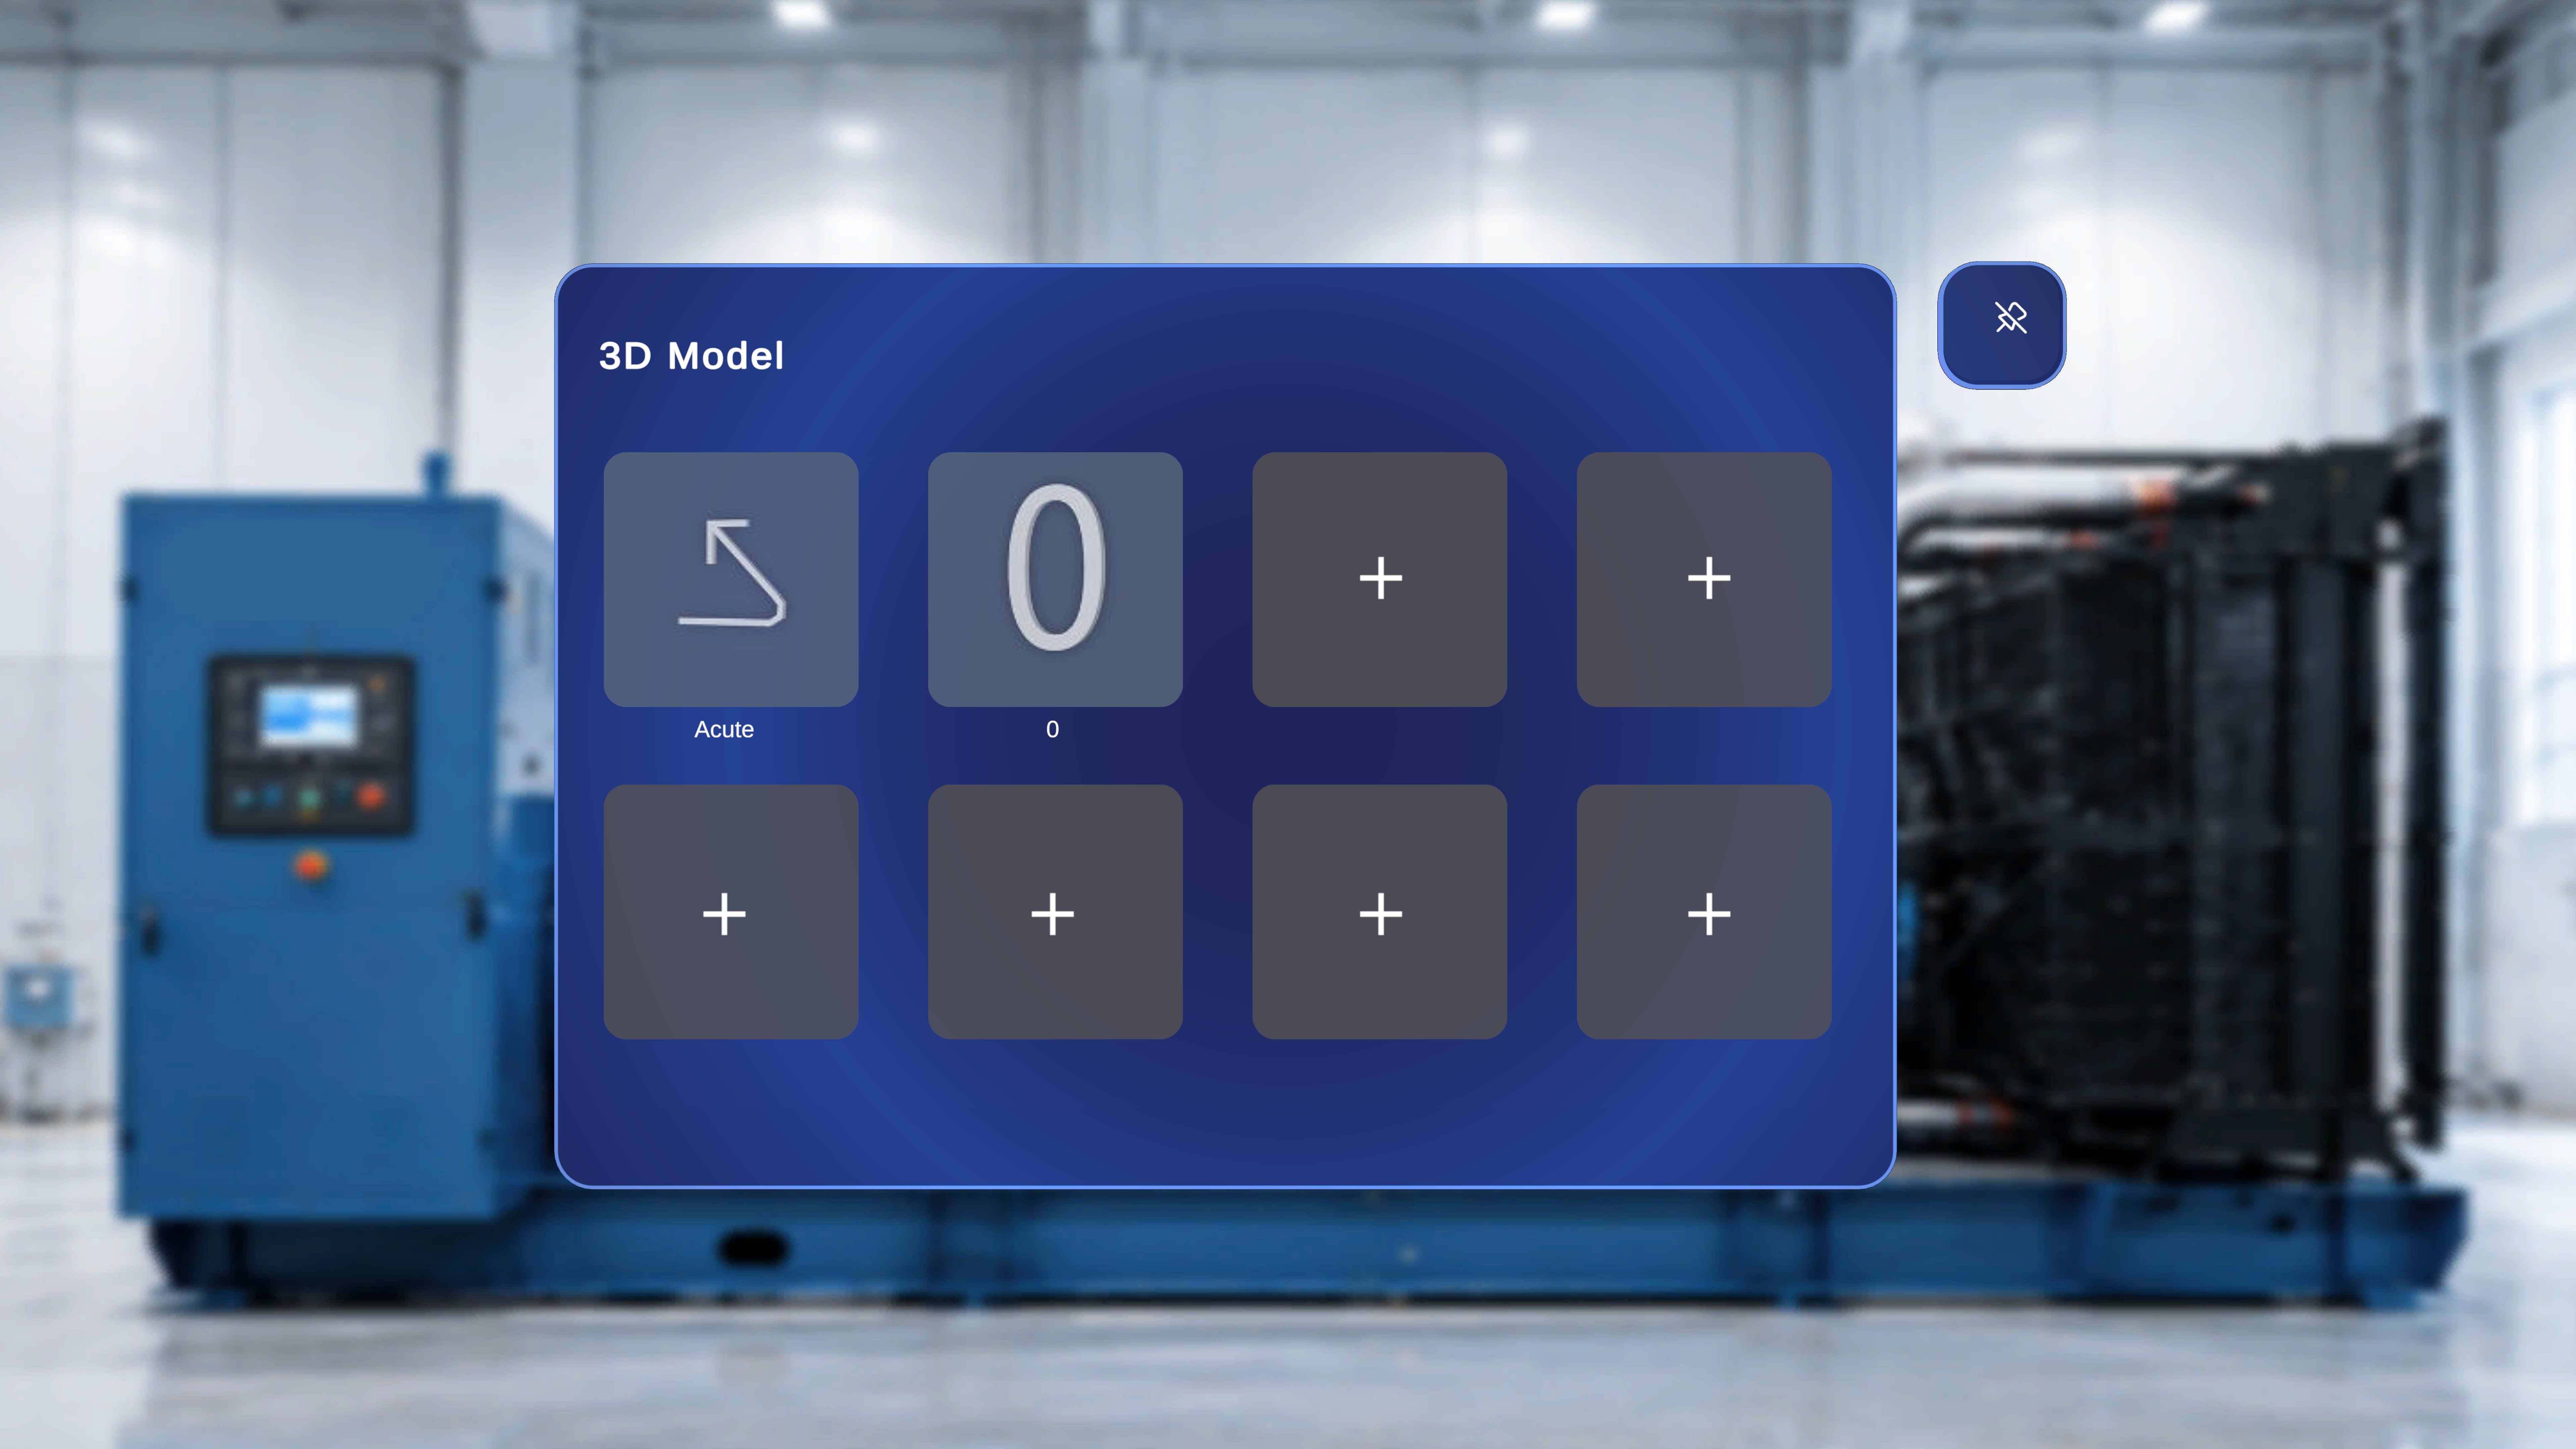
When a step opens with no 3D models attached, the **3D Model** panel displays a grid of empty slots, each marked with a **+** (plus) icon.
Models added from the HMD stay in sync with the same procedure in the Procedures Portal, and vice versa.
***
## When to Use This Feature
Use the default 3D model catalogue in Author mode to:
* Add commonly used models (arrows, markers, tools, hand poses) to a step on the fly
* Fill empty 3D Model panel slots without switching to the Procedures Portal
* Iterate on step content directly in the physical environment
* Keep the authoring flow inside the HMD when the model you need already exists in the catalogue
***
## Open the Catalogue from an Empty Slot
When a step opens with no 3D models attached, the **3D Model** panel displays a grid of empty slots, each marked with a **+** (plus) icon.
 ### Step-by-Step Instructions
1. Look at the **3D Model** panel for the current step.
2. Identify an empty slot (marked with a **+** icon).
3. Focus the **+** tile — the tile is highlighted while it is in focus.
### Step-by-Step Instructions
1. Look at the **3D Model** panel for the current step.
2. Identify an empty slot (marked with a **+** icon).
3. Focus the **+** tile — the tile is highlighted while it is in focus.
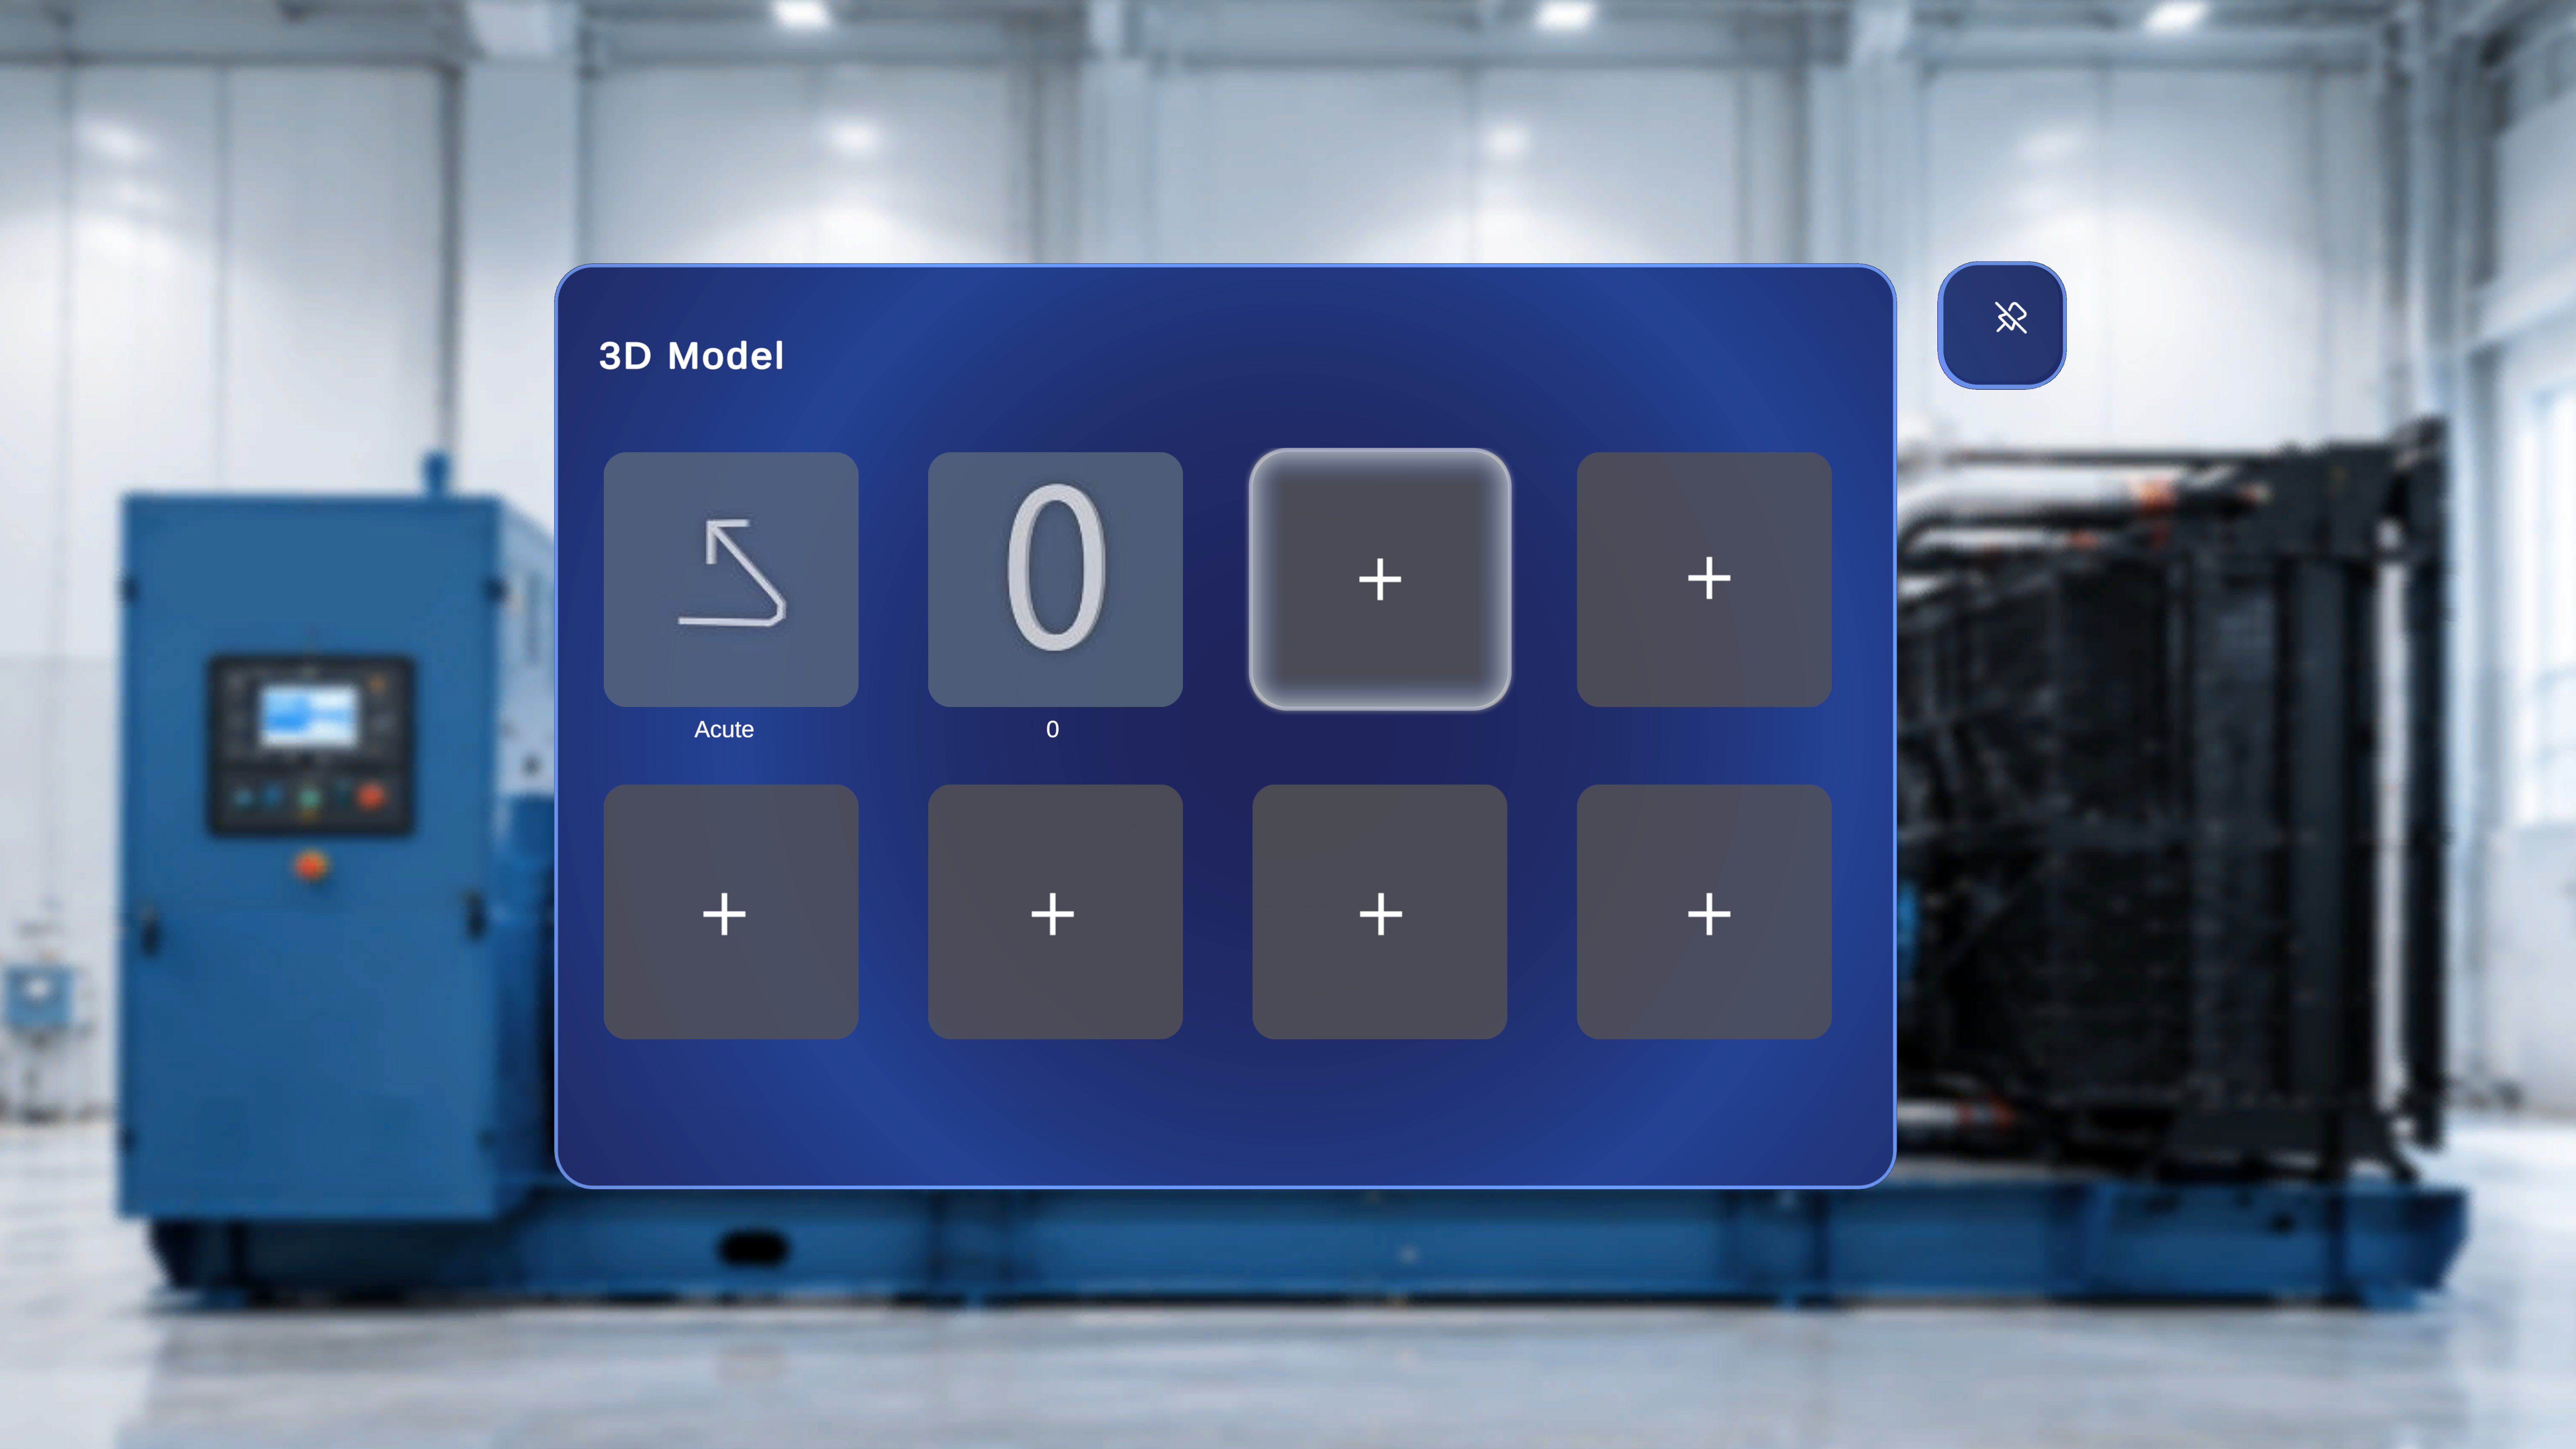 4. Air-tap the tile, or say **"Select"** while gazing at it.
### What Happens Next
The default 3D model catalogue opens in place of the empty grid, ready for you to browse.
***
## Browse the Catalogue
4. Air-tap the tile, or say **"Select"** while gazing at it.
### What Happens Next
The default 3D model catalogue opens in place of the empty grid, ready for you to browse.
***
## Browse the Catalogue
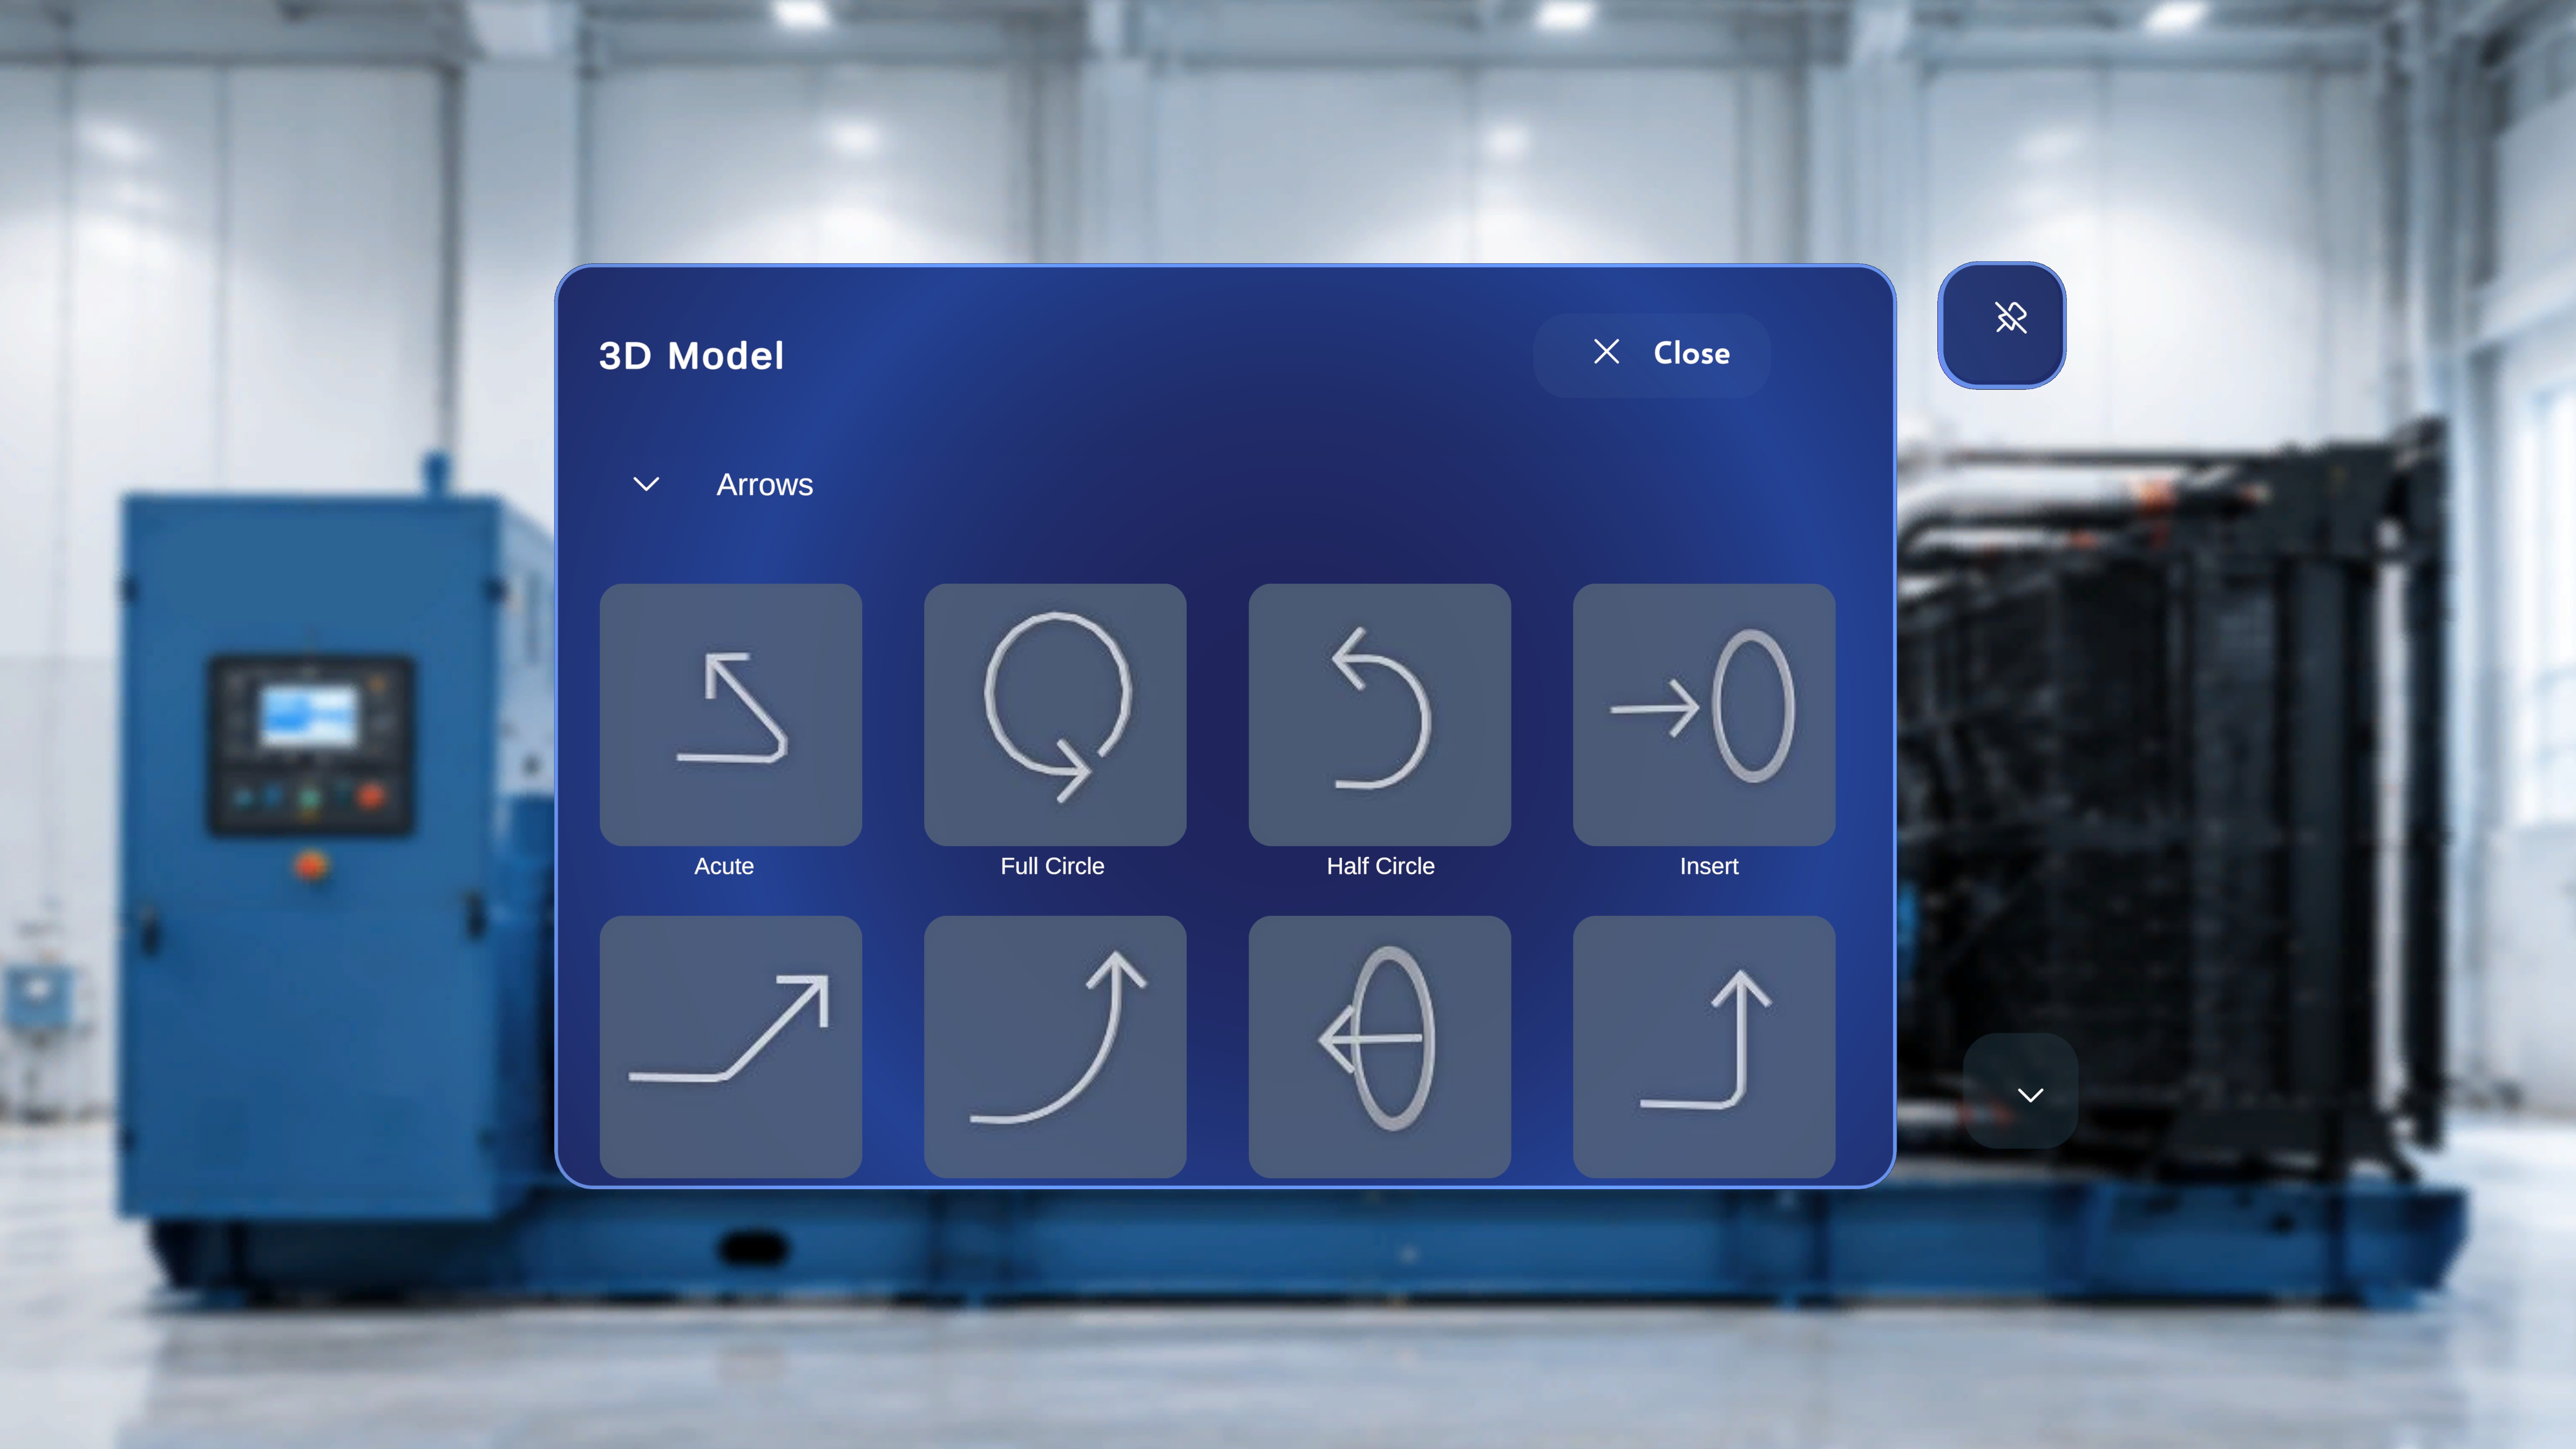 When the catalogue opens:
* Models are organised into collapsible **groups** — for example, **Arrows**, **Generic Tools**, and **Hands**.
* The first group (**Arrows**) is expanded by default.
* Each tile shows a preview icon and the model name (for example, **Acute**, **Full Circle**, **Half Circle**, **Insert**).
* A **Close** button appears in the top-right corner of the catalogue.
Focus a tile to see the **"Say 'select'"** voice hint appear beneath it, indicating you can select it by voice or by air-tap.
***
## Scroll Through a Group
If a group contains more models than fit on screen, use the **scroll buttons** on the right side of the catalogue to page through the group.
### Step-by-Step Instructions
1. Focus the **down chevron (˅)** at the bottom of the catalogue and select it to scroll to the next page of models within the current group.
When the catalogue opens:
* Models are organised into collapsible **groups** — for example, **Arrows**, **Generic Tools**, and **Hands**.
* The first group (**Arrows**) is expanded by default.
* Each tile shows a preview icon and the model name (for example, **Acute**, **Full Circle**, **Half Circle**, **Insert**).
* A **Close** button appears in the top-right corner of the catalogue.
Focus a tile to see the **"Say 'select'"** voice hint appear beneath it, indicating you can select it by voice or by air-tap.
***
## Scroll Through a Group
If a group contains more models than fit on screen, use the **scroll buttons** on the right side of the catalogue to page through the group.
### Step-by-Step Instructions
1. Focus the **down chevron (˅)** at the bottom of the catalogue and select it to scroll to the next page of models within the current group.
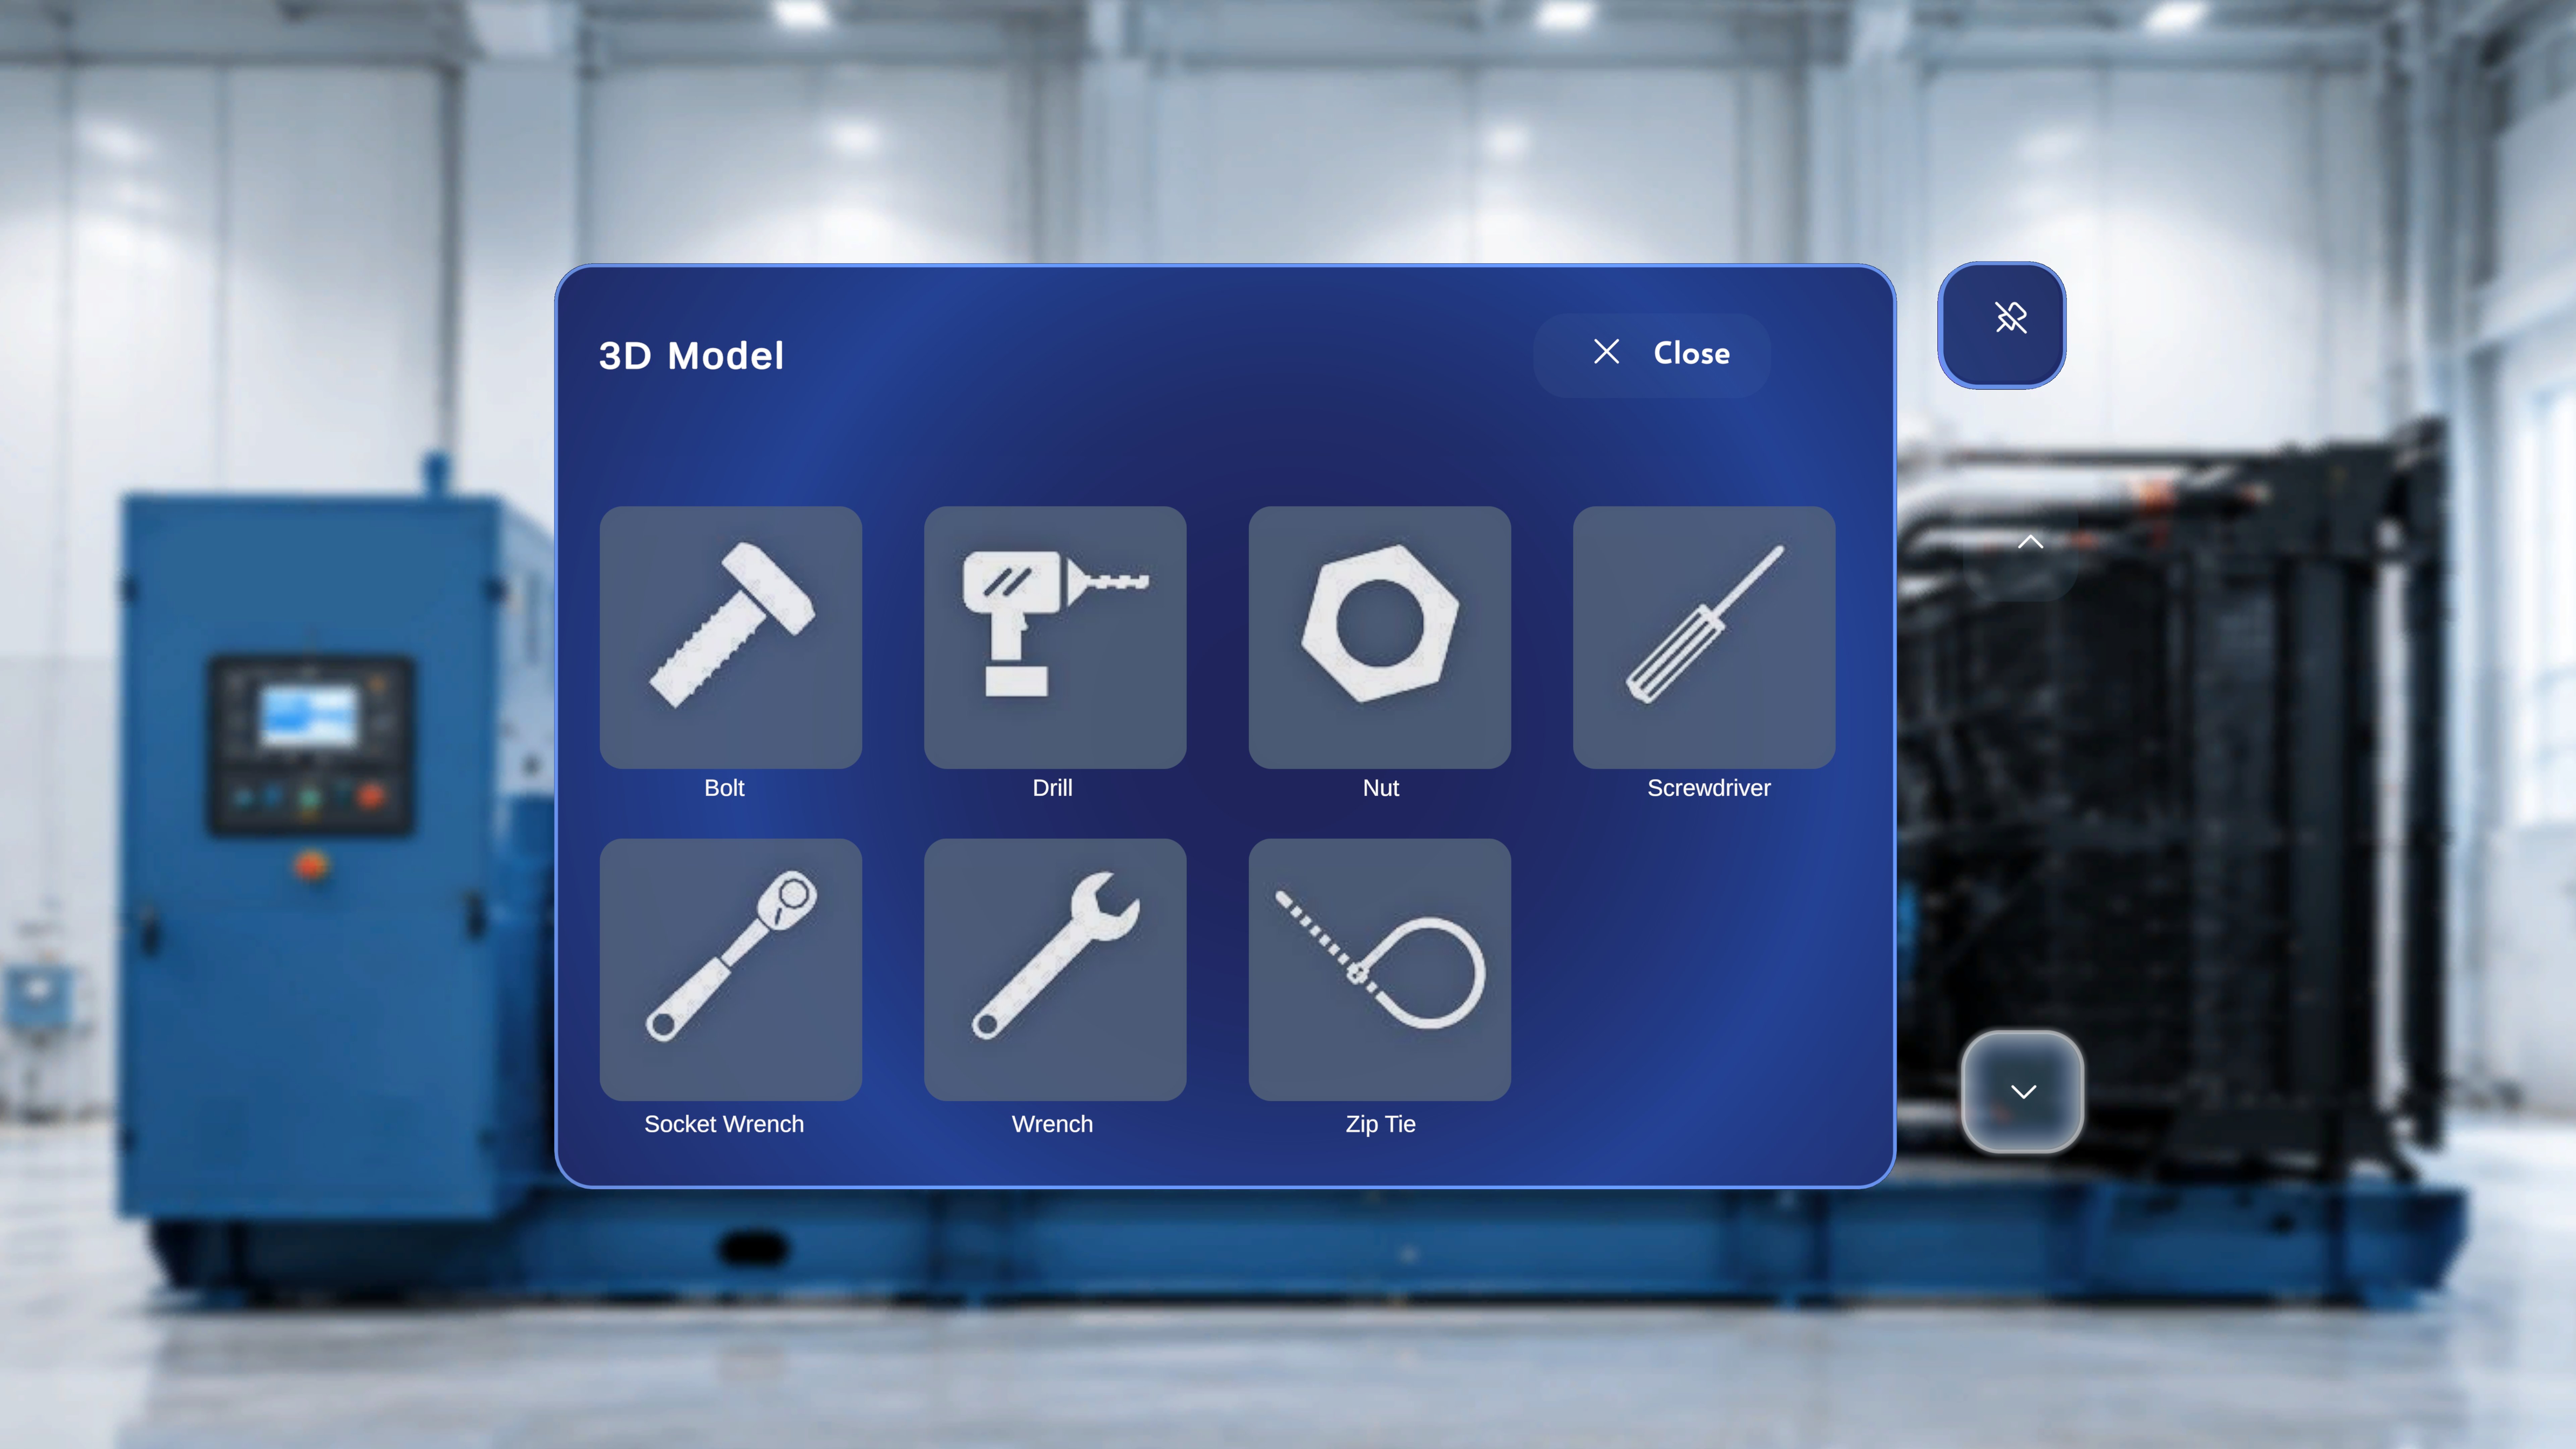 2. Focus the **up chevron (˄)** at the top of the catalogue and select it to return to the previous page.
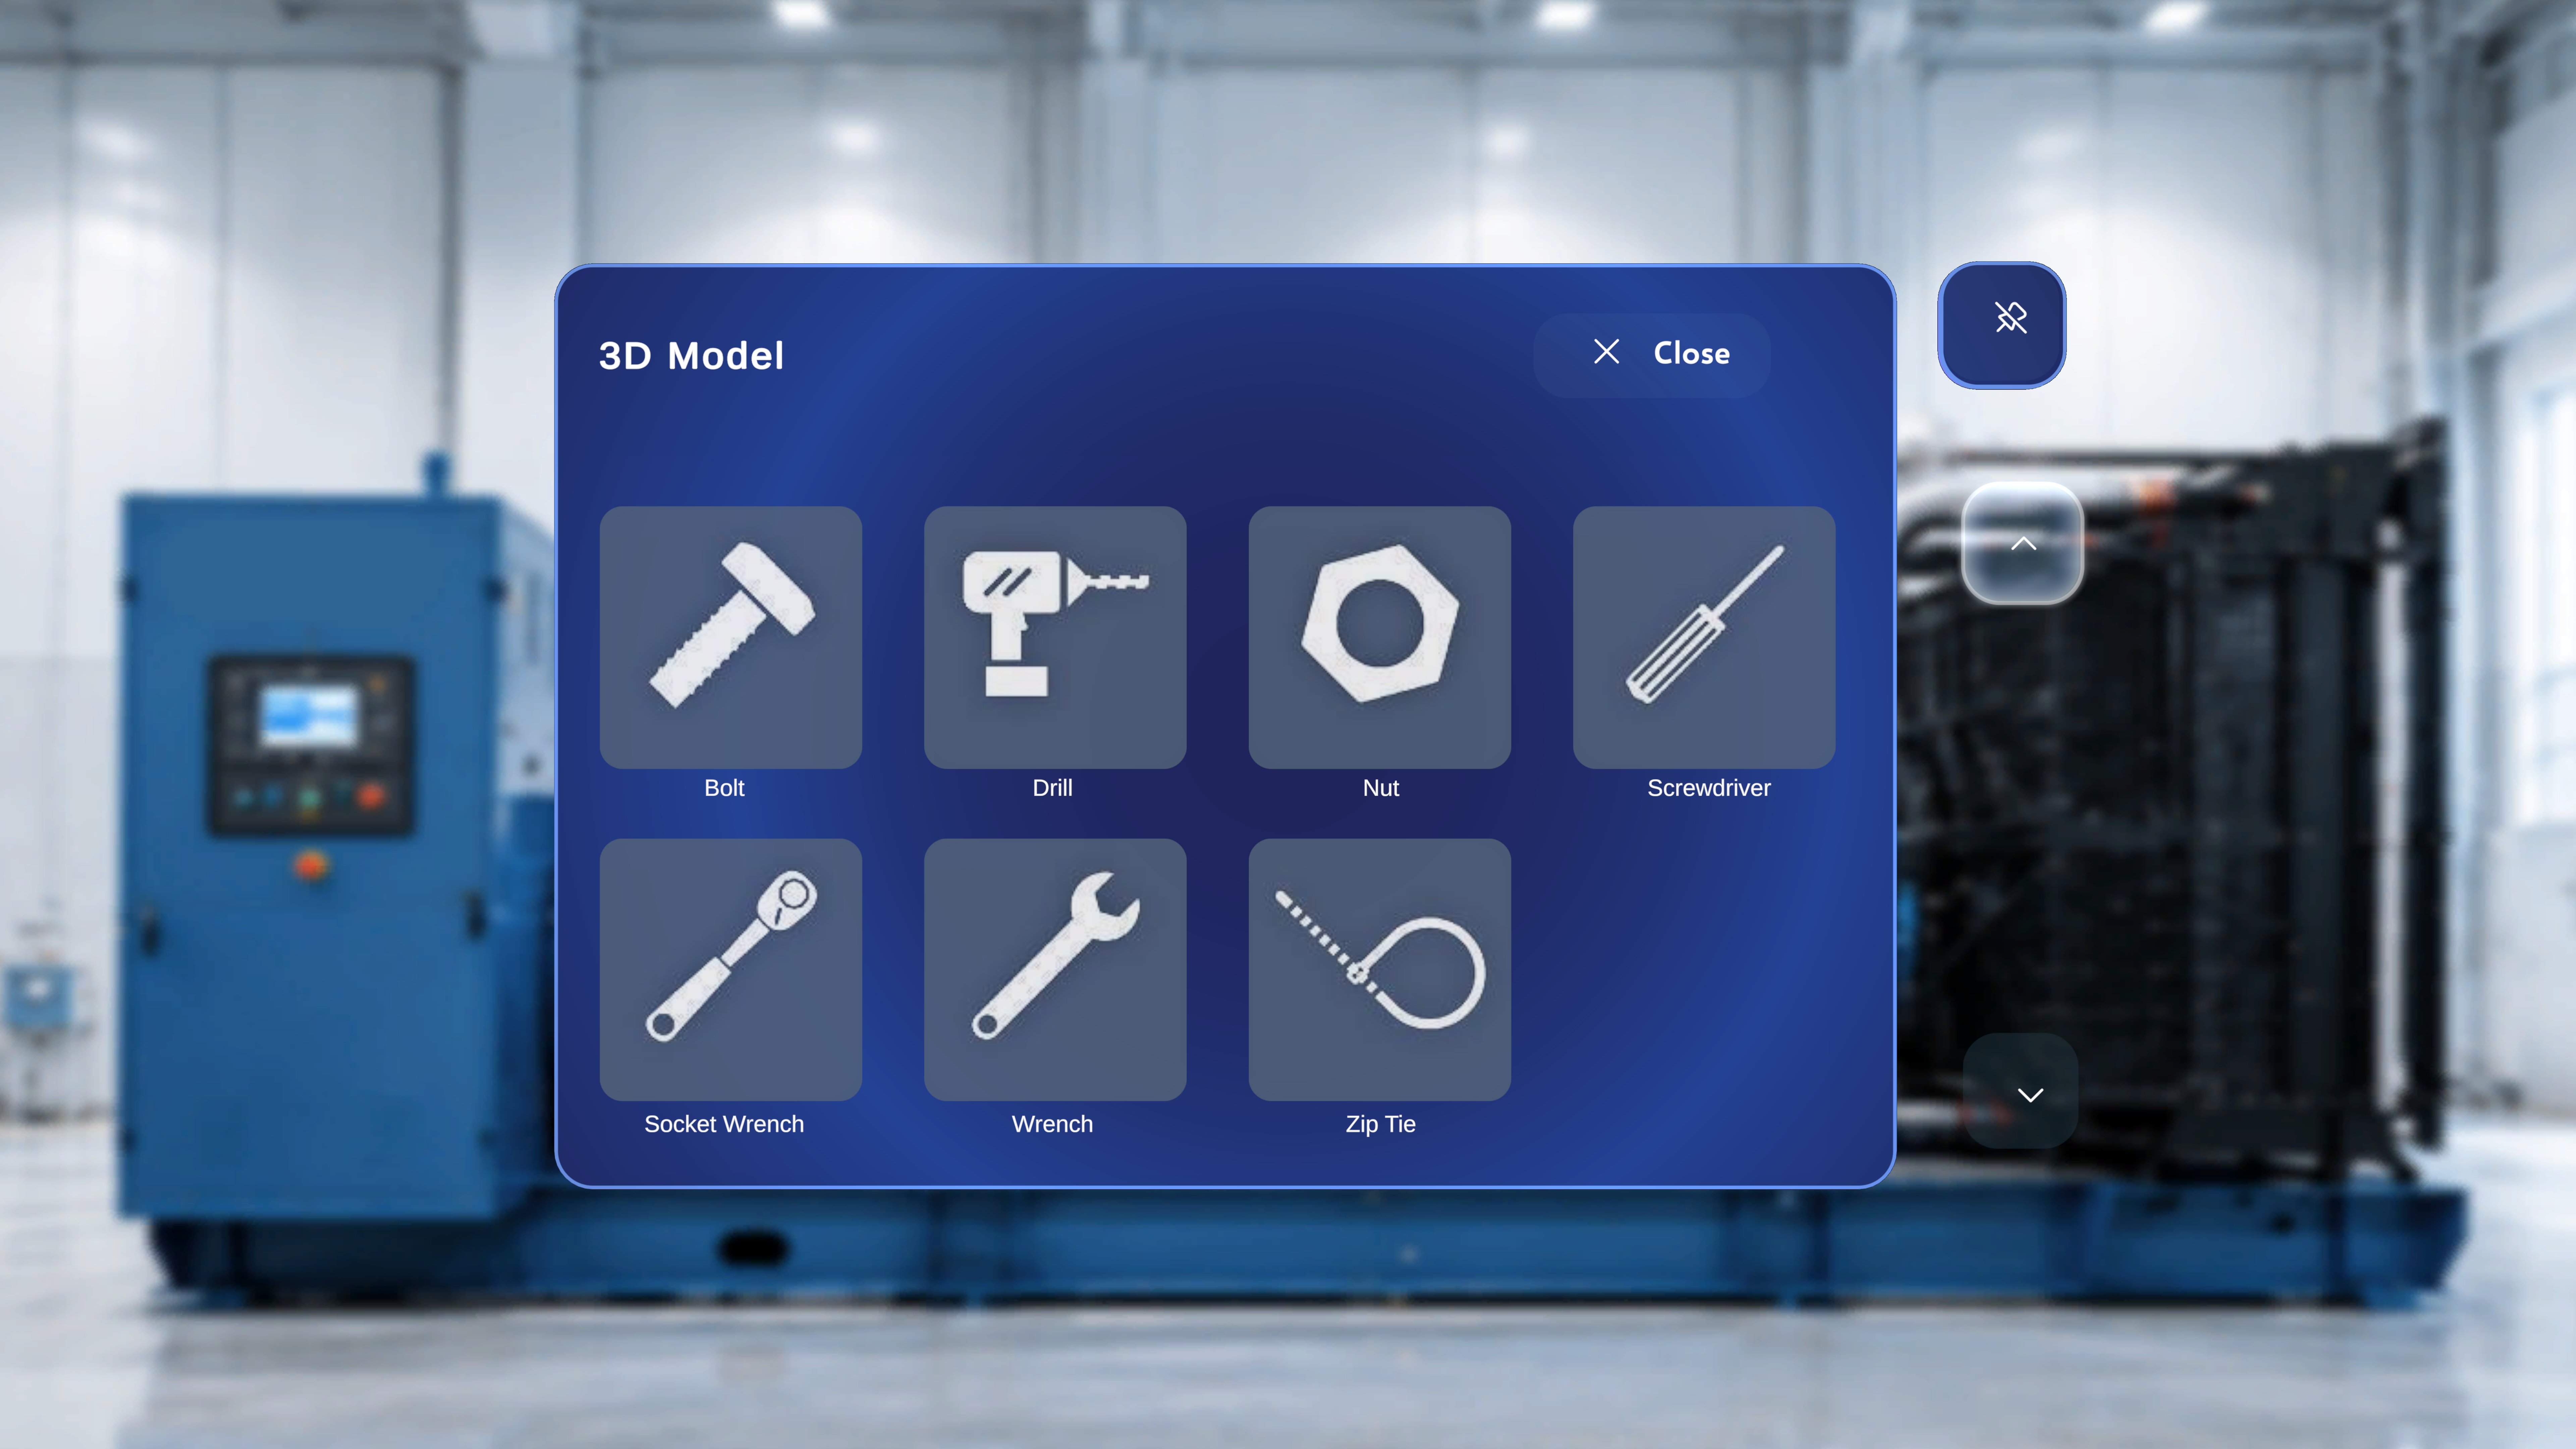 ### What Happens Next
The catalogue advances one page at a time so you can review all available models in the group without leaving the catalogue view.
***
## Collapse and Expand Groups
You can collapse and expand groups to jump between categories without scrolling through everything.
### Collapse a Group
Focus the **caret (˅)** next to an expanded group name and select it to hide that group's tiles. Once collapsed, only the group headers remain visible so you can see all available categories at a glance.
### What Happens Next
The catalogue advances one page at a time so you can review all available models in the group without leaving the catalogue view.
***
## Collapse and Expand Groups
You can collapse and expand groups to jump between categories without scrolling through everything.
### Collapse a Group
Focus the **caret (˅)** next to an expanded group name and select it to hide that group's tiles. Once collapsed, only the group headers remain visible so you can see all available categories at a glance.
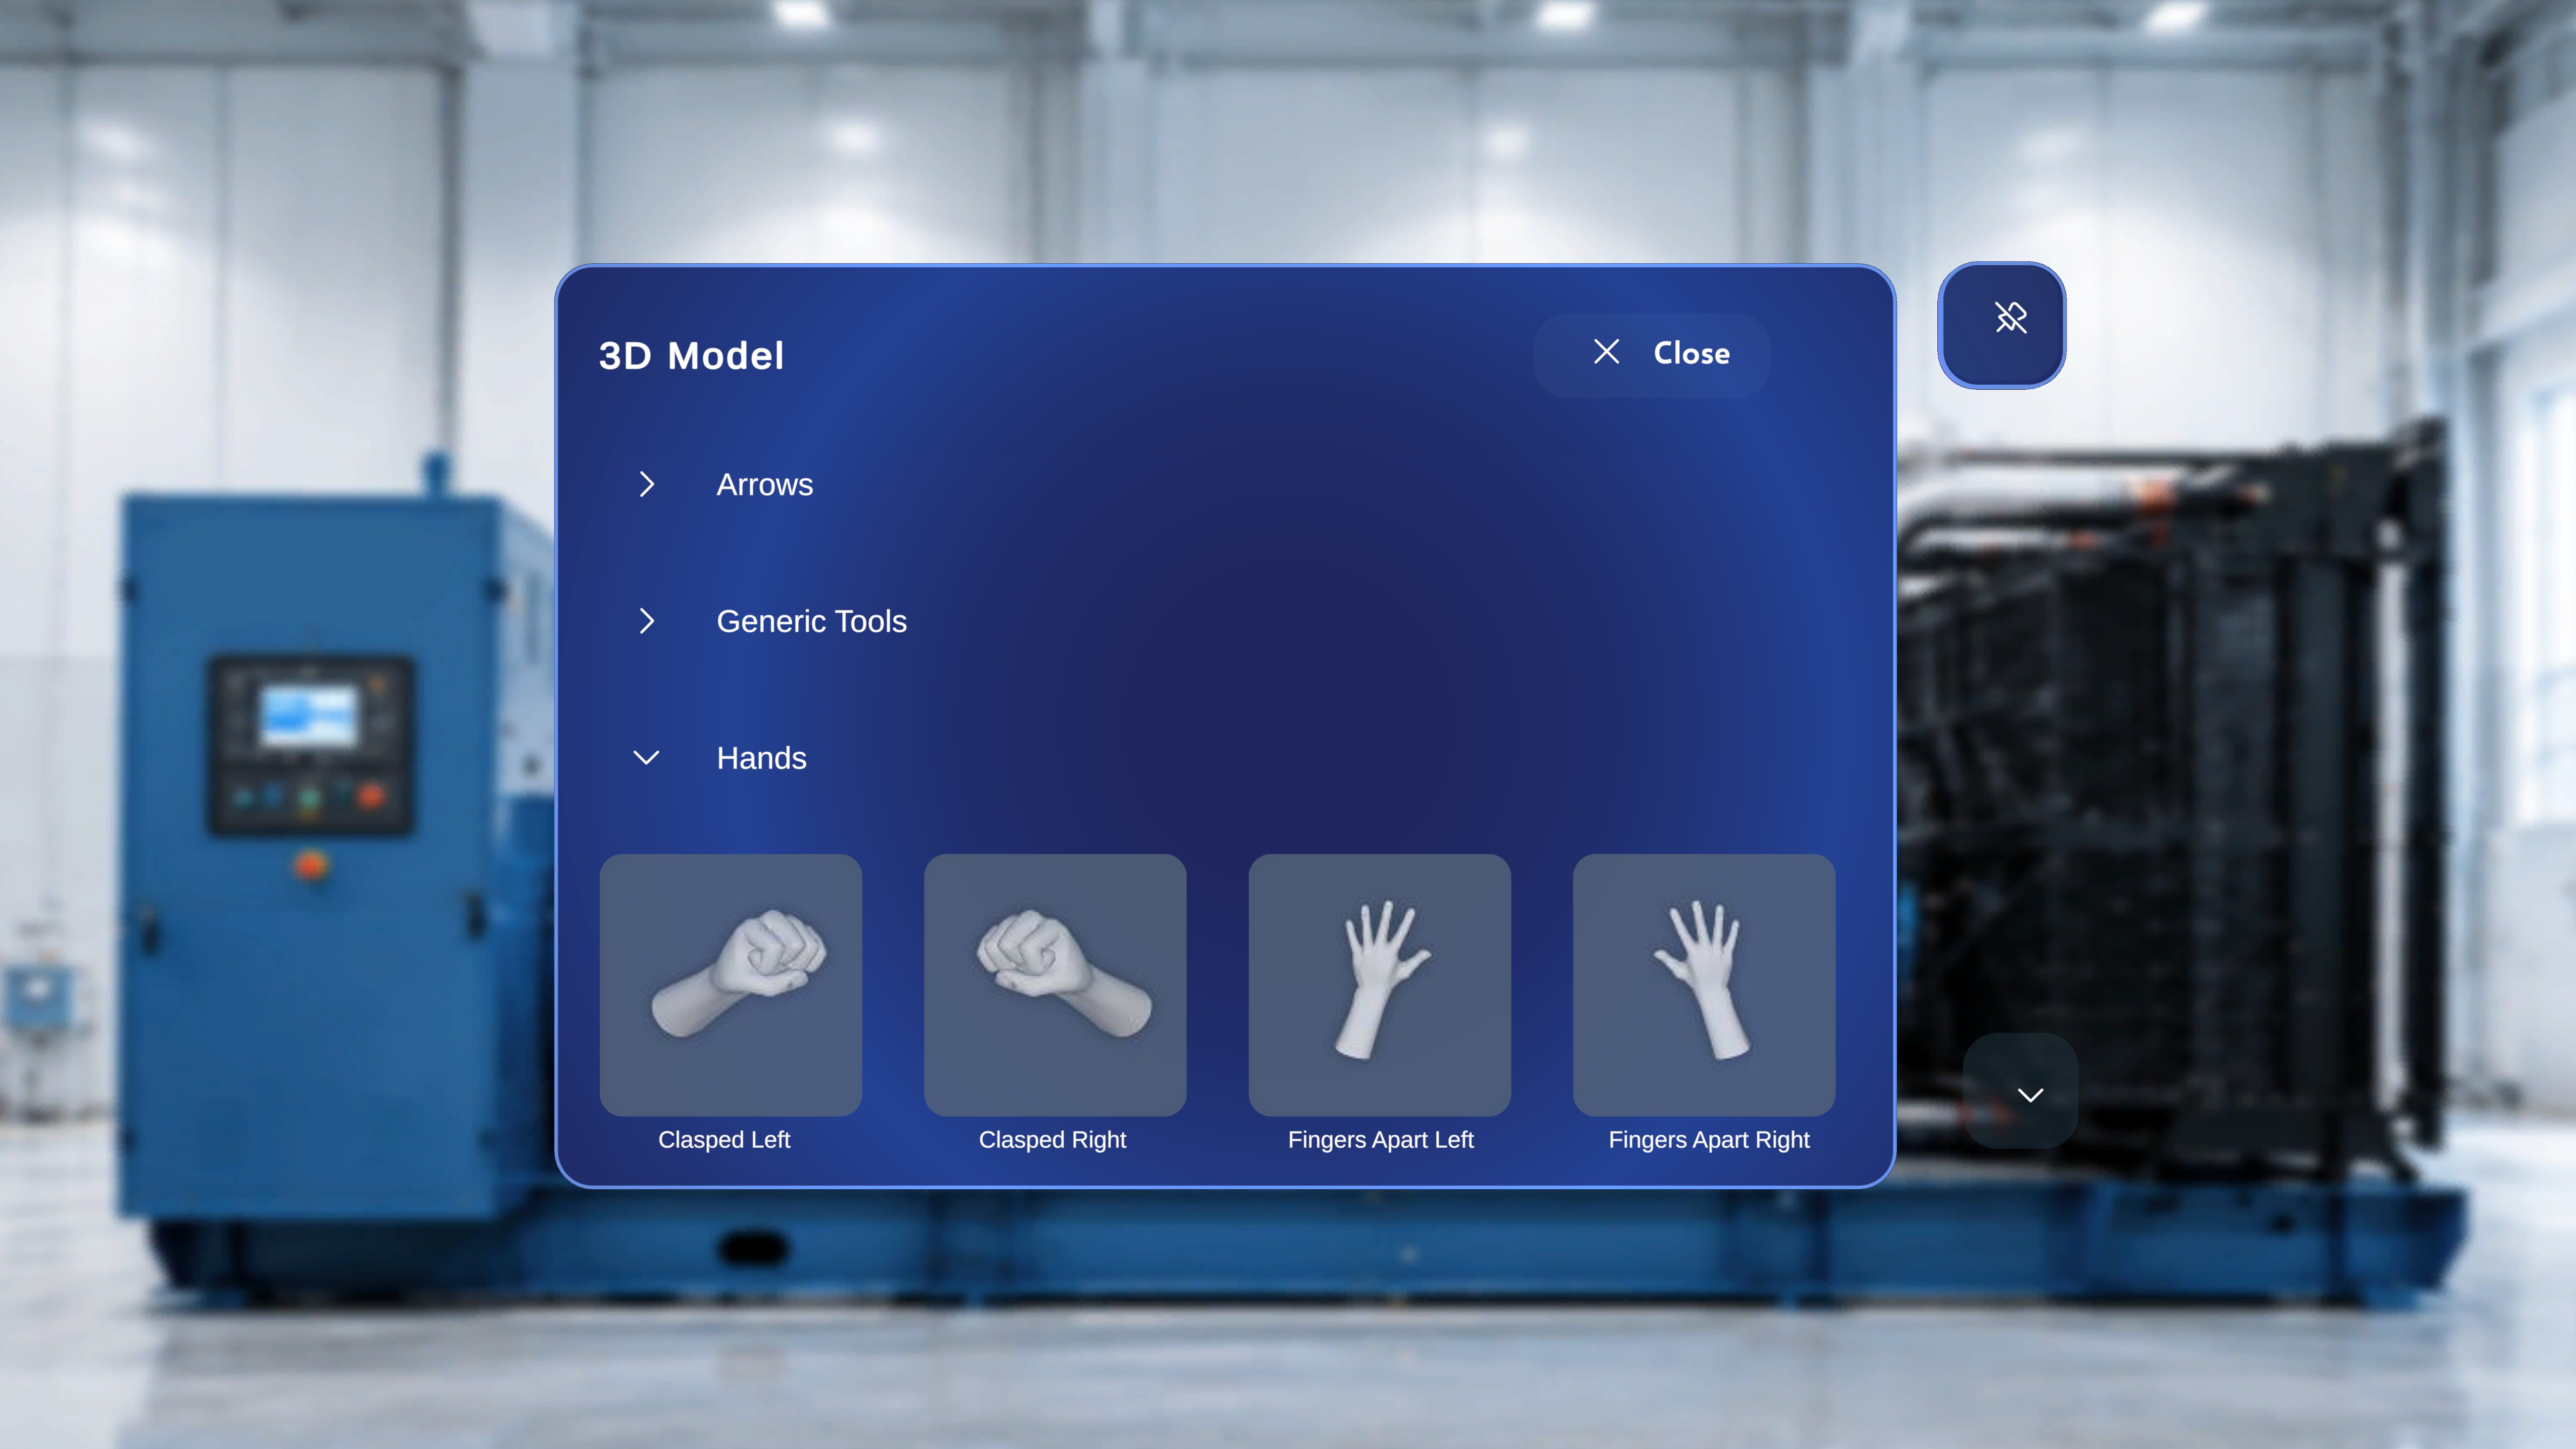 ### Expand a Group
Focus the **caret (˃)** next to a collapsed group name and select it to open that group's tiles.
### Expand a Group
Focus the **caret (˃)** next to a collapsed group name and select it to open that group's tiles.
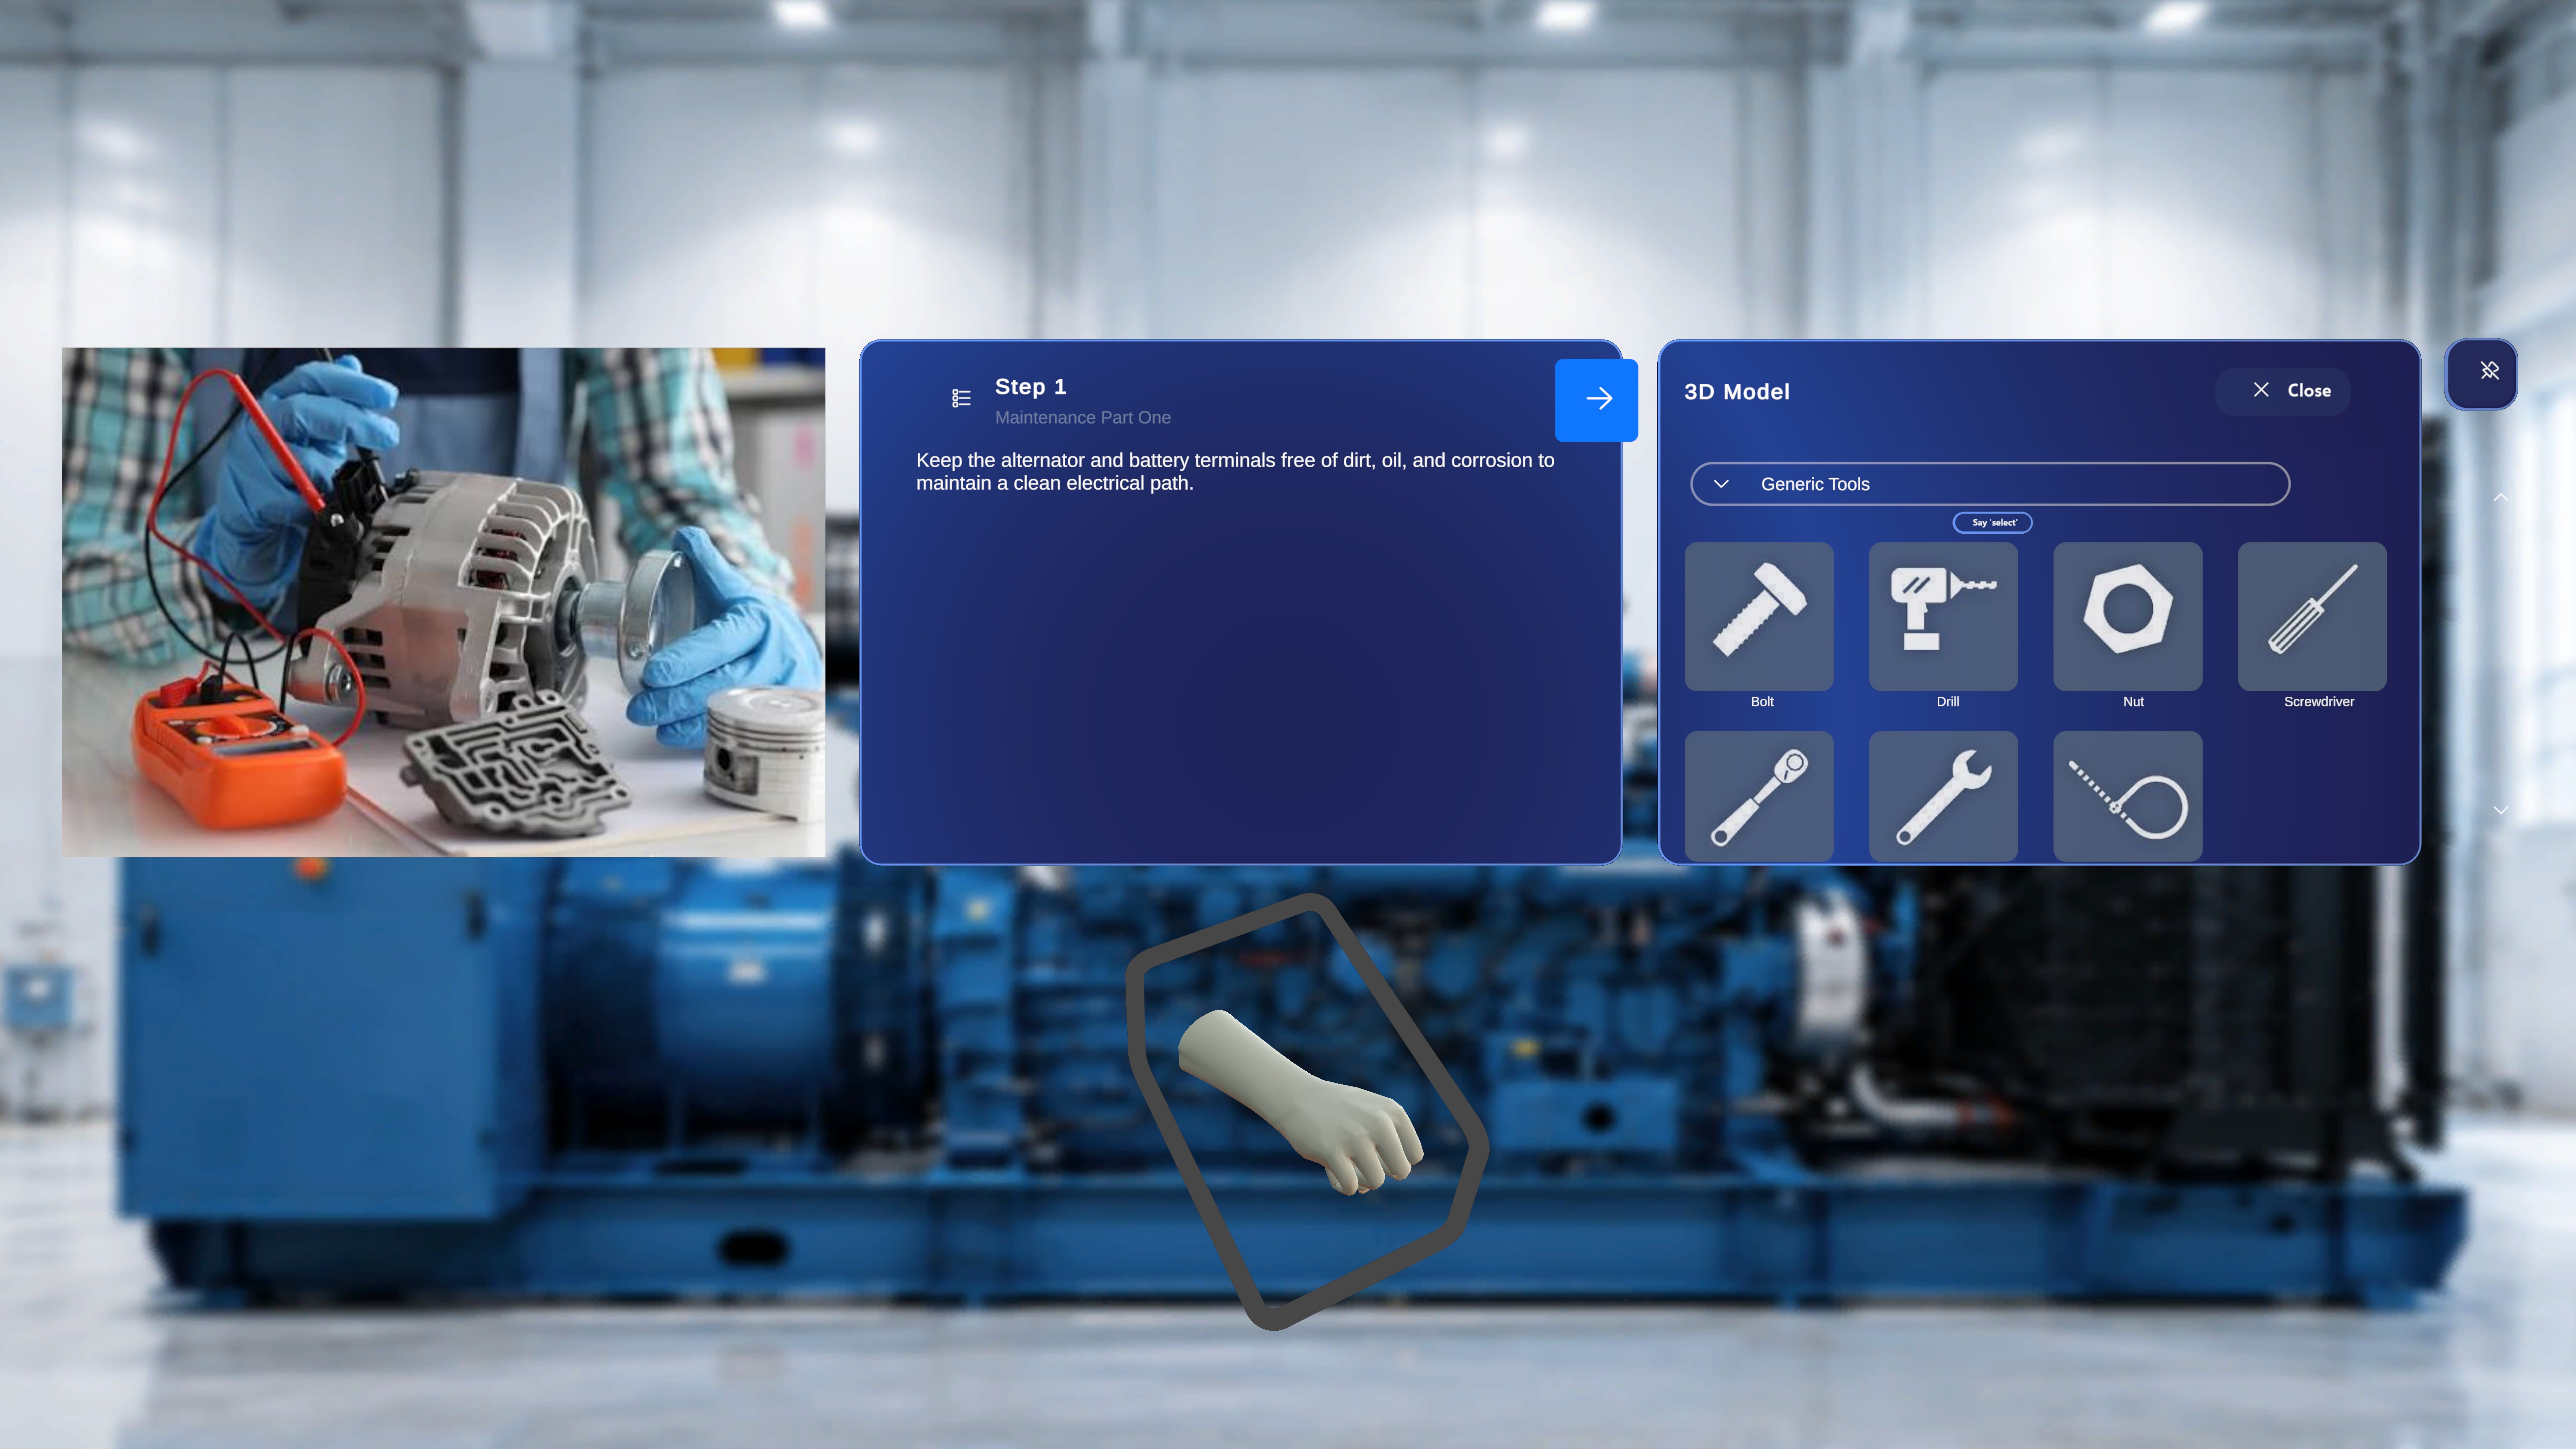
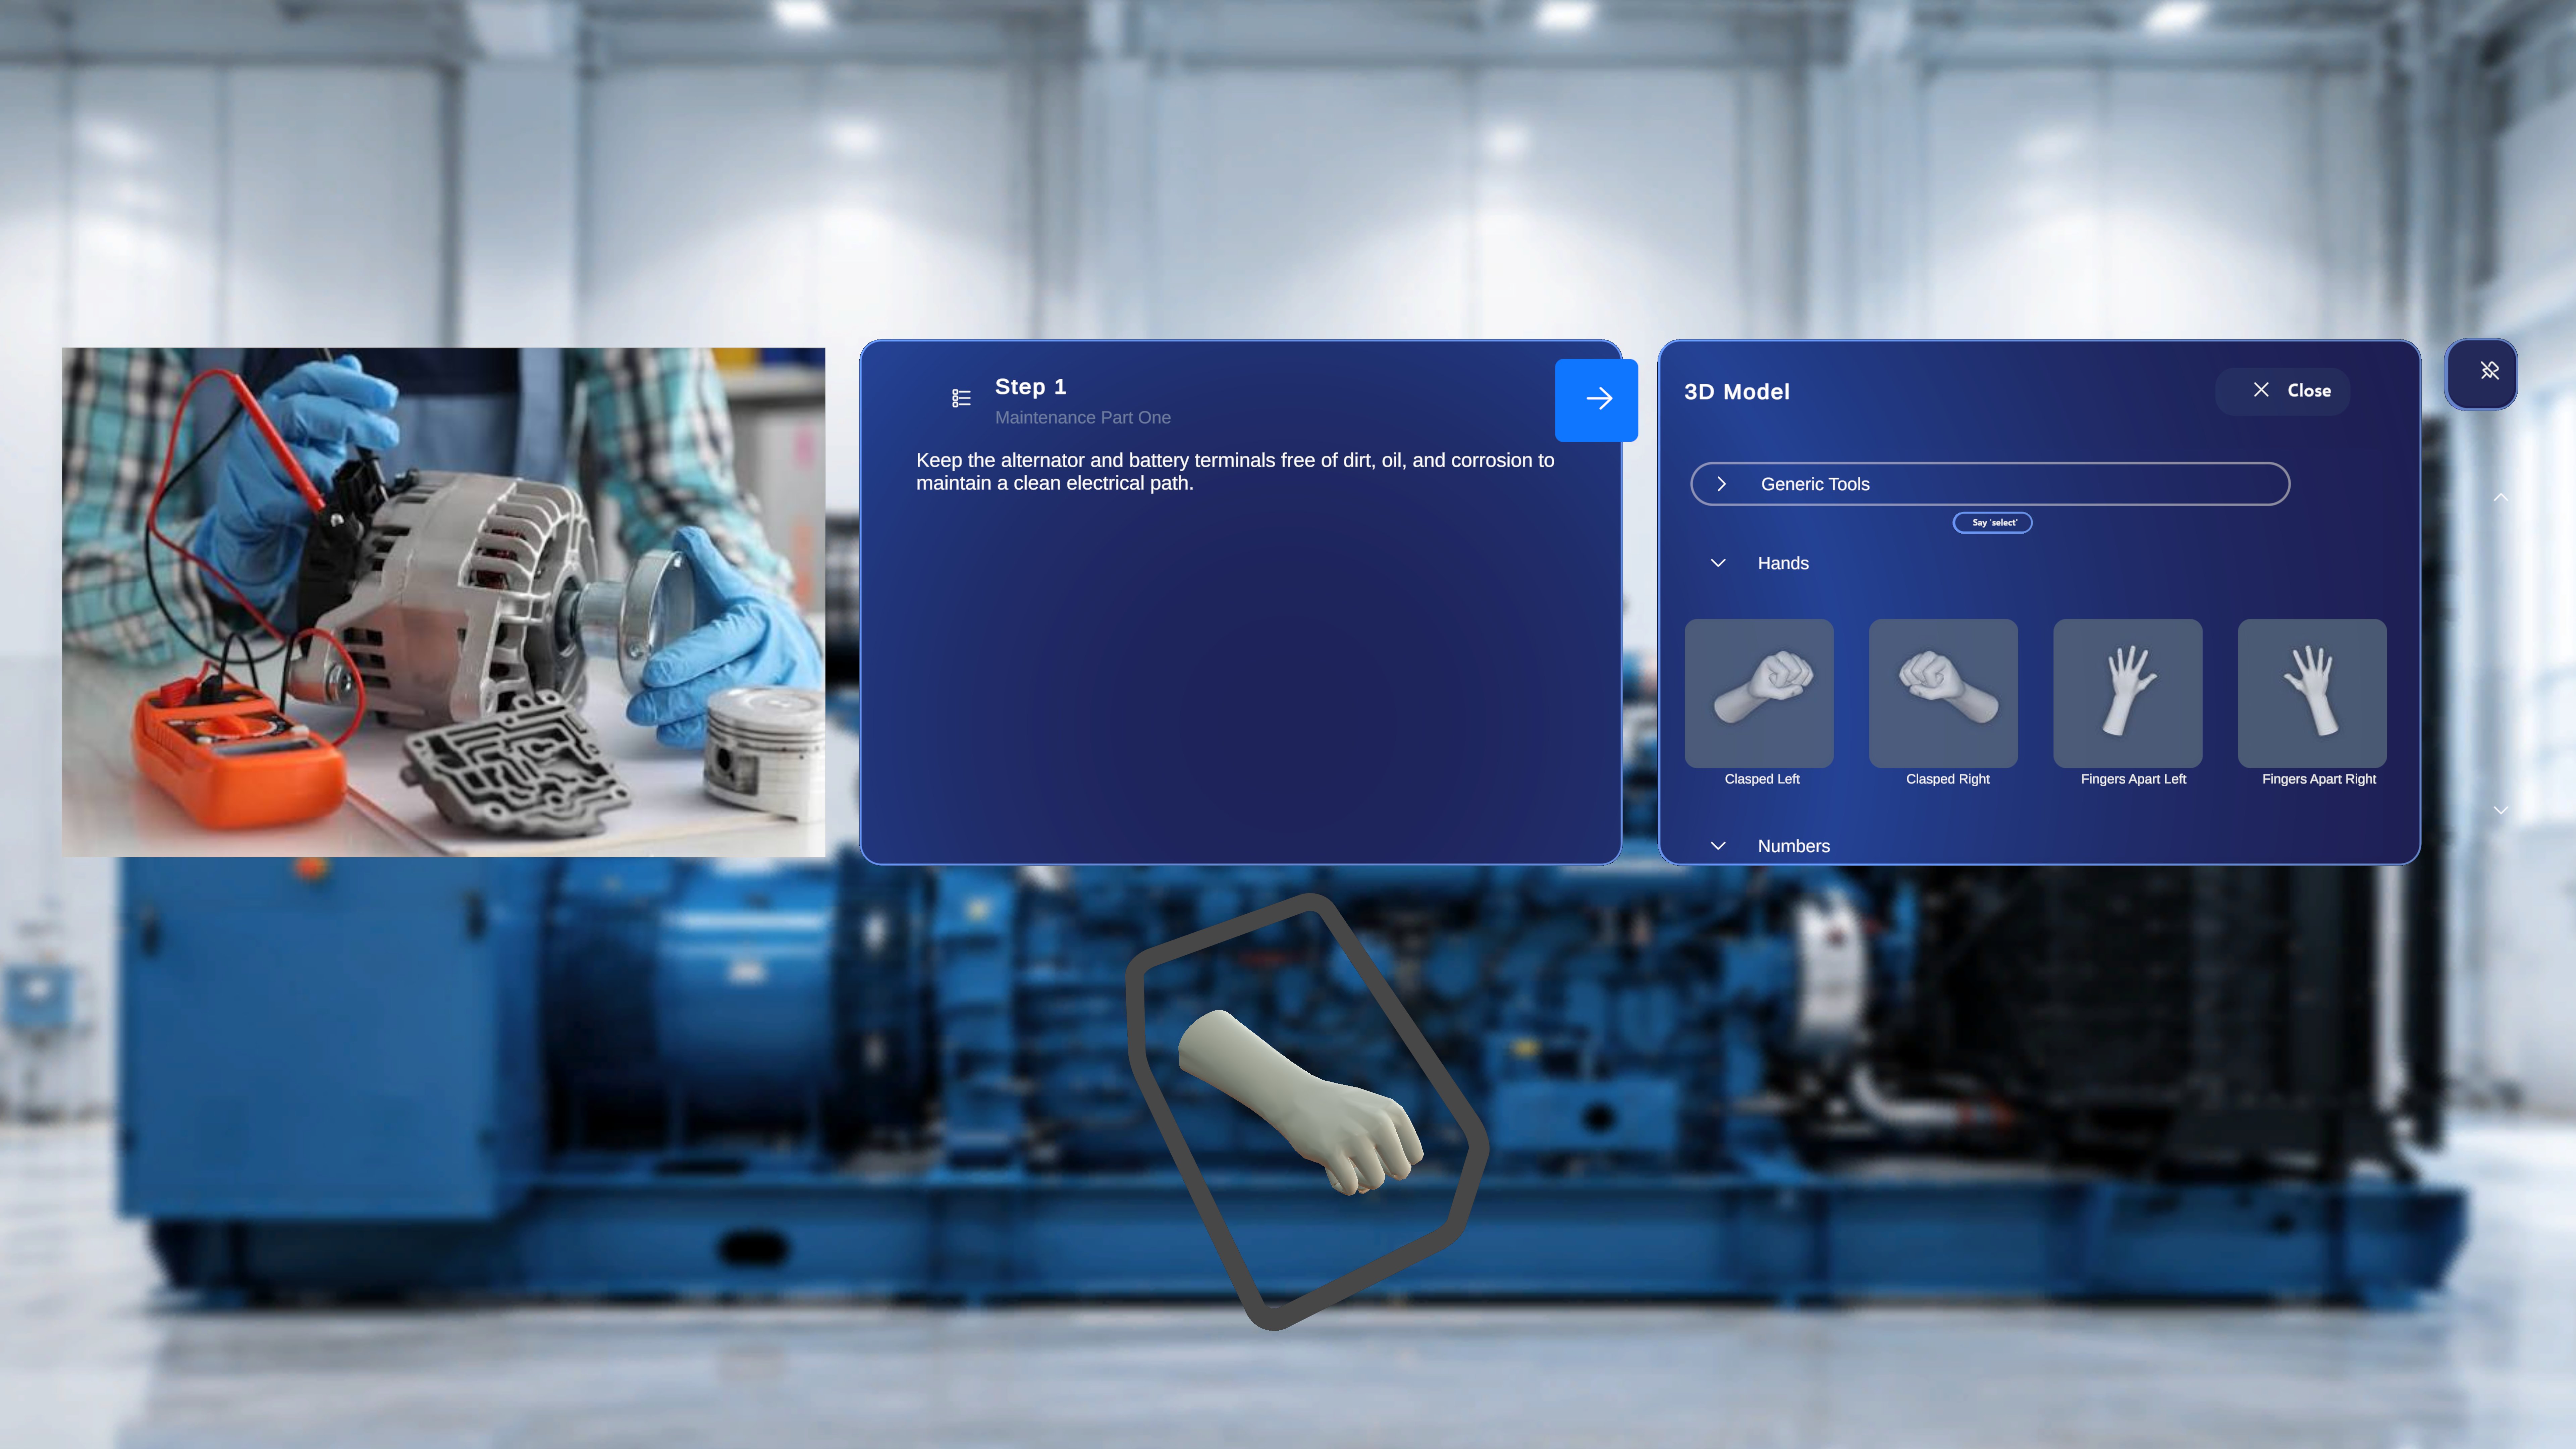 The group expands and its tiles appear below the header. For example, expanding **Generic Tools** shows models such as **Bolt**, **Drill**, **Nut**, and **Screwdriver**:
 ***
## Close the Catalogue
***
## Close the Catalogue
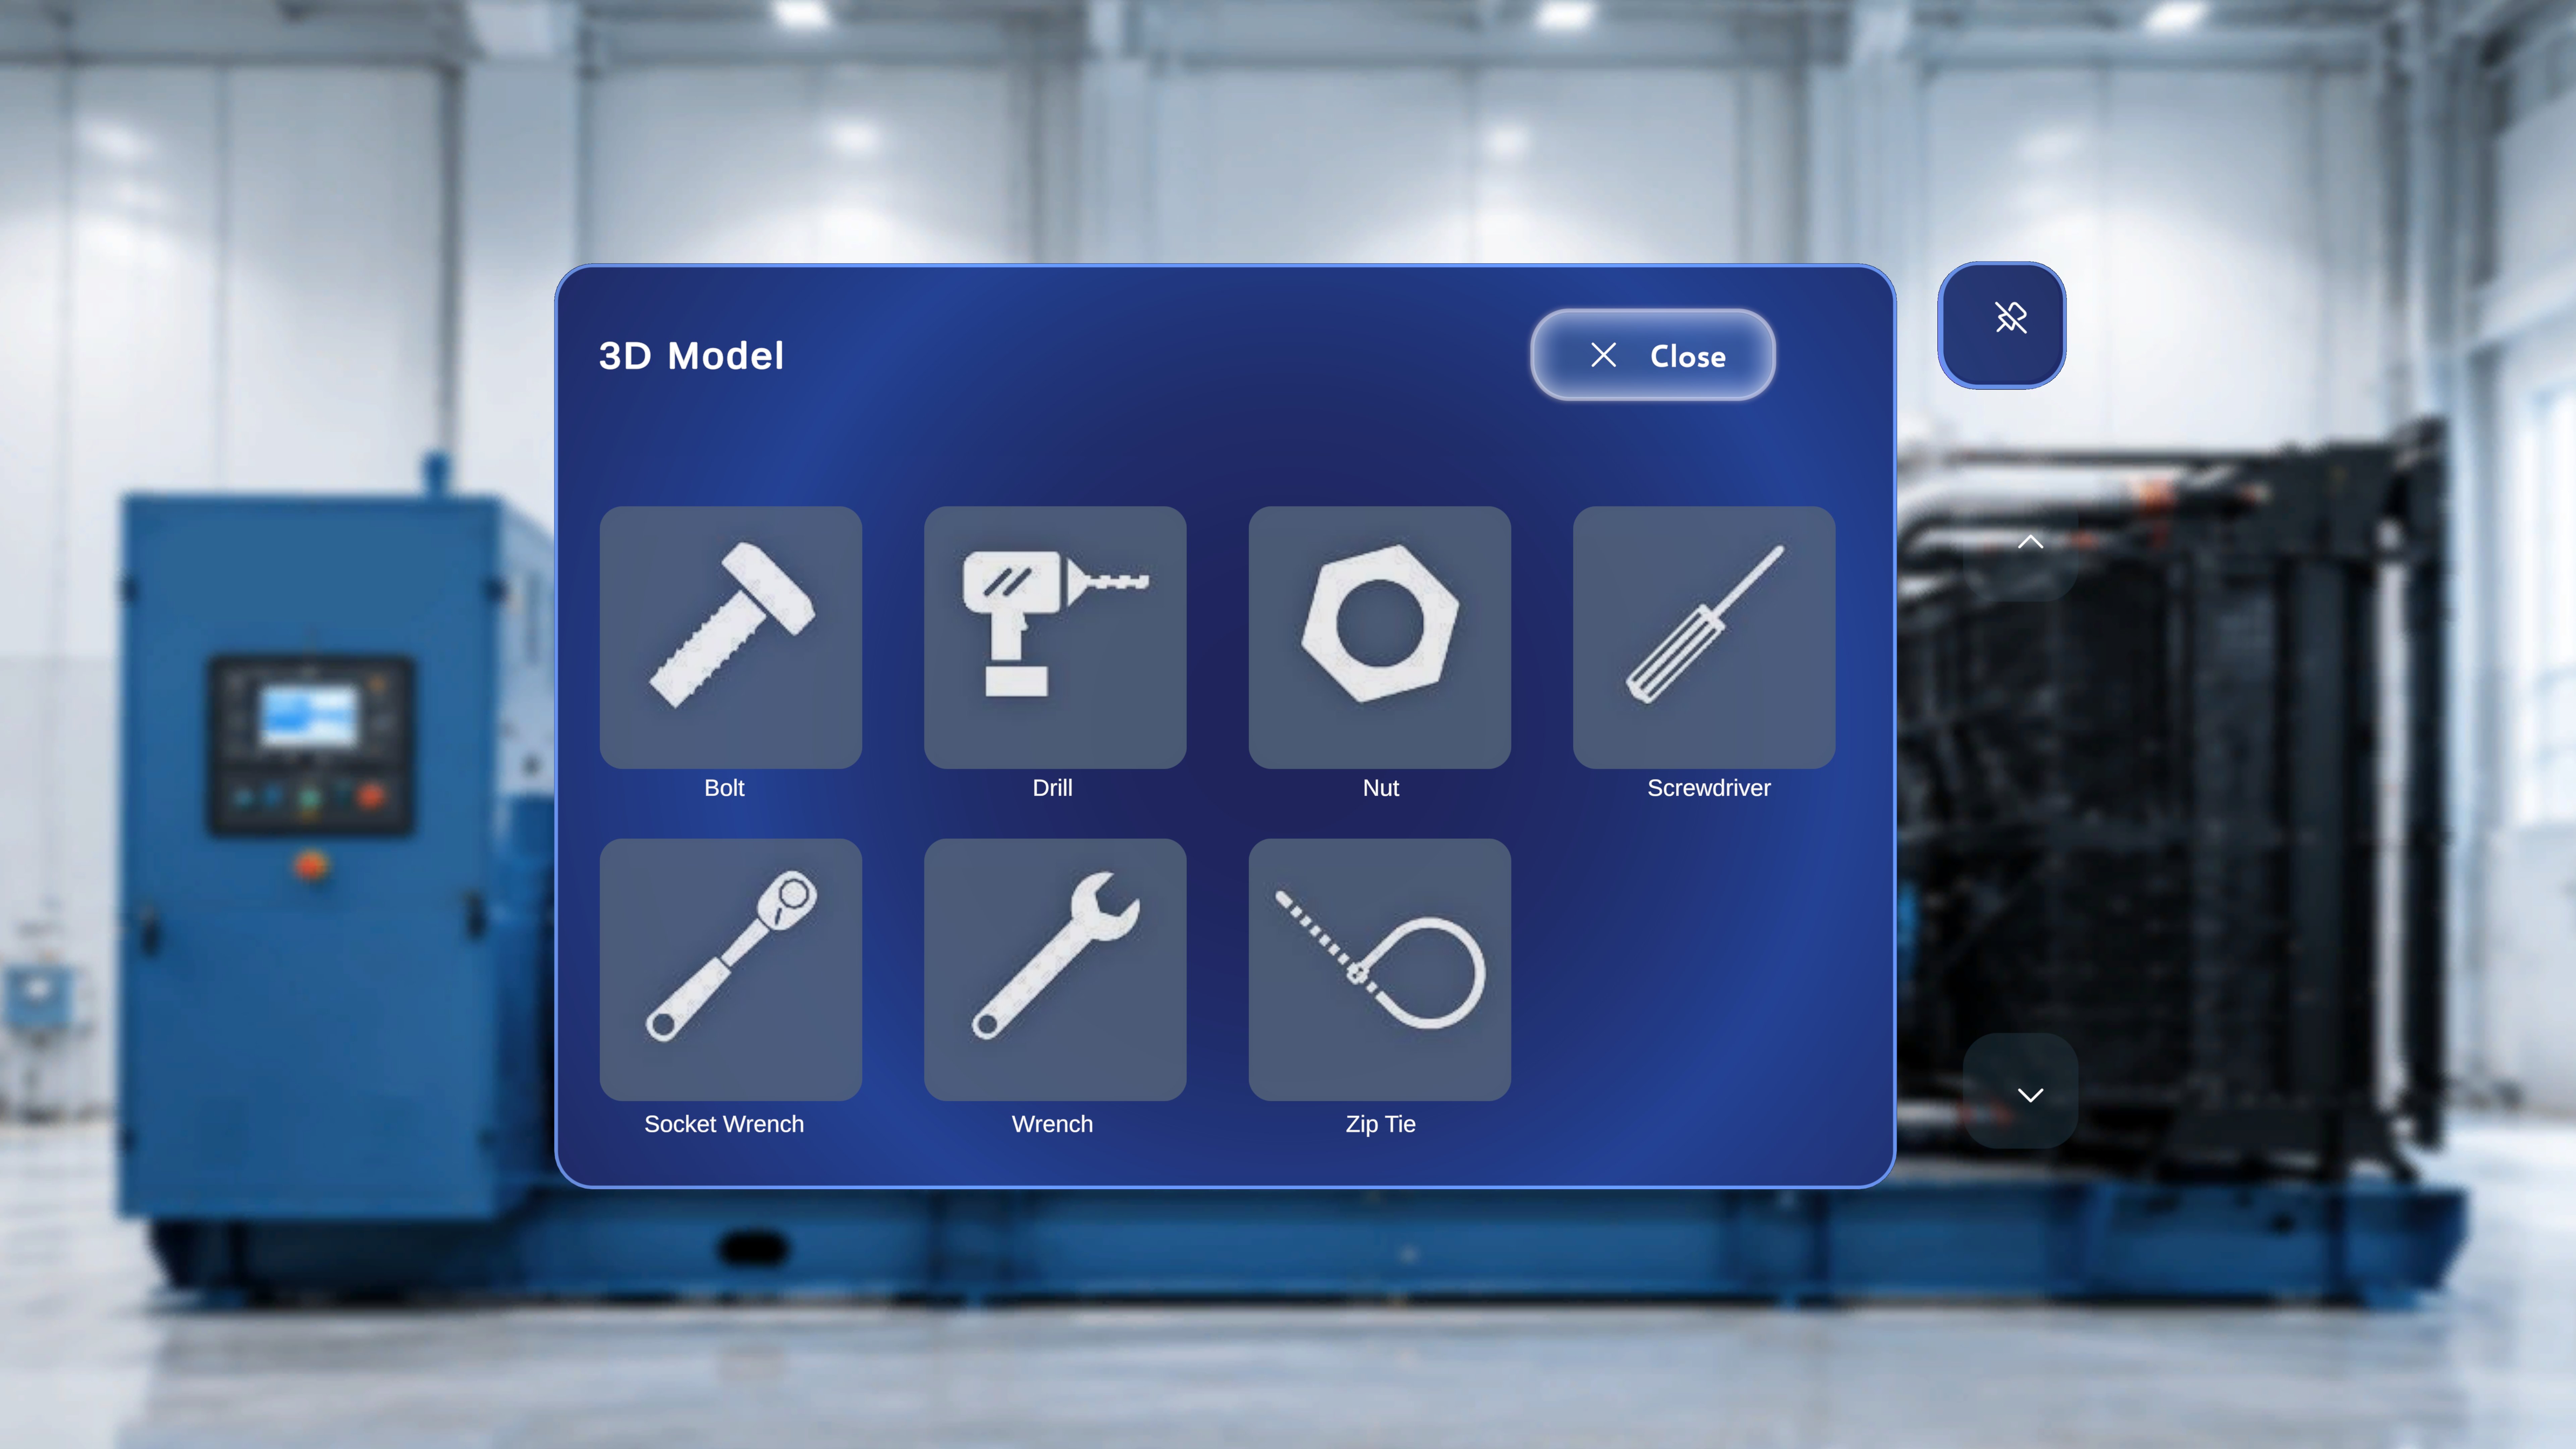 If you do not want to add a model right now, you can dismiss the catalogue and return to the standard 3D Model panel view.
### Step-by-Step Instructions
1. Focus the **X Close** button in the top-right corner of the catalogue.
2. Air-tap it, or say **"Select"**.
### What Happens Next
The catalogue closes without adding any model. The 3D Model panel returns to its previous state, and any empty slots remain available for later.
***
## Add a Model to the 3D Model Panel
Once you have found the model you want, add it to the current step in a single action.
If you do not want to add a model right now, you can dismiss the catalogue and return to the standard 3D Model panel view.
### Step-by-Step Instructions
1. Focus the **X Close** button in the top-right corner of the catalogue.
2. Air-tap it, or say **"Select"**.
### What Happens Next
The catalogue closes without adding any model. The 3D Model panel returns to its previous state, and any empty slots remain available for later.
***
## Add a Model to the 3D Model Panel
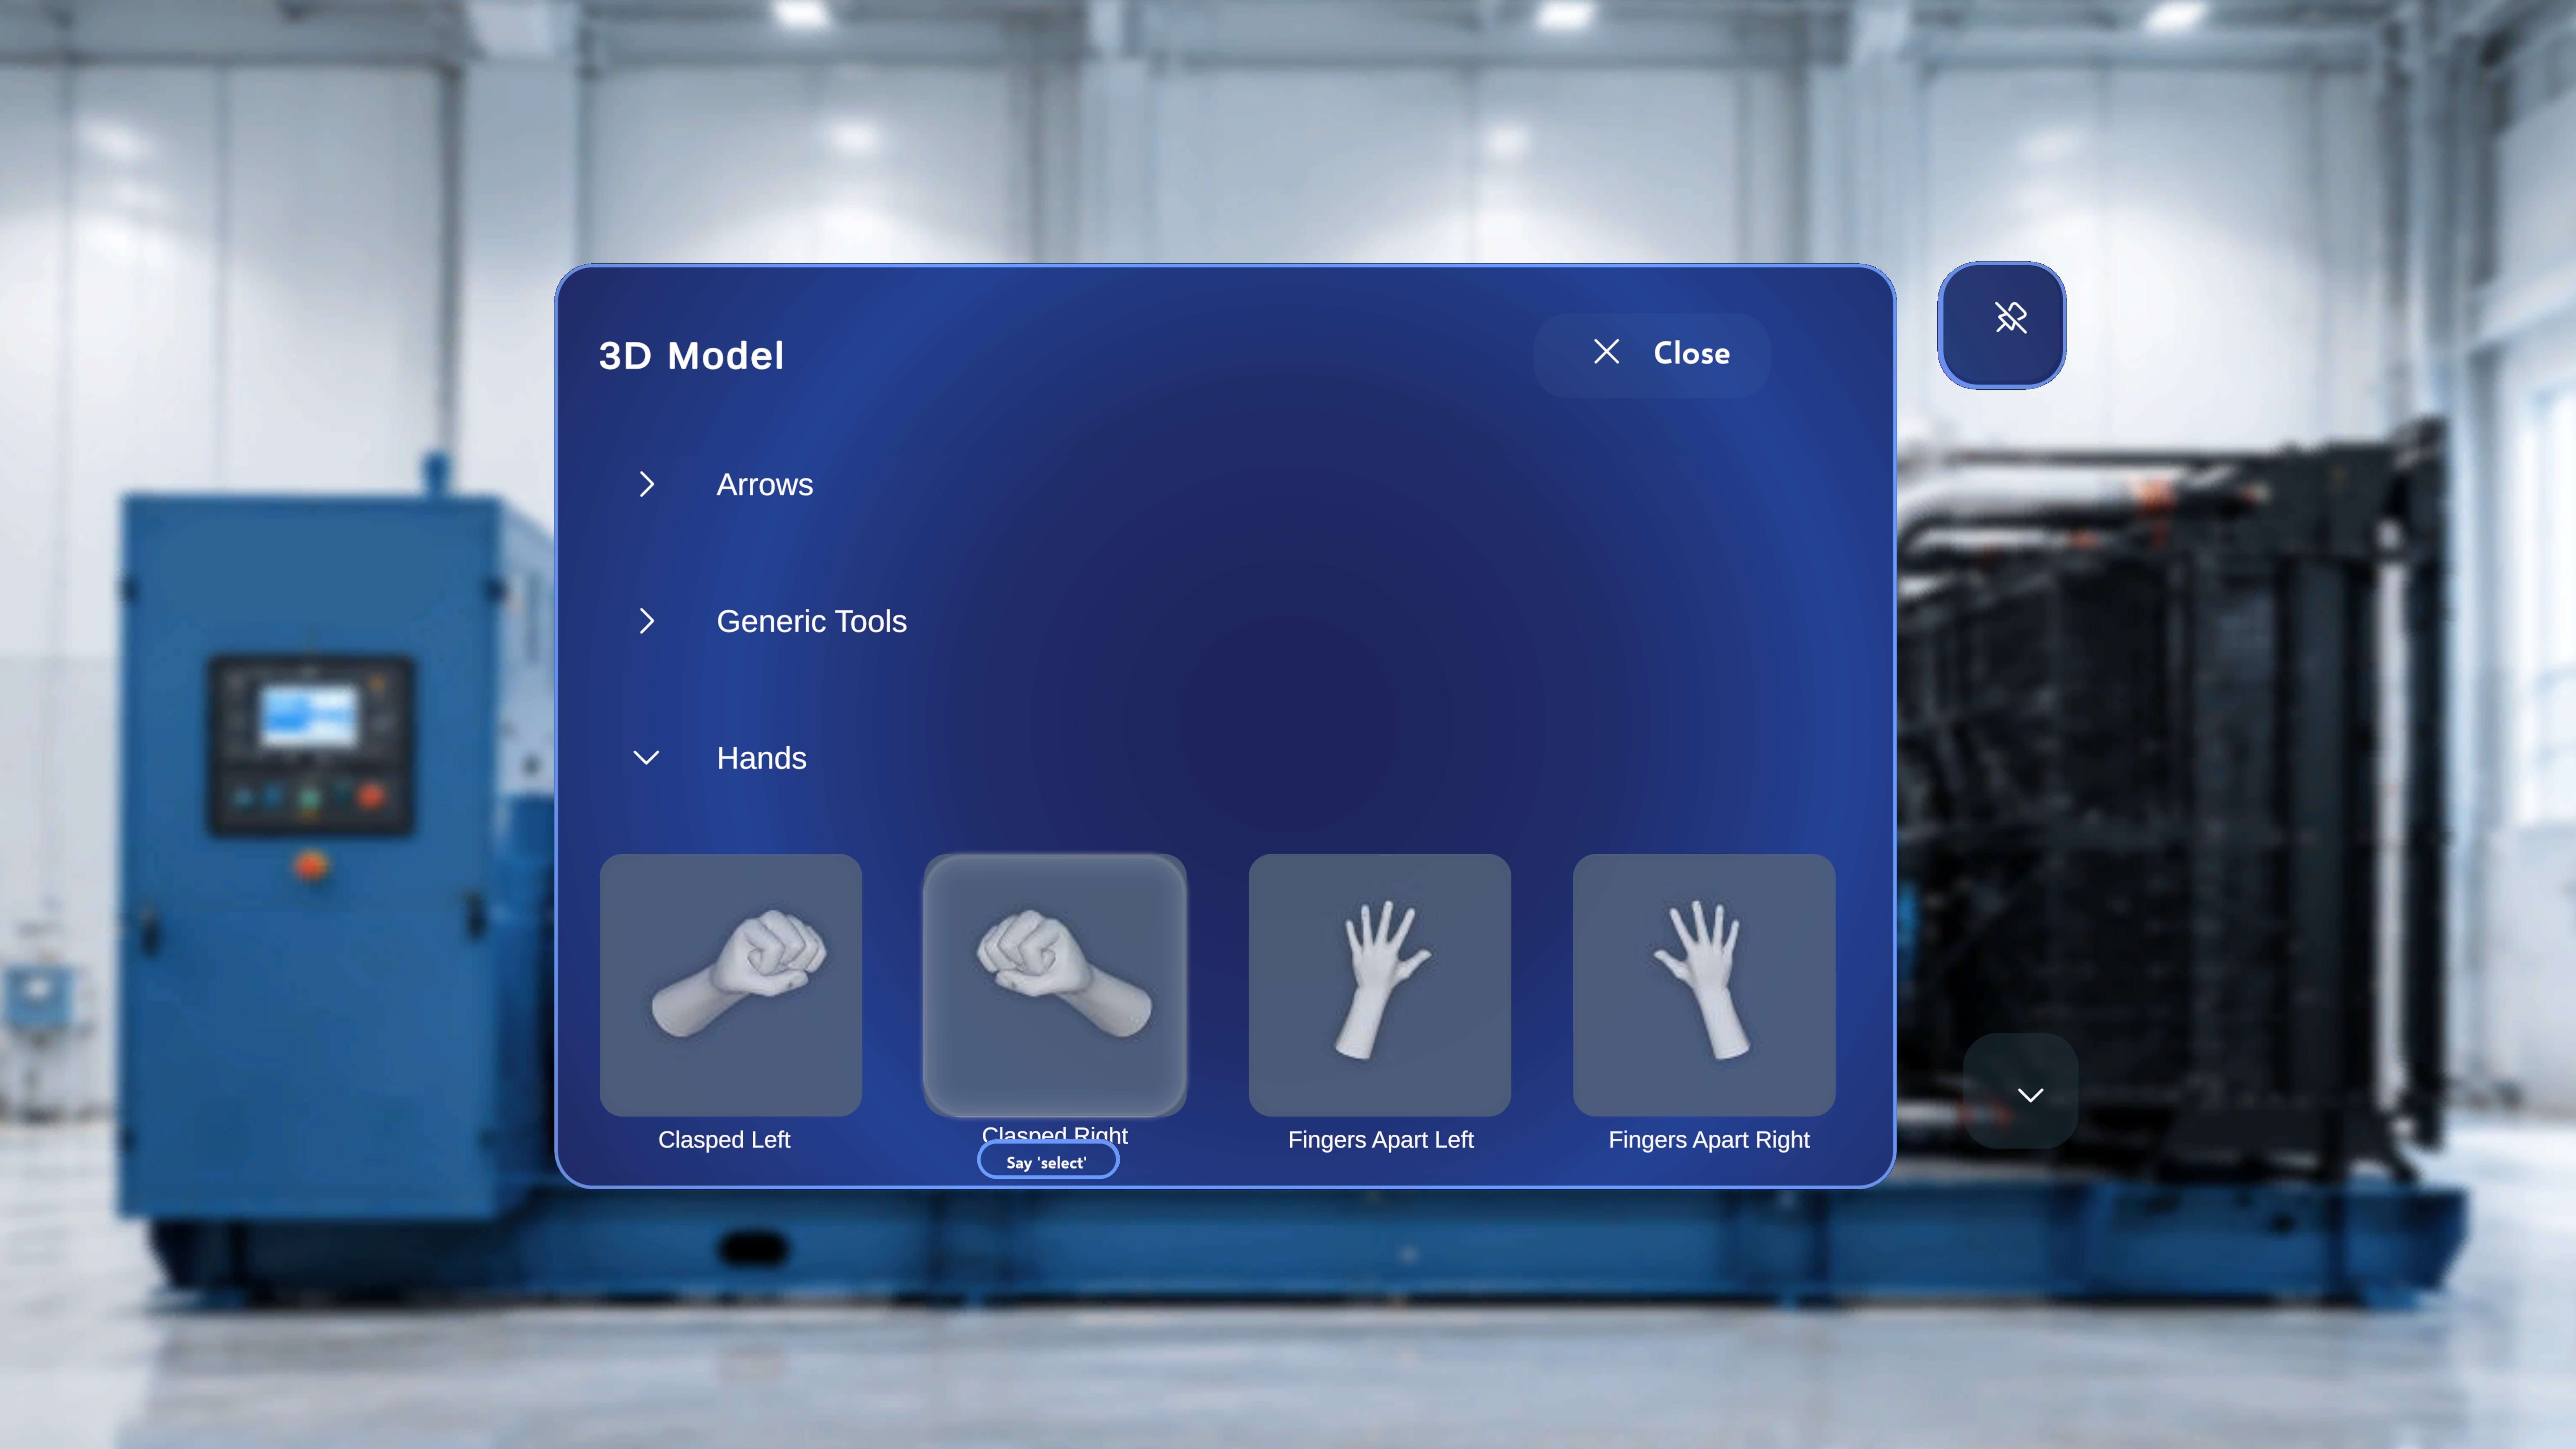
Once you have found the model you want, add it to the current step in a single action.
 ### Step-by-Step Instructions
1. Focus the model tile you want to add (for example, **Acute**).
2. Air-tap the tile, or say **"Select"** when the voice hint appears.
### What Happens Next
* The catalogue closes automatically.
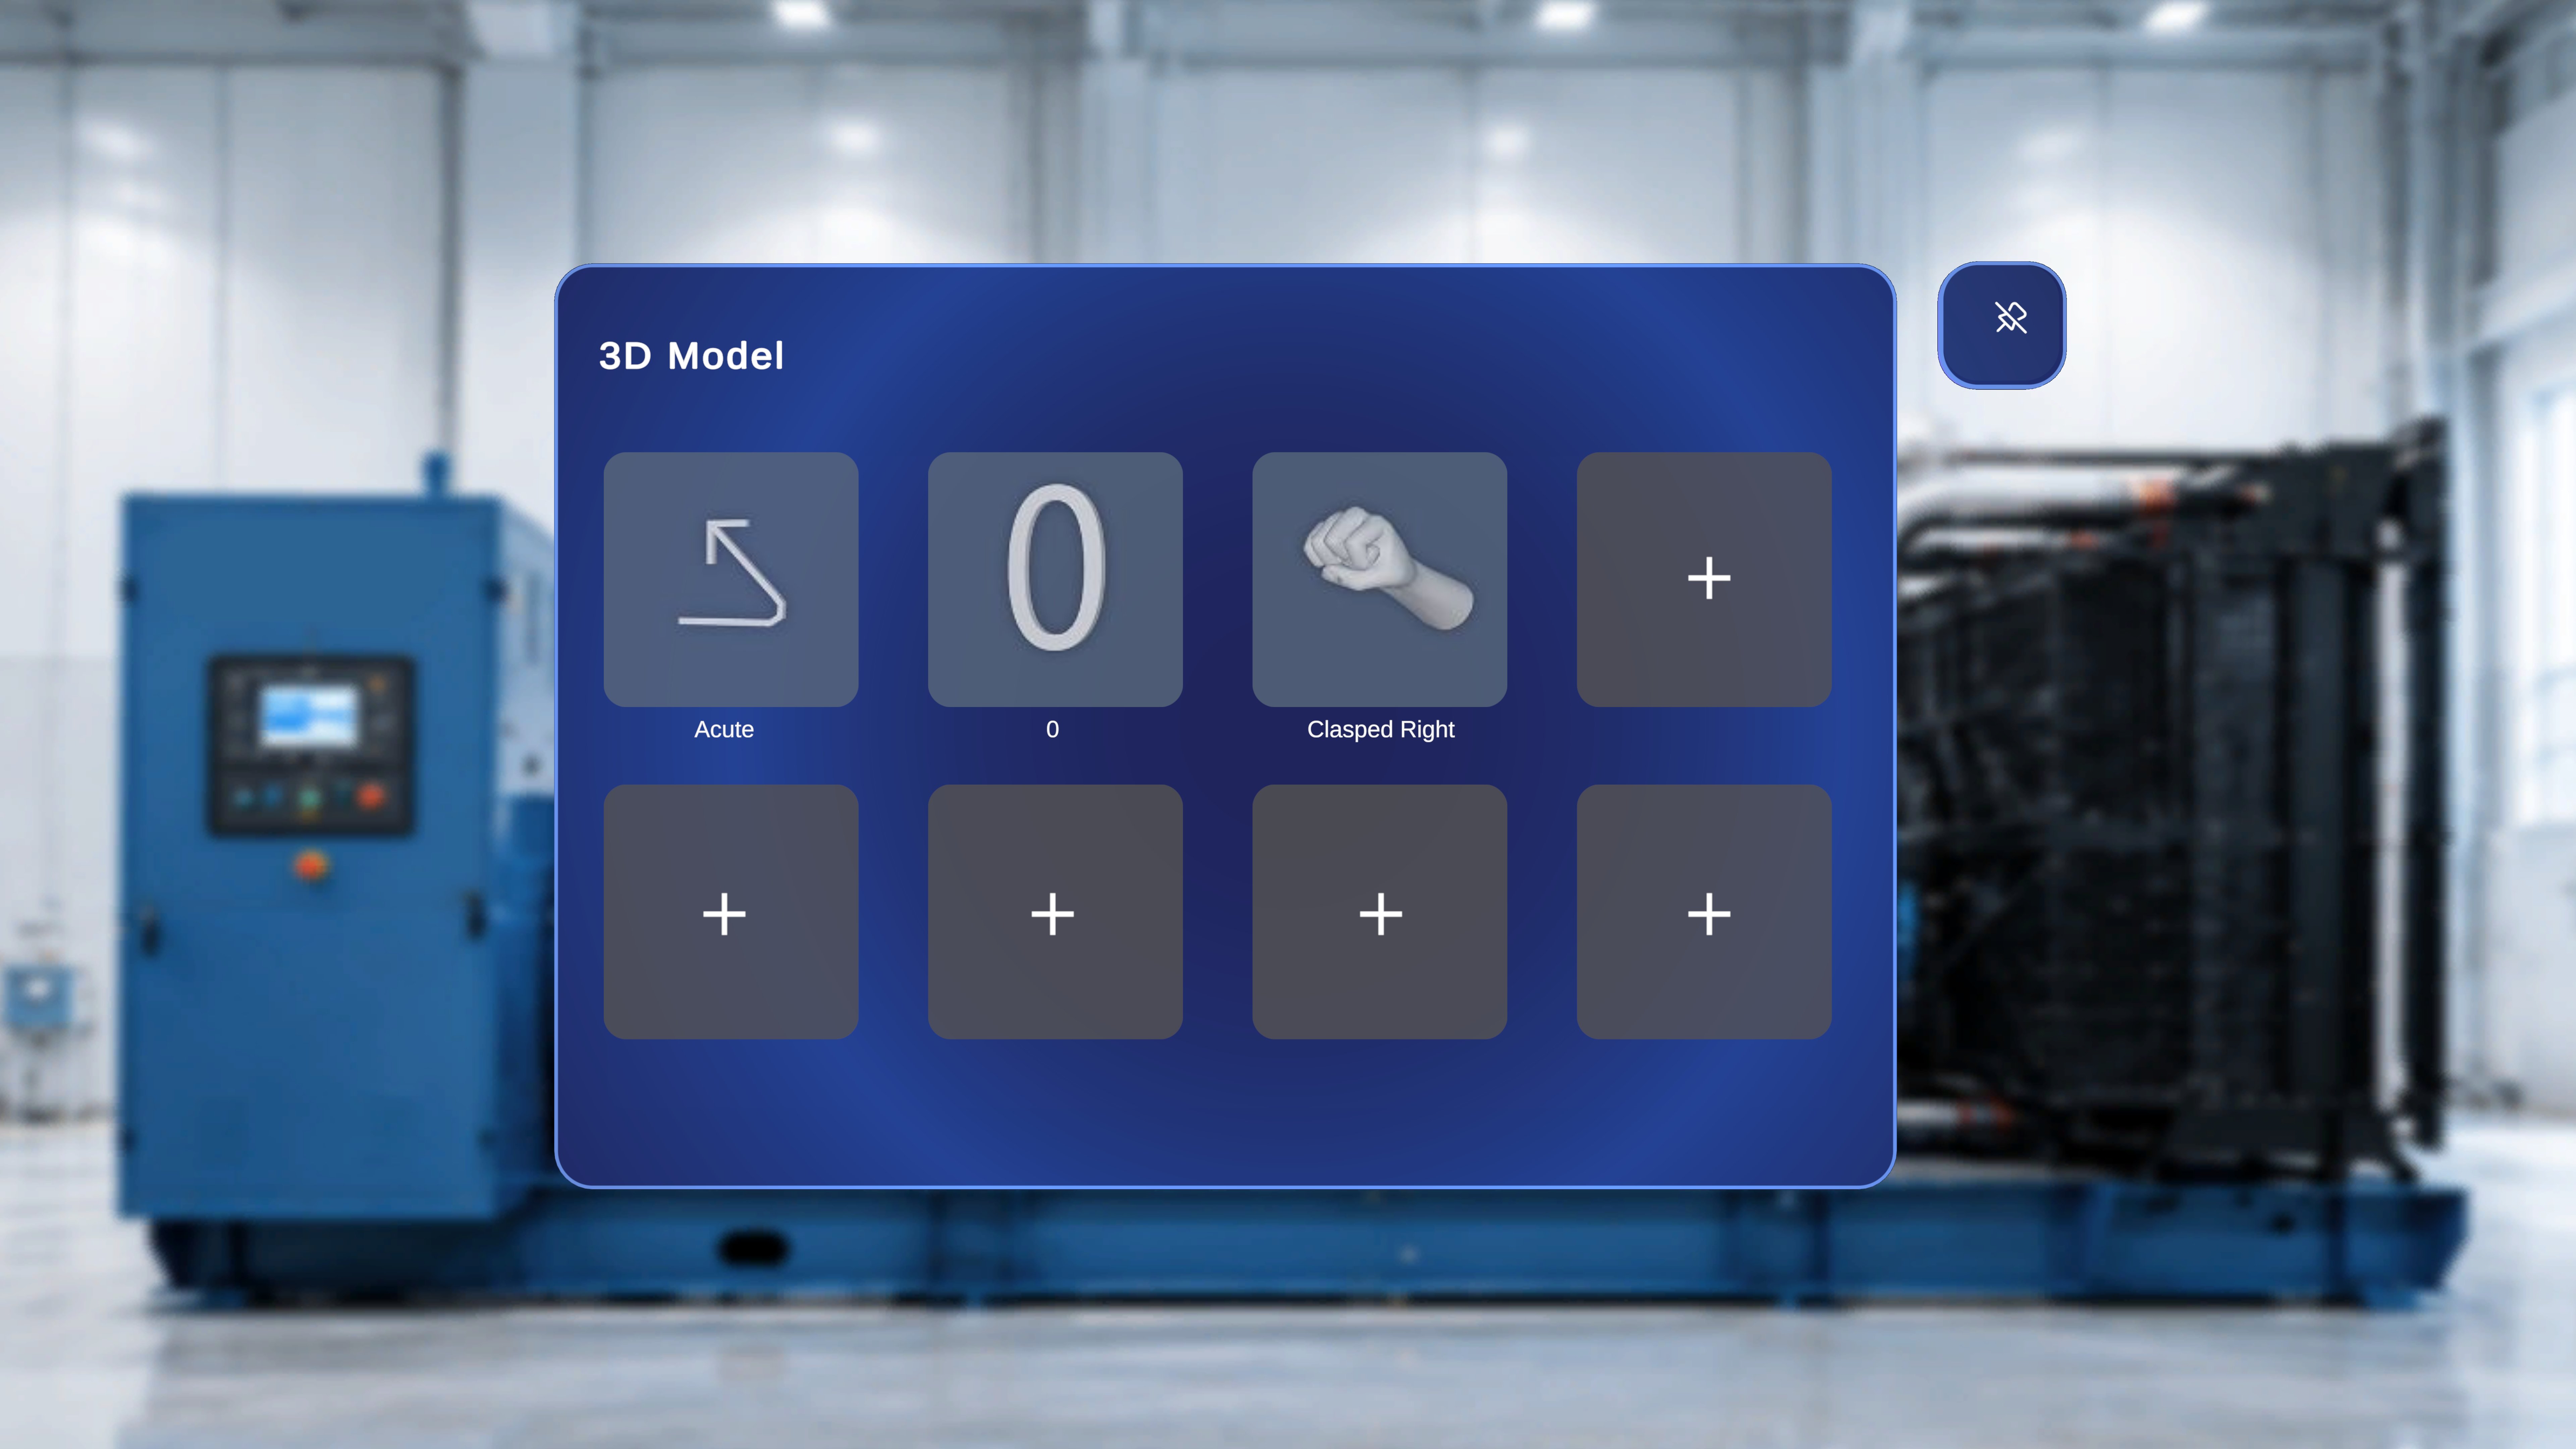
* The selected model is added as a new tile in the **3D Model** panel for the current step.
* The tile becomes available to place in the physical space, just like any model attached from the Procedures Portal.
### Step-by-Step Instructions
1. Focus the model tile you want to add (for example, **Acute**).
2. Air-tap the tile, or say **"Select"** when the voice hint appears.
### What Happens Next
* The catalogue closes automatically.
* The selected model is added as a new tile in the **3D Model** panel for the current step.
* The tile becomes available to place in the physical space, just like any model attached from the Procedures Portal.
 ***
## Place the Model in the Physical Space
After a model has been added to the 3D Model panel, you can spawn it in front of you to author its position, rotation, and behaviour.
### Step-by-Step Instructions
1. In the **3D Model** panel, select the tile of the model you just added.
### What Happens Next
The model spawns in the physical environment in front of you, anchored relative to the QR position for the step.
***
## Place the Model in the Physical Space
After a model has been added to the 3D Model panel, you can spawn it in front of you to author its position, rotation, and behaviour.
### Step-by-Step Instructions
1. In the **3D Model** panel, select the tile of the model you just added.
### What Happens Next
The model spawns in the physical environment in front of you, anchored relative to the QR position for the step.
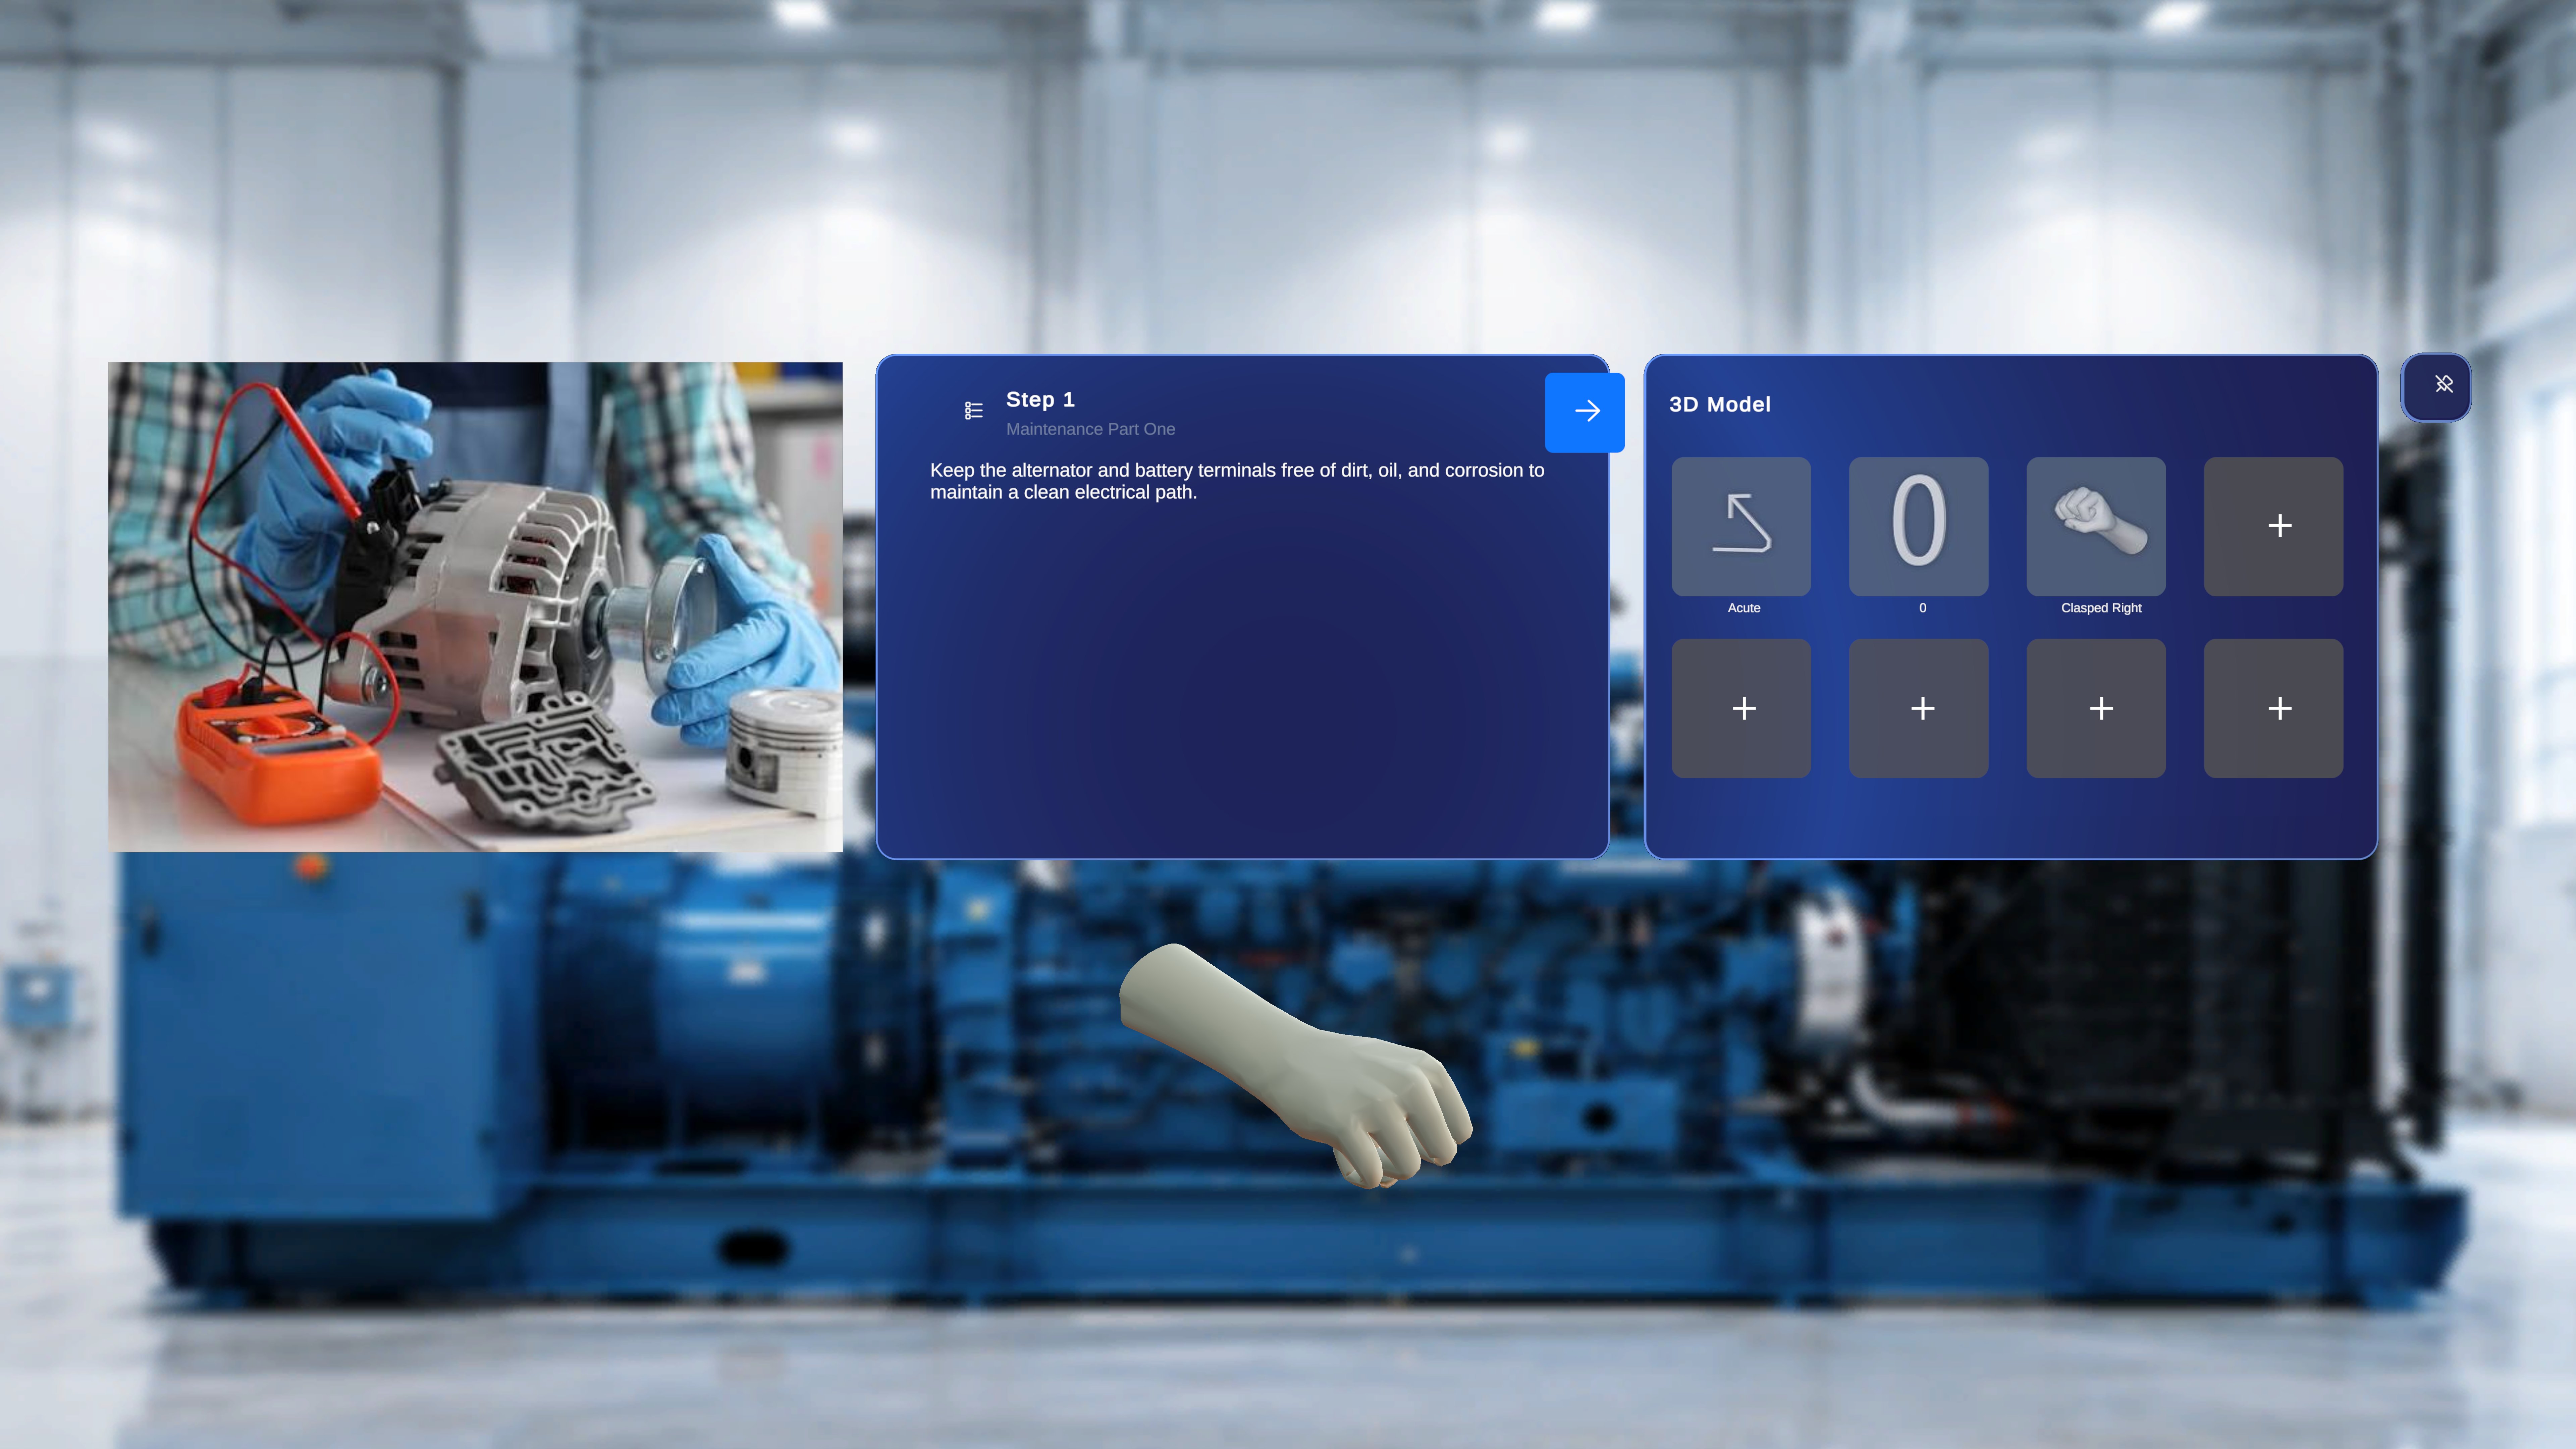 Select the spawned model to activate its edit handle, which lets you reposition, rotate, and resize it in space.
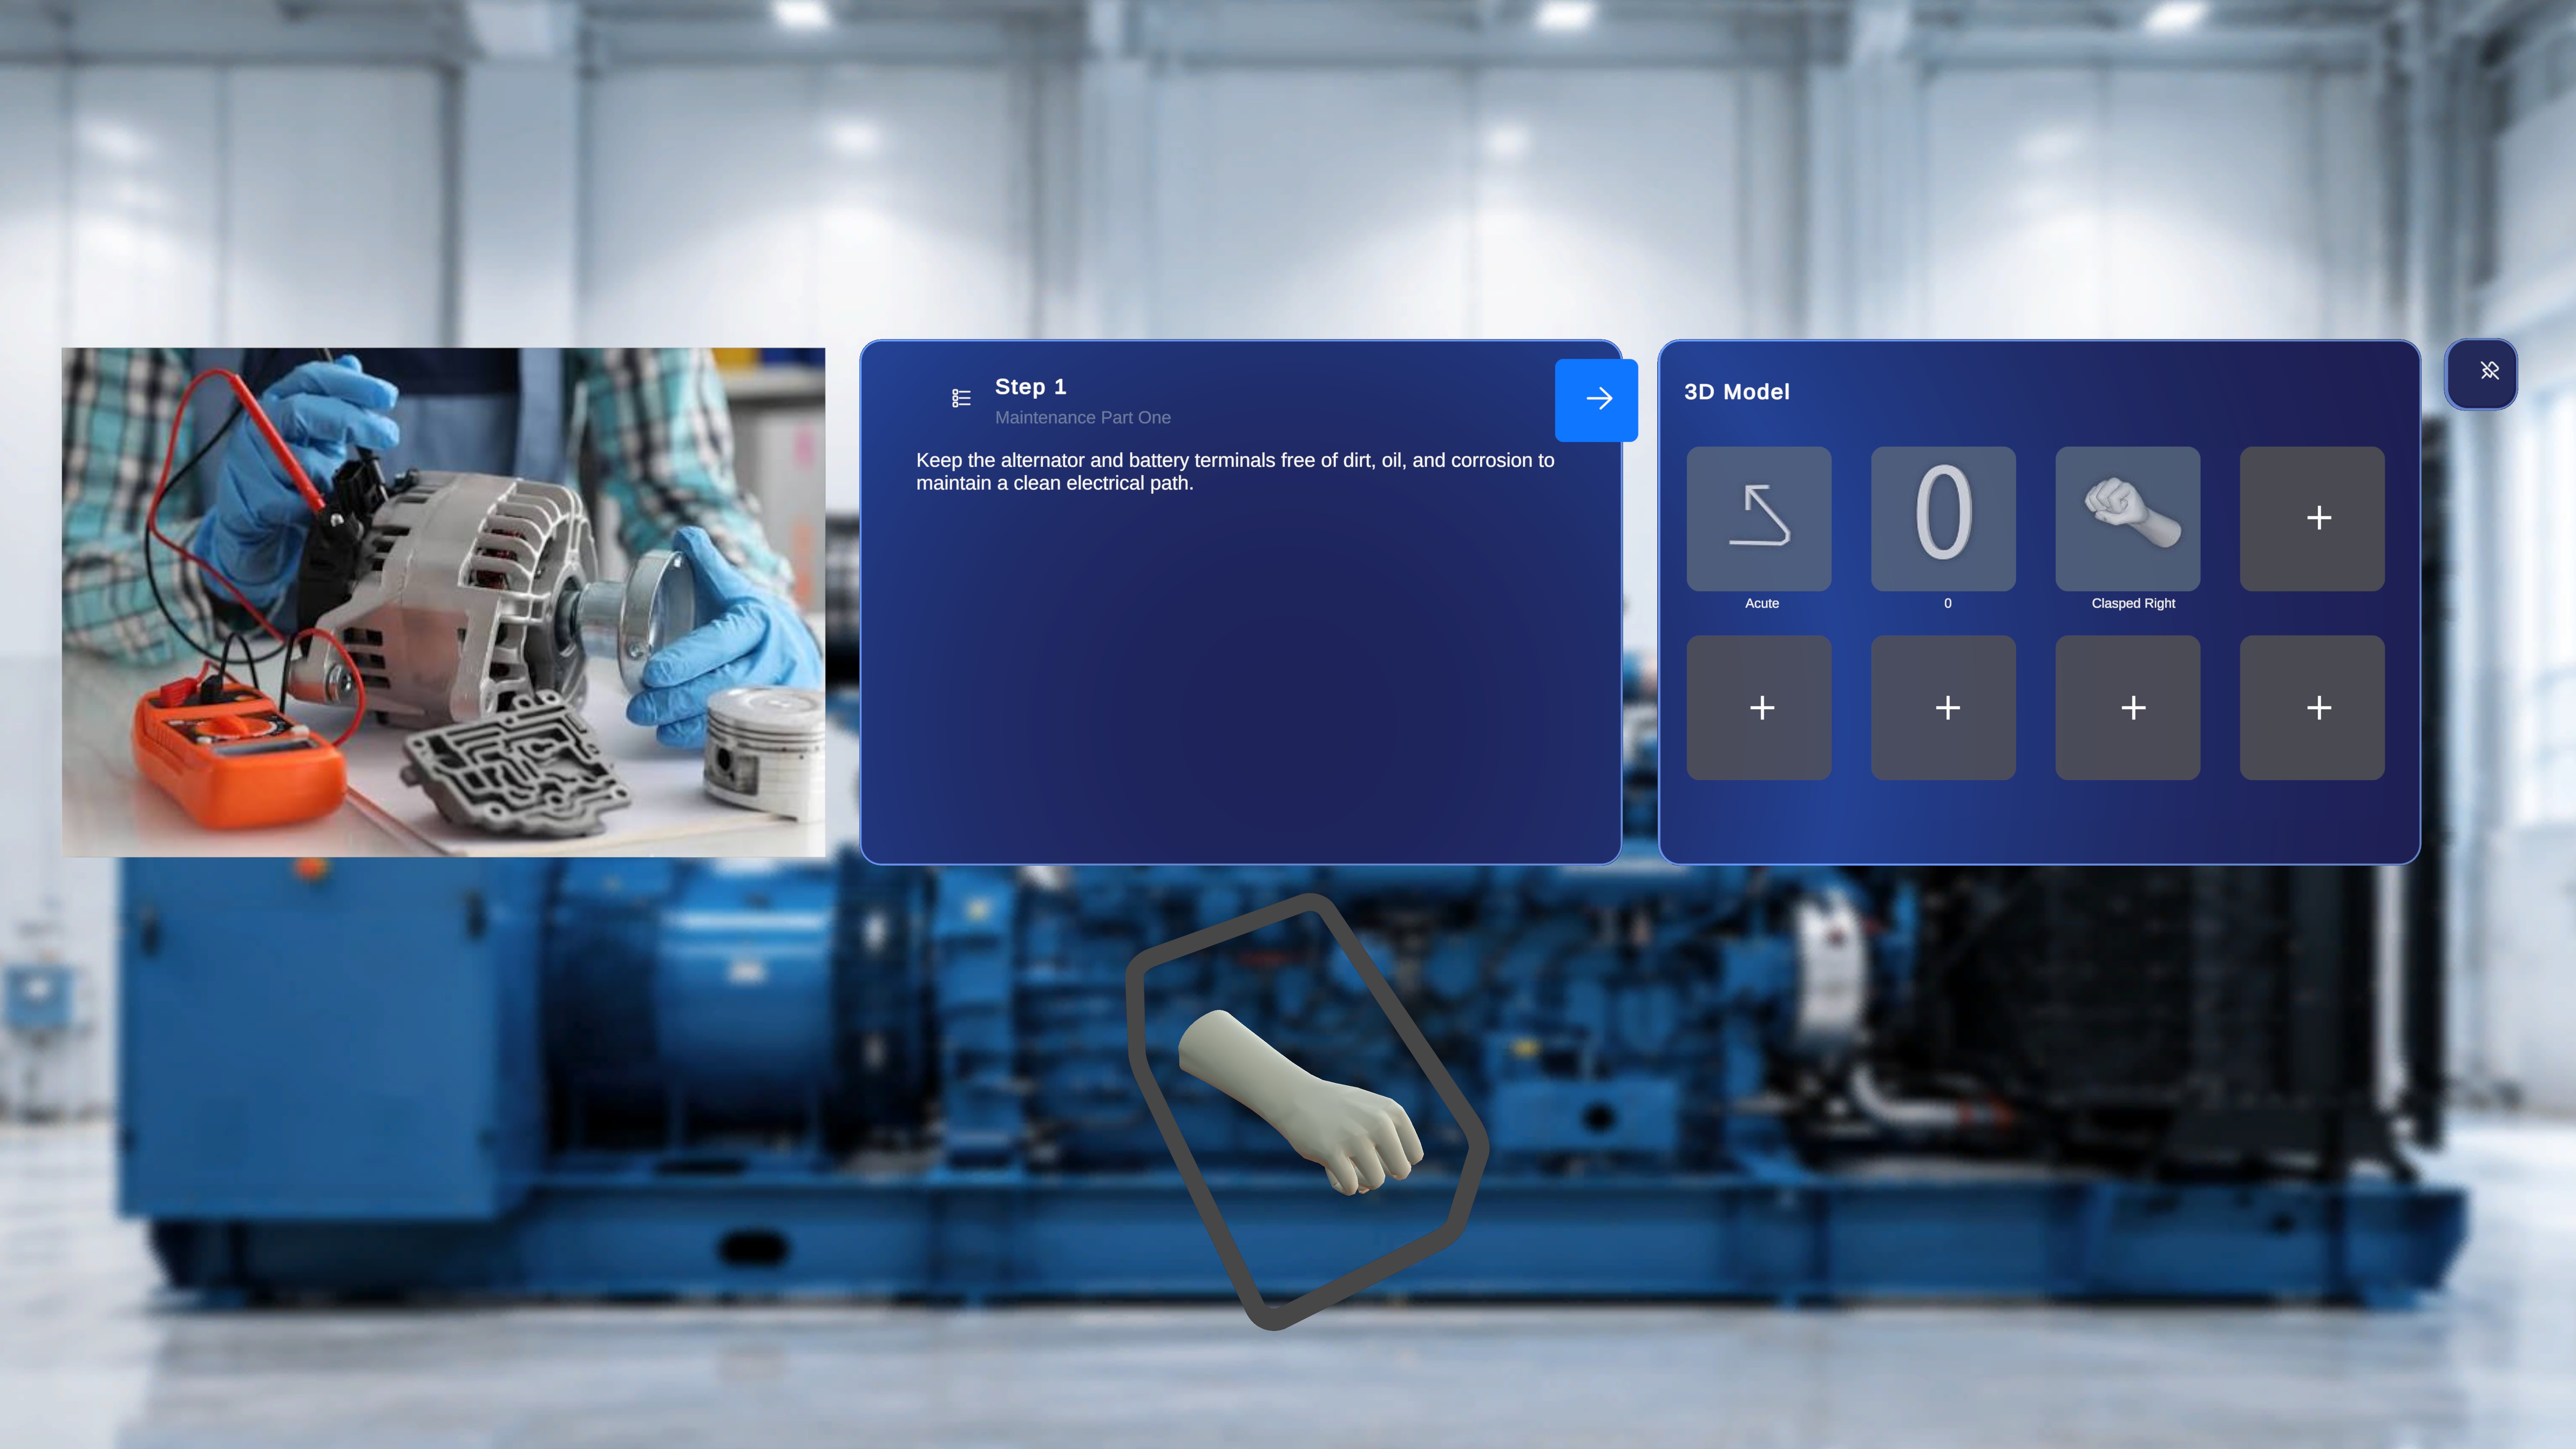 You can then continue authoring the model — repositioning, resizing, rotating, and configuring animation or interactability. See [3D Model Authoring in Author Mode](/frontline/procedures/author/3d-model-authoring) for the full set of editing controls.
***
## Sync with the Procedures Portal
Models added from the default catalogue on the HMD are stored against the same procedure as the one you would edit in the **Procedures Portal**. The two experiences stay in sync:
* Models added on the HoloLens appear on the same step in the Procedures Portal.
* Models removed from the Procedures Portal are removed from the step on the HoloLens.
* The same is true in reverse — any change on either side propagates to the other.
Sync is not always instant in an active session. To make sure you are seeing the latest step content:
* On the **HoloLens**, tap the **Procedures** button in the side menu to fetch the latest changes.
* In the **Procedures Portal**, refresh the browser tab.
***
## Notes & Limitations
* The default catalogue provides a curated set of common models. Custom `.glb` models still need to be uploaded via the **Procedures Portal**.
* Empty slots in the 3D Model panel are the only entry point for the catalogue. If the panel is full, remove a model first to expose a **+** slot.
* Voice command **"Select"** works on any focused tile, scroll button, group caret, or the **Close** button.
You can then continue authoring the model — repositioning, resizing, rotating, and configuring animation or interactability. See [3D Model Authoring in Author Mode](/frontline/procedures/author/3d-model-authoring) for the full set of editing controls.
***
## Sync with the Procedures Portal
Models added from the default catalogue on the HMD are stored against the same procedure as the one you would edit in the **Procedures Portal**. The two experiences stay in sync:
* Models added on the HoloLens appear on the same step in the Procedures Portal.
* Models removed from the Procedures Portal are removed from the step on the HoloLens.
* The same is true in reverse — any change on either side propagates to the other.
Sync is not always instant in an active session. To make sure you are seeing the latest step content:
* On the **HoloLens**, tap the **Procedures** button in the side menu to fetch the latest changes.
* In the **Procedures Portal**, refresh the browser tab.
***
## Notes & Limitations
* The default catalogue provides a curated set of common models. Custom `.glb` models still need to be uploaded via the **Procedures Portal**.
* Empty slots in the 3D Model panel are the only entry point for the catalogue. If the panel is full, remove a model first to expose a **+** slot.
* Voice command **"Select"** works on any focused tile, scroll button, group caret, or the **Close** button.