> ## Documentation Index
> Fetch the complete documentation index at: https://docs.altoura.com/llms.txt
> Use this file to discover all available pages before exploring further.
# States
> A **state** is a discrete moment or screen in your training — think of it like a single scene or lesson slide, but interactive. Each state can display a 3D scene, wait for learner interaction, or trigger actions automatically.
## What Happens in a State
When a state is active, the learner sees:
* A **3D scene** (the environment or scenario they're working in)
* Possibly **instructional content** (text panels, highlights, instruction animations)
* Objects they can interact with (tap, move, rotate, etc.)
The state stays active until an **event** occurs that triggers a transition to another state.
## Creating a State
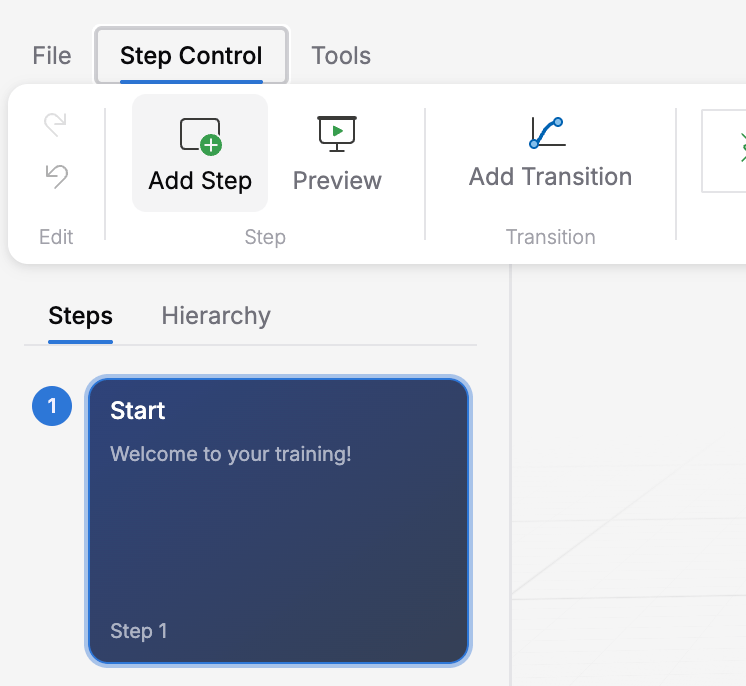 You'll see a workspace with your existing states (if any).
A new step appears in both the **Steps** list on the left and on the outline canvas. It is automatically selected.
The center area shows the step's panel. Click the title and body text to edit them inline — the placeholders are **Enter panel title...** and **Enter panel body text...**
Click **Step Properties** on the ribbon to open the **Properties** panel on the right. From there you can configure on-entry actions, transitions, on-exit actions, and other step modules. See the Entry & Exit Actions section for details.
## Step Properties
Open the **Properties** panel by clicking **Step Properties** on the ribbon. For a step, the Properties panel shows three tabs:
You'll see a workspace with your existing states (if any).
A new step appears in both the **Steps** list on the left and on the outline canvas. It is automatically selected.
The center area shows the step's panel. Click the title and body text to edit them inline — the placeholders are **Enter panel title...** and **Enter panel body text...**
Click **Step Properties** on the ribbon to open the **Properties** panel on the right. From there you can configure on-entry actions, transitions, on-exit actions, and other step modules. See the Entry & Exit Actions section for details.
## Step Properties
Open the **Properties** panel by clicking **Step Properties** on the ribbon. For a step, the Properties panel shows three tabs:
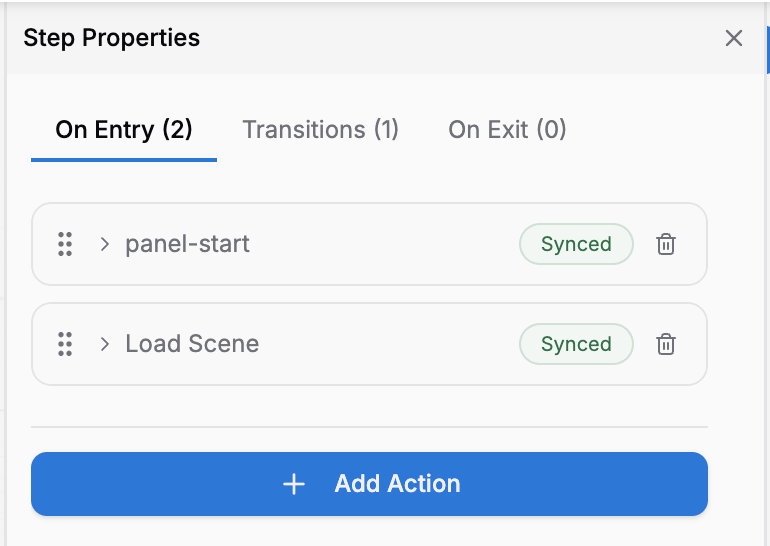 | Tab | What It Holds |
| --------------- | ------------------------------------------------------------------------------------------------------------------------------ |
| **On Entry** | Actions that run automatically when the step is entered (load a scene, show a panel, set a variable, etc.) |
| **Transitions** | Events that move the training to another step (taps, moves, choices) — each transition can have conditions and its own actions |
| **On Exit** | Actions that run when the step is left (stop audio, hide panels, save progress) |
The step's **panel title** and **body text** are edited inline in the center panel view, not in the Properties panel.
## Start Node and End Steps
* **Start node**: The training begins at a fixed **Start node** on the canvas. The first transition out of the Start node leads to your first real step. There is no per-step "entry" checkbox — you control the starting point by connecting transitions from the Start node.
* **End steps**: A step that has no outgoing transitions effectively ends that path of the training. There is no separate "Final" flag; an end is simply a step the learner cannot leave. You can have several such steps (for example, one for "Passed" and one for "Try Again Later").
## onEntry and onExit Actions
Each state has two special action lists:
* **onEntry**: Actions that run automatically when the state is entered (before anything else happens)
* **onExit**: Actions that run when the learner leaves the state (after an event triggers a transition)
**Common onEntry actions:**
* Load a 3D scene
* Play narration or audio
* Show a text panel with instructions
* Highlight an object to guide learner attention
* Set a variable (e.g., start a timer or counter)
**Common onExit actions:**
* Stop audio or narration
* Hide panels or highlights
* Save progress to a variable
* Reset object positions for the next state
The full sequence is: **onExit of current state** → **transition actions** → **onEntry of next state**. Plan your actions with this order in mind.
See [Entry & Exit Actions](/creator-studio/creator-app/transitions/onentry) and [Exit Actions](/creator-studio/creator-app/transitions/onexit) for more detail.
## The Visual Canvas: Working with State Nodes
### Selecting a State
Click any state node on the canvas to select it. If the **Properties** panel is open (toggle it from **Step Properties** on the ribbon), it updates to show that step's tabs and actions.
### Moving a State
Click and drag a state node to reposition it on the canvas. (This is purely visual organization — it doesn't change the logic.)
### Deleting a State
Right-click a state node to open the context menu. From here you can Duplicate, Move Up, Move Down, or Delete the state.
| Tab | What It Holds |
| --------------- | ------------------------------------------------------------------------------------------------------------------------------ |
| **On Entry** | Actions that run automatically when the step is entered (load a scene, show a panel, set a variable, etc.) |
| **Transitions** | Events that move the training to another step (taps, moves, choices) — each transition can have conditions and its own actions |
| **On Exit** | Actions that run when the step is left (stop audio, hide panels, save progress) |
The step's **panel title** and **body text** are edited inline in the center panel view, not in the Properties panel.
## Start Node and End Steps
* **Start node**: The training begins at a fixed **Start node** on the canvas. The first transition out of the Start node leads to your first real step. There is no per-step "entry" checkbox — you control the starting point by connecting transitions from the Start node.
* **End steps**: A step that has no outgoing transitions effectively ends that path of the training. There is no separate "Final" flag; an end is simply a step the learner cannot leave. You can have several such steps (for example, one for "Passed" and one for "Try Again Later").
## onEntry and onExit Actions
Each state has two special action lists:
* **onEntry**: Actions that run automatically when the state is entered (before anything else happens)
* **onExit**: Actions that run when the learner leaves the state (after an event triggers a transition)
**Common onEntry actions:**
* Load a 3D scene
* Play narration or audio
* Show a text panel with instructions
* Highlight an object to guide learner attention
* Set a variable (e.g., start a timer or counter)
**Common onExit actions:**
* Stop audio or narration
* Hide panels or highlights
* Save progress to a variable
* Reset object positions for the next state
The full sequence is: **onExit of current state** → **transition actions** → **onEntry of next state**. Plan your actions with this order in mind.
See [Entry & Exit Actions](/creator-studio/creator-app/transitions/onentry) and [Exit Actions](/creator-studio/creator-app/transitions/onexit) for more detail.
## The Visual Canvas: Working with State Nodes
### Selecting a State
Click any state node on the canvas to select it. If the **Properties** panel is open (toggle it from **Step Properties** on the ribbon), it updates to show that step's tabs and actions.
### Moving a State
Click and drag a state node to reposition it on the canvas. (This is purely visual organization — it doesn't change the logic.)
### Deleting a State
Right-click a state node to open the context menu. From here you can Duplicate, Move Up, Move Down, or Delete the state.
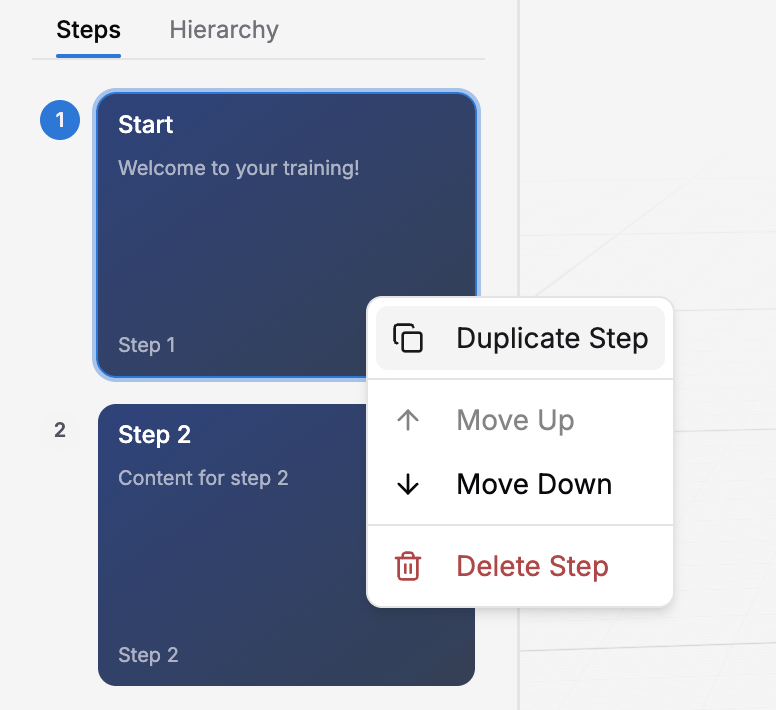 Be careful: deleting a state also removes all transitions connected to it.
## Naming States: Best Practices
Give your states **meaningful, descriptive names** — not generic names like "State 1" or "Screen 2". Good names make your logic easier to understand and debug.
**Good state names:**
* "Show Safety Warning"
* "Wait for Valve Tap"
* "Demonstrate Valve Opening"
* "Show Completion Screen"
* "Incorrect Choice Feedback"
**Avoid:**
* "State 1", "State 2"
* "Next", "Previous"
* Single-word vague names like "Interaction"
## State Canvas Tips
Use the canvas space to arrange your states in a logical flow (left to right or top to bottom). This makes your logic easier to follow and debug.
Zoom in to see details, zoom out to see the overall structure of your training.
If you have multiple choice branches, arrange them side by side so the flow is clear.
## Next Steps
Now that you understand states, learn how to:
* **[Connect states with Events and Transitions](/creator-studio/creator-app/events)** — Define what triggers movement between states
* **[Add Entry & Exit Actions](/creator-studio/creator-app/transitions/onentry)** — Make things happen automatically
* **[Build Conditional Transitions](/creator-studio/creator-app/transitions/conditional)** — Create branching flows based on learner choices or variables
Be careful: deleting a state also removes all transitions connected to it.
## Naming States: Best Practices
Give your states **meaningful, descriptive names** — not generic names like "State 1" or "Screen 2". Good names make your logic easier to understand and debug.
**Good state names:**
* "Show Safety Warning"
* "Wait for Valve Tap"
* "Demonstrate Valve Opening"
* "Show Completion Screen"
* "Incorrect Choice Feedback"
**Avoid:**
* "State 1", "State 2"
* "Next", "Previous"
* Single-word vague names like "Interaction"
## State Canvas Tips
Use the canvas space to arrange your states in a logical flow (left to right or top to bottom). This makes your logic easier to follow and debug.
Zoom in to see details, zoom out to see the overall structure of your training.
If you have multiple choice branches, arrange them side by side so the flow is clear.
## Next Steps
Now that you understand states, learn how to:
* **[Connect states with Events and Transitions](/creator-studio/creator-app/events)** — Define what triggers movement between states
* **[Add Entry & Exit Actions](/creator-studio/creator-app/transitions/onentry)** — Make things happen automatically
* **[Build Conditional Transitions](/creator-studio/creator-app/transitions/conditional)** — Create branching flows based on learner choices or variables