

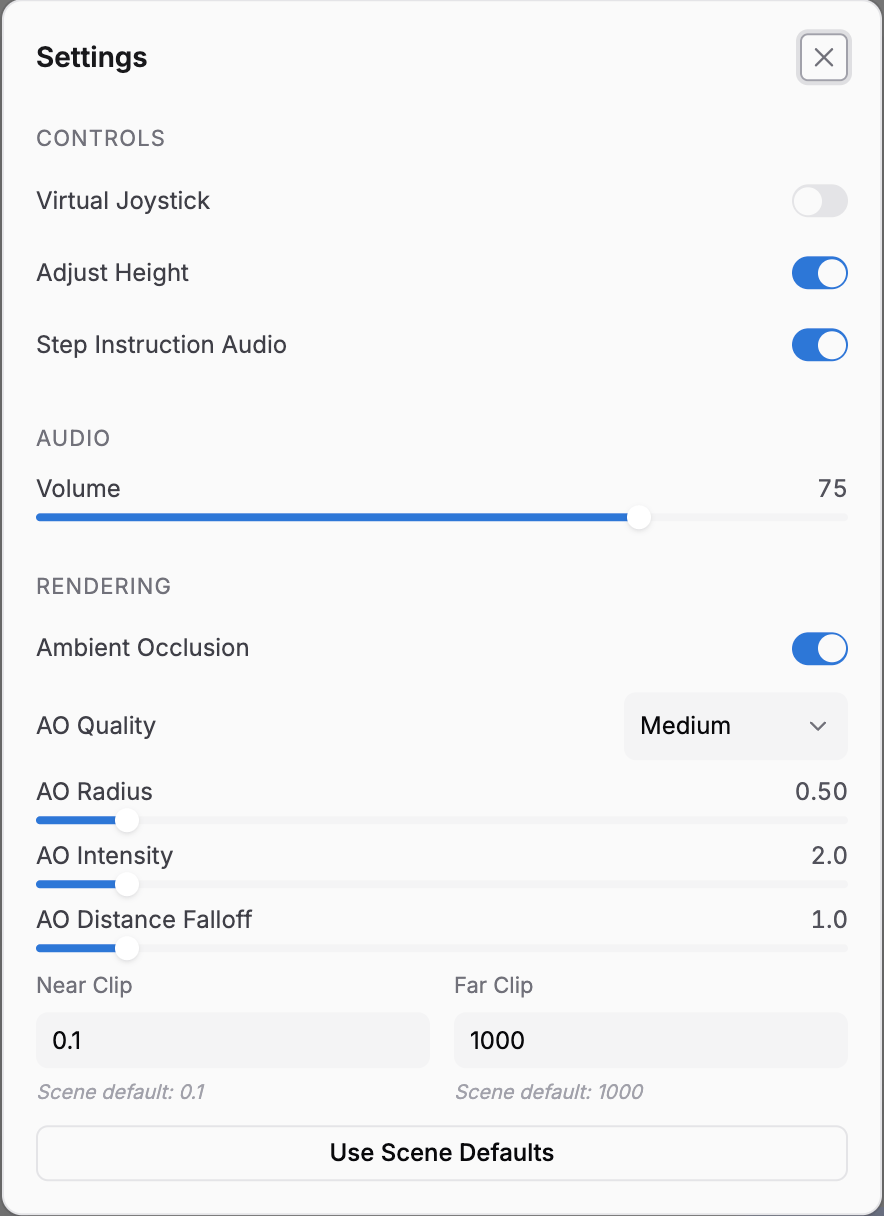
Opening Settings
1
Click Your Profile Avatar
Click the circular avatar icon in the top-right corner of the screen
2
Click Settings
In the dropdown menu, click the Settings (gear icon) option. A settings modal will open.
3
Adjust Your Preferences
Toggle switches and adjust sliders as needed
4
Close Settings
Click outside the modal or press Escape to close
Controls Section
The Controls section has toggles to enable or disable on-screen features:Virtual Joystick Toggle
What it does:- Turns the on-screen movement controller on or off
- When ON: A game-controller-style pad appears at the bottom-left of your screen for movement. Looking around is still done by dragging with your mouse or a one-finger swipe.
- When OFF: No joystick visible — use keyboard (WASD) and mouse instead
- You’re on a touchscreen device
- You prefer game-controller-style movement
- You want an alternative to keyboard controls
- You prefer keyboard and mouse controls
- The joystick is in your way
- You’re on a desktop and don’t need it
Adjust Height Toggle
What it does:- Turns the camera height +/− buttons on or off
- When ON: Buttons appear on the left side of the screen (below the share button) to raise/lower your viewpoint
- When OFF: No height buttons — your camera stays at the default level
- You need to see objects at different heights (above and below eye level)
- You want full control over your viewpoint
- The training allows height adjustment
- You prefer a fixed viewpoint
- You don’t need to adjust your view
On tablets this toggle is not shown. The +/− buttons are always available, and you can also change height with a two-finger vertical drag.
Step Instruction Audio Toggle
What it does:- Turns narration (spoken instructions) on or off
- When ON: You hear audio narration of step instructions
- When OFF: No audio — only read text instructions on panels
- This is the only setting that is remembered across sessions
If your account has trainee (read-only) access to the training, this toggle appears greyed out and narration is always on. Only users with edit access to the training can turn it off.
- You prefer listening to audio instructions
- You’re in an environment where reading isn’t practical
- The training includes narration for accessibility
- You’re in a noisy environment and can’t hear well
- You prefer reading over listening
- You’re in a situation where audio would be distracting
Audio Section
Volume Slider
What it does:- Controls the overall volume of all training audio
- Ranges from 0 (mute) to 100 (full volume)
- Affects narration, sound effects, videos, and any audio in the 3D scene
- Drag the slider left to decrease volume
- Drag the slider right to increase volume
- Test it with a small movement first
- Find a comfortable level that you can hear but isn’t overwhelming
- If you need instant silence, move the slider all the way to 0
- Move it back up when you’re ready to hear audio again
Rendering Section
The Rendering section lets you trade visual quality for performance. The defaults come from the scene itself, so you usually don’t need to touch these. Adjust them if the scene looks flat, runs slowly, or clips objects that are very close or very far away.Ambient Occlusion Toggle
What it does:- Adds soft shadowing where surfaces meet, giving objects more depth and realism
- When ON: Corners, crevices, and contact points are subtly darkened
- When OFF: Flatter lighting, but faster rendering
AO Quality
A dropdown with four levels: Low, Medium, High, and Ultra. Higher levels look smoother but cost more performance. Only takes effect when Ambient Occlusion is on.AO Sliders
Three sliders fine-tune the ambient occlusion effect. Only take effect when Ambient Occlusion is on.Near Clip and Far Clip
Two number fields that set the closest and farthest distances the camera will draw, in meters. Anything closer than Near Clip or farther than Far Clip is not rendered. The scene’s own values are shown beneath each field as “Scene default”. When to change them:- Objects disappear or look cut off when you walk right up to them: lower Near Clip
- Distant parts of the scene are missing: raise Far Clip
Use Scene Defaults
A button that resets Near Clip and Far Clip to the values set by the training author. It does not change the Ambient Occlusion settings.Quick Settings Reference
Virtual Joystick — Off by default. Enable on touchscreen devices or if you prefer gamepad-style controls. Press J to toggle. Adjust Height — On by default. Enable when you need to see objects at different heights. Not shown on tablets. Step Instruction Audio — On by default and remembered across sessions. Locked on for trainee (read-only) access. Volume — Set to 75 by default. Adjust based on your environment. Ambient Occlusion — Follows the scene’s performance mode. Turn off if the training lags. AO Quality / Radius / Intensity / Falloff — Medium / 0.5 / 2.0 / 1.0 by default. Fine-tune only if Ambient Occlusion is on. Near Clip / Far Clip — Set by the scene. Use Use Scene Defaults to restore them.Except for Step Instruction Audio, settings reset to their defaults when you reload the page or open a different training.
Troubleshooting
I can't find the Settings option
I can't find the Settings option
Click your profile avatar in the top-right corner of the screen. Settings is available in the profile dropdown menu. If it’s not showing, try refreshing the page.
I toggled a setting but nothing changed
I toggled a setting but nothing changed
Try closing and reopening Settings. The change should take effect immediately. If it doesn’t, try refreshing the page.
The virtual joystick is still visible even though I turned it off
The virtual joystick is still visible even though I turned it off
Close Settings and wait a moment. The joystick should disappear. If it’s still there, try refreshing the page.
The Step Instruction Audio toggle is greyed out
The Step Instruction Audio toggle is greyed out
Your account has trainee (read-only) access to this training, so narration is always on. Use the Volume slider to lower or mute it instead.
I don't see the Adjust Height toggle
I don't see the Adjust Height toggle
You’re on a tablet. The +/− height buttons are always available there, and a two-finger vertical drag also changes height.
The training got slow after I changed rendering settings
The training got slow after I changed rendering settings
Turn Ambient Occlusion off, or lower AO Quality to Low. Ambient occlusion is the most expensive rendering option.
Objects vanish when I get close or look far away
Objects vanish when I get close or look far away
Your Near Clip or Far Clip value is cutting them off. Click Use Scene Defaults in the Rendering section to restore the author’s values.
My settings reset when I came back
My settings reset when I came back
Only Step Instruction Audio is remembered between sessions. Joystick, height, volume, and rendering settings return to their defaults on each reload.
Tips
- Visit Settings early: Before you get deep into training, set up your preferences for comfort
- Experiment: Try different settings to see what works best for you
- Adjust as needed: Your preferences may change as you work through training — it’s okay to toggle settings during training