

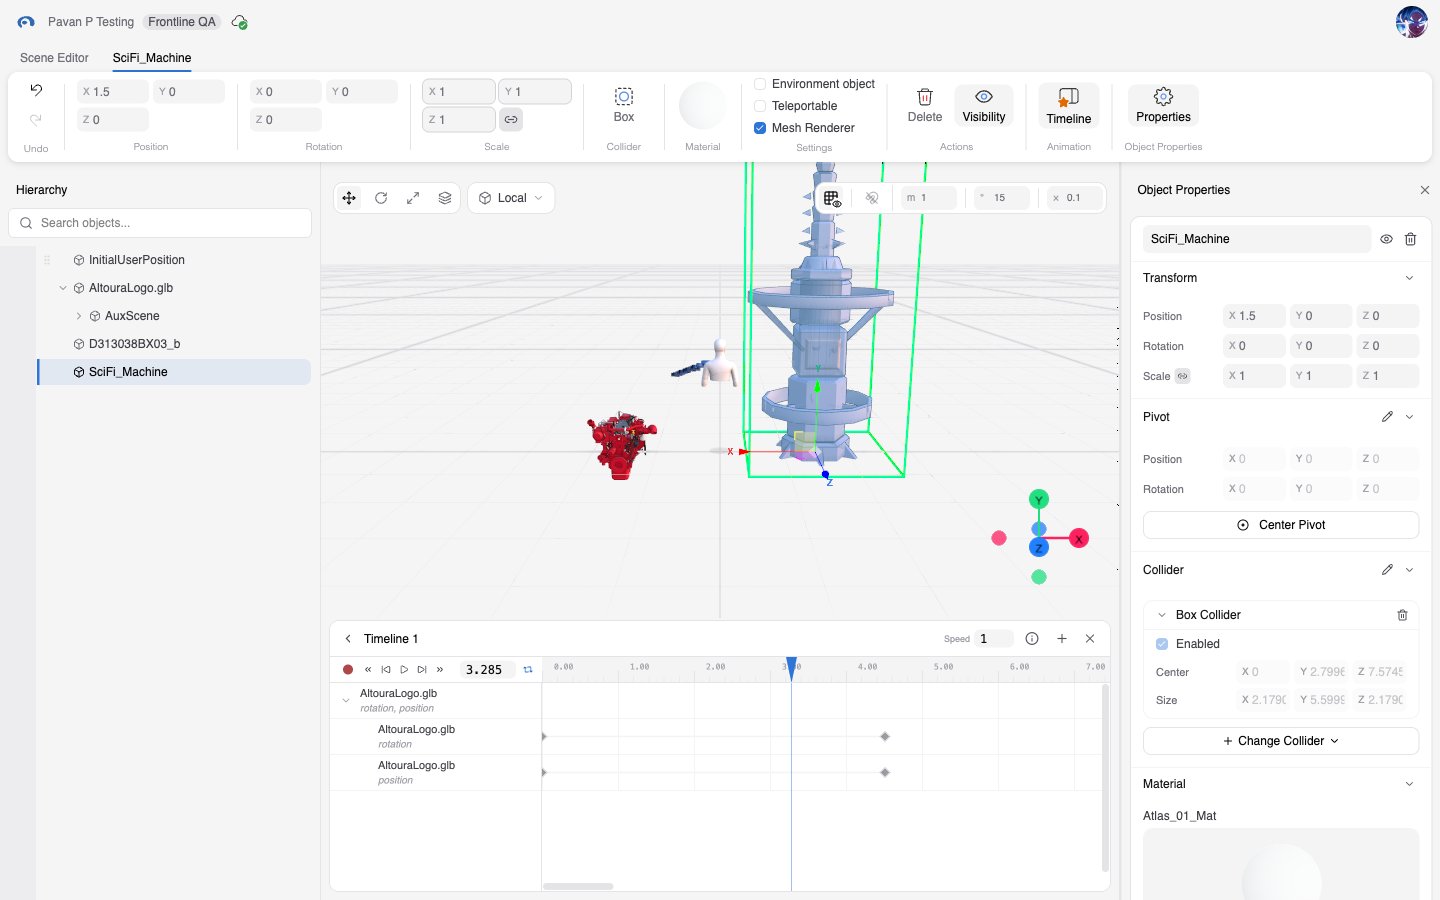
Layout
The Hierarchy, Object Properties, and Timeline panels can be resized by dragging the thin divider between them and the viewport. Scene Editor remembers the sizes you choose in this browser.
Header

- Altoura logo. Click it to open the Altoura Dashboard in a new tab.
- Scene name. Double-click it to rename the scene. Press Enter to keep the new name or Esc to cancel. Names can be up to 50 characters.
- Organization badge. Shows which organization owns the scene. It is for information only.
- Save status icon. A cloud icon that shows the state of your work. Hover over it to read the state.
- Profile picture. Opens the profile menu. See Profile and Pair Device.
Tabs
Directly under the header is a tab strip:- Scene Editor is always available and shows the scene-level ribbon.
- A second tab named after the selected object appears when you select something. It shows the object ribbon. Clicking Scene Editor while an object is selected clears the selection.
Ribbon: Scene Editor

On narrow windows the File group collapses into a single File dropdown, and scroll arrows appear at the ends of the ribbon.
Ribbon: Selected Object

Fields turn blue when the property is animated in the open timeline and red while recording. Transform fields are disabled during timeline playback.
Hierarchy Panel
The left panel lists every object in the scene as a tree that shows which objects are children of which. Selecting an object here also selects it in the viewport, and the other way round. Use the panel to search, rename, hide, reorder, and nest objects by dragging one onto another. See Objects and Hierarchy.Viewport
The center area shows the scene in 3D. Orbit, pan, and zoom the camera to view the scene from any angle, and click an object to select it. Toolbars in the top corners hold the move, rotate, and scale tools and the snapping settings. The axis widget in the bottom-right corner jumps the camera to standard views such as top or front. See Viewport and Placement.Object Properties Pane
The right panel shows every editable property of the selected object: Transform, Pivot, Collider, Animation, Material, and Object Settings. Open or close it with the Properties button in the object ribbon. See Object Properties.Timeline Panel
The bottom panel lists the scene’s timelines and opens an editor for the one you choose, where you record and play back animations. Open or close it with the Timeline button in the ribbon. See Timelines and Animation.Drag and Drop
You can add files and organize objects by dragging them.
Dropping a file anywhere else on the page does nothing. The editor blocks the browser from navigating away.