

Why Use Variables?
Variables enable powerful training logic:- Track scores: Keep a running total of correct answers
- Count attempts: Limit how many times a learner can retry
- Remember choices: Store what the learner selected in a quiz
- Branching decisions: Use variable values in conditions to create different paths
- Personalization: Store the learner’s name and use it in messages
correctAnswers variable. Later, in a condition, check correctAnswers >= 8 to decide the ending.
Opening the Variables Pane
The Variables pane is where you create and manage custom variables in your training. Open it from the ribbon: click Variable in Step Control. The pane slides in on the right. Click the same button again to close it.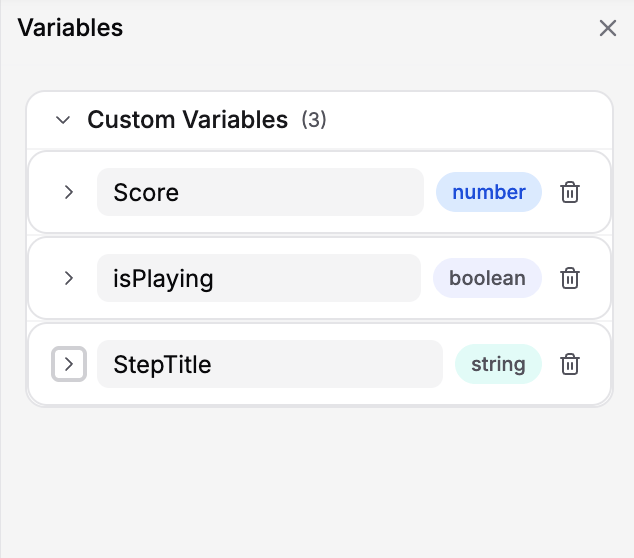
Variables pane showing custom variables
Creating a Variable
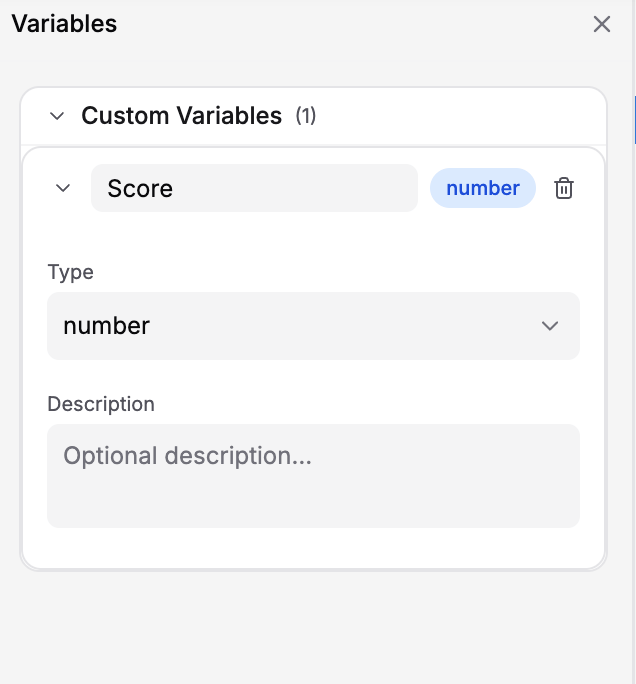
Expanded Score variable showing its name, Number type, and optional description
1
Open the Variables pane
Click Variable in Step Control on the ribbon.
2
Click the Add Variable button
Click Add Variable at the bottom of the pane to open the type menu.
3
Choose the variable type
Select String, Number, Boolean, or Array. A variable card is added with the selected type. See Variable Types for help choosing a type.
4
Rename the variable
Edit the name field in the card header. A rename takes effect when it is a valid, unique name; an invalid or duplicate name retains the last valid stored name. Names start with a letter or underscore and contain only letters, digits, and underscores.
5
Configure the variable's fields
Expand the card if needed and enter an optional Description. You can also change the Type using its dropdown.The available fields change based on the type:
- All types: Name, Type, and Description
- String: also Pattern (Regex)
Variable Naming Conventions
Choose clear, meaningful names for your variables. Good naming makes your training logic easier to understand and debug. Recommendations:- Use camelCase:
correctAnswers,userScore,isComplete(start lowercase, capitalize new words) - Be descriptive:
scoreis better thansortemp - No spaces: Use
attemptCountnotattempt count - Avoid special characters: Stick to letters, numbers, and underscores
- Match capitalization: Variable names are case-sensitive;
scoreandScoreare different names
userName(string)score(number)isComplete(boolean)correctAnswers(number)selectedOption(string)completedSteps(array)
var1,temp,x(not descriptive)Correct Answers(spaces)correct-answers(hyphens)_internal(too cryptic)
Viewing Custom Variables
In the Custom Variables section of the pane, each variable is shown as a collapsible card. The card header shows:- The variable’s name (editable inline)
- A colored type badge (string, number, boolean, or array)
- A trash icon for deleting the variable
Editing a Variable
Edit fields directly in the variable card. Valid changes update the working training; use the training’s Save command to persist them.1
Open the Variables pane
Click Variable on the ribbon.
2
Expand the variable's card
Click the chevron on the variable’s header (or anywhere on the header other than the name input or the trash icon).
3
Edit any field directly
Update the Name, Type, Description, or String Pattern (Regex). Changes update the working training; use Save to persist them.
Renaming a variable does not automatically update references elsewhere in the training. Update the selected variable and any expressions in Set Variable actions, transition conditions, and interpolated text to use the new name. For example, when renaming
score to quizScore, change score >= 80 to quizScore >= 80 and {{score}} to {{quizScore}}. Save and test the affected steps in Preview.Changing a variable’s Type resets its stored default to the new type’s default (
"" for string, 0 for number, false for boolean, [] for array). Review actions and conditions that use the variable, and update any Set Variable actions that assign its starting value.Deleting a Variable
1
Open the Variables pane
Click Variable on the ribbon.
2
Click the trash icon on the variable's header
The variable is removed immediately. There is no separate confirmation dialog.
Variable Initialization (Default Values)
New variables start with"" for String, 0 for Number, false for Boolean, and [] for Array. Existing stored defaults are preserved when the type stays the same. The Variables pane does not expose an editable Default Value field. For a different starting value, add Set Variable in the starting step before actions or events that read it.
Examples:
Review whether the automatic default suits each variable. Choose Set Value to assign a literal starting value or Set Expression to calculate one. Enter expressions directly, such as
score + 10, without an assignment or {{ }}.
Example: Creating Variables for a Quiz
For a 10-question quiz scored out of 100, create the following variables:
In the starting step’s On Entry actions, add two Set Variable actions:
Place these before actions that display or use the values. During the quiz, use Set Variable actions to record answers, update the score and counters, and mark completion.
Use Boolean expressions for transition conditions:
- Quiz result:
score >= passingScorefor the pass path;score < passingScorefor the fail path. - Another attempt:
attempts < 3to allow a retry;attempts >= 3when the attempt limit has been reached.
true for that transition to run. Update the values before the event that checks them; the same transition’s Actions run only after its condition passes.
Testing Variables in Preview
Test the quiz conditions above using values assigned through Set Variable:- In the step used to test the result, add Set Variable for
scoreand use Set Value to enter100. EnsurepassingScoreis set to70before the result is checked. - Save the training and start Preview.
- Trigger the event that checks the result conditions and verify the pass path.
- Exit Preview, change the score’s Set Value to
50, and save. - Start Preview again, trigger the same event, and verify the fail path.
- Remove the temporary score-setting action after testing so the quiz uses its earned score.
The Variables pane manages definitions. Use Set Variable actions to assign values, and save and restart Preview when testing changes to those actions.
Best Practices
Use consistent naming
Use consistent naming
Pick a convention (like camelCase) and stick with it throughout your training.
Create variables before using them
Create variables before using them
Don’t start building conditions and actions that reference variables you haven’t created yet. Plan your variables first.
Initialize values before use
Initialize values before use
Review the automatic defaults and use Set Variable for other starting values. Assign values before actions or events that depend on them.
Document your variables
Document your variables
In your training’s notes or in variable descriptions, write down what each variable does and why it exists.
Use arrays for lists
Use arrays for lists
Choose String, Number, or Boolean for a single value. Use Array when you need a list, such as completed steps or selected answers.
Next Steps
Learn about:- Variable Types — Understand string, number, boolean, and array types
- Variable Interpolation — Use variables in text with
{{variableName}}syntax - Conditions — Use variables in conditions to control training flow