
Saving & Save As
The Creator App gives you two ways to persist your work: Save updates the current training in place, and Save As creates a brand-new copy under a different name.Saving Your Training
Where to Find Save
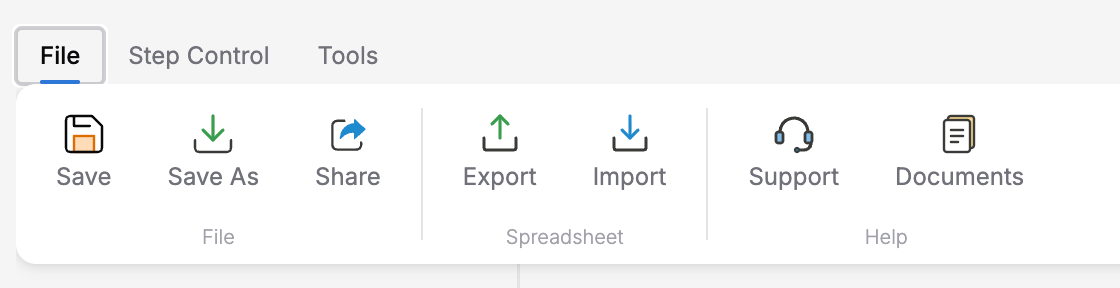
You can save from two places:- File tab on the ribbon — Click the Save button (the first button in the File tab)
- Header bar — Click the small Save icon next to the training name (its tooltip reads “Save”)
What Save Does
When you click Save:- The Creator App converts your entire training flow (all steps, transitions, actions, variables) into an SCJSON document
- The SCJSON file is uploaded to cloud storage
- The current training version is updated to point to the new file
- You see confirmation in the UI
Save Feedback
The Creator App shows real-time feedback during save:| Status | What You See |
|---|---|
| Saving | A spinner with Saving training… |
| Success | A green checkmark with Training saved successfully! |
| Error | A red alert with Save failed! and an error description below it |
Renaming Your Training
The training name (shown in the header bar) is saved separately from the training content. To rename:- Click the training name in the header — it becomes an editable text field
- Edit the text
- Press Enter or click away — the name is saved immediately
Save As
Save As creates a completely new training that is a copy of your current work. This is useful when you want to create a variation of an existing training without modifying the original.How to Use Save As
Enter a name in the Training Name field
The default value is your current training name with
(Copy) appended. The field has a 100-character limit and a live counter underneath (e.g., 12/100 characters).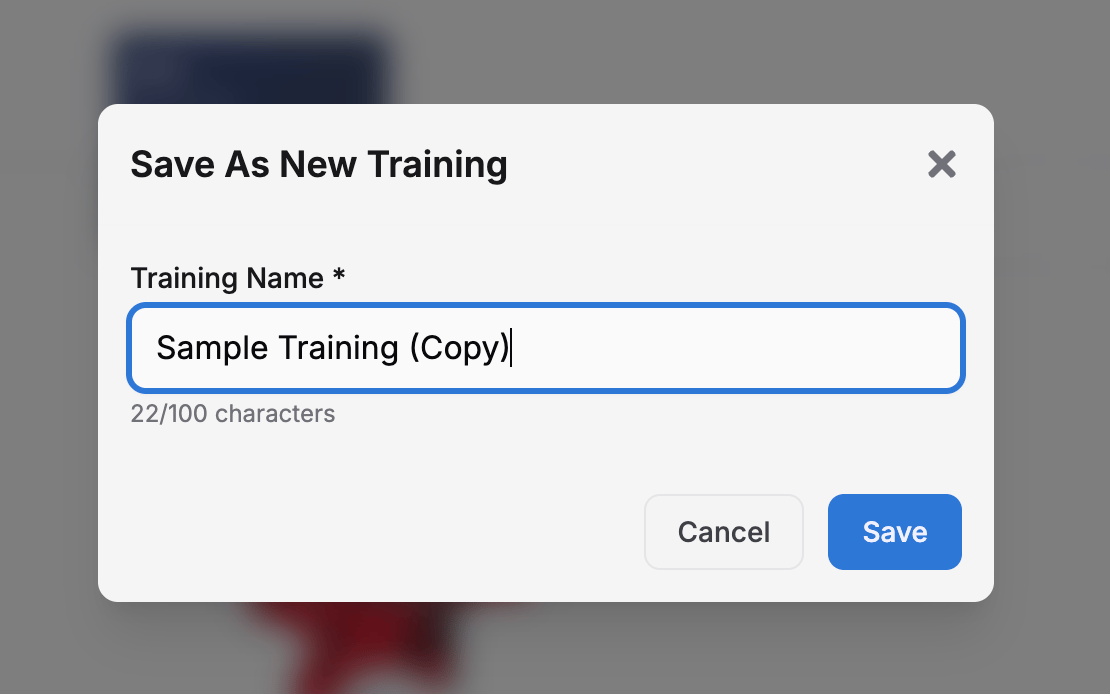
What Happens During Save As
The Save As process shows three status messages in order:- Creating training… — A new training record is created with your chosen name
- Uploading content… — Your current SCJSON (all steps, transitions, actions, variables) is uploaded for the new training
- Saving version… — The new training’s first version is linked to the uploaded content
Save As Validation
The dialog validates your input:- Empty name — Shows the error
Training name is required - Too long — Shows
Training name must be 100 characters or less - Duplicate name — Shows
A training with this name already exists. Please choose a different name.
Save As always creates a fresh training with a single version. It does not carry over the version history of the original training.
Save vs Save As
| Save | Save As | |
|---|---|---|
| What it updates | Current training version | Creates a new training |
| Training name | Unchanged | You choose a new name |
| Where you end up | Same page, same training | New tab with the new training |
| Version history | Continues from current version | Fresh start (version 1) |
| Dialog | None — saves immediately | Save As New Training dialog |
Versions
Each training has a version. When you save, the current version is updated with your latest changes. The version URL includes both the training ID and version ID:Best Practices
Save before making major changes
Save before making major changes
Before restructuring your training flow or deleting states, save your current progress. If something goes wrong, you have a recent save point.
Use Save As for variations
Use Save As for variations
If you need a safety training for both beginners and advanced users, build the base training, then Save As to create the advanced variant.
Watch the footer for save status
Watch the footer for save status
Name copies meaningfully
Name copies meaningfully
When using Save As, choose descriptive names like “Safety Training - Advanced” rather than “Safety Training (Copy)”.
Next Steps
- Sharing a Training — Invite collaborators to your training